Football Manager Playbook
You need some kind of plan of action, in this chapter, we take a look at the very beginning of tactical creation as we look to create a starting point.
Whatever shape you use, it will have strengths and weaknesses. This chapter is a few words about actually understanding the shape and what it means.
After identifying the shape you will use it’s time to start focusing on the playing style you want to create. We delve into all the different playstyles, and the implications and try to understand the attribute side of the game too.
5. Understand the roles, duties and team instructions
This topic covers how to bring all the roles, duties and instructions together to create the style of play we are wanting. Focusing on the different phases of play and talking about the impact all of this has on the tactic.
In this section, we break down mentality and I give an insight into how I select what I’ll use. Less is more.
I explain why I decided to go with central midfielders instead of attacking midfielders. I talk about the pros and cons of both variations and why I selected what I did.
Lots of people struggle with knowing what to look out for when trying to find faults and issues with their systems. In this chapter, I try and break down how I focus on things and simplify the game for myself by developing a system to help with the identifying issues part.
Games strategies! That’s basically what this section is. Whether it’s a tactical change, substitution, role change, settings change etc. We have it all covered in here.
A chapter dedicated to understanding the context of what you actually see happening.
Once you’ve got a tactic and playstyle, what you do next is covered under this section. I take a deep dive and talk you through what I do.
Is the system/players/settings all playing/doing what you expected? Again I break it all down in this section as we put everything we learned in the other 11 chapters into motion.
I talk about how we can use other tools available in the game to help us with really honing down our tactics and playing style.
The finished product can take a while to achieve and is something that can take seasons to perfect. In this section, I talk through all the settings, roles and instructions and give a real breakdown of how it all links together.
Introduction
I started this project about seven years ago, maybe longer. The idea was to take all the Football Manager-related content I had written over the years and turn them into book form. Lots of you who have followed my work for many years have asked about me doing some kind of book(s) for a very long time. Originally and until very recently this was going to be one giant book but after a while, it became very clear that it would be far too big. So I’ve decided to do multiple books about specific aspects of Football Manager. Although these books are still really long! While some of this content might be familiar because ultimately this is a collection of my work, there is also lots of new stuff that you have not read before and has been rewritten from scratch for Football Manager 2022 and beyond. All of these books will be very in-depth and more importantly free of charge. However, if people enjoy the content and want to donate or buy me a coffee as appreciation they are able to via the links below. But it’s not expected and is 100% optional.
Donate with Paypal: paypal.me/Cleon1981

I know a lot of you have been waiting for this content for a long-time and even a few of you thought it was never coming. But when I originally posted about it late last year the idea was a bit different to what we’ve ended up with. As I mentioned above it was just going to be one book but it quickly became apparent that I had far too much content and ideas for just one book. So hopefully this is the first of many that are to come at a later date.
Another issue was when I started giving people the bits I’d written for some early feedback I began to get ideas for things I could explain in a less complicated way or perhaps I had totally forgotten. While it might have been a little inconvenient to wait, I’d rather you did that than have something I have written and wasn’t happy about because it felt like things were missing or I could do things in a different way. But we’ve finally got there in the end, I hope :)
As always, I hope you enjoy the content.
Do you have a tactical idea in mind?
When creating a tactic you need to have an idea of how you want it to play and have an idea of the kind of football you want to see. Without knowing this you’ll feel a bit lost and struggle to have success. Everyone needs a starting point of some kind whether it's an idea, tactical philosophy or a style of play. Having this thought out will make it possible to build around this and give you a starting point. If you have no idea how you want to play then how do you know what you are looking for in a game, how can you tell if the players are behaving like you want or not? It’s kind of impossible to know without you having any idea of the style you’re implementing.
This makes it incredibly difficult to make changes and adjust if issues do arise. It doesn’t matter if your idea is on a grand scale or a small scale. The only thing that matters at this stage of tactical creation is you have something you can keep referencing when it comes to the analysis side of things a little later on in your management journey.
Copying/replicating real life
Trying to replicate real-life football can be hard because the terminology in-game doesn’t usually match that of real life. This confuses a lot of people. I’d suggest to anyone who is trying to create anything based on real life, to ignore the role names in the game and instead focus on the settings the role comes with and base any decision-making on that. At least by doing it this way, you can see if the settings reflect what you see the real-life players doing or attempting to do. Don’t get hung up on labels, instead focus on what a role offers.
Another thing that I find tricky to achieve is creating a specific style based on a real-life team. One of the reasons for this is that teams change settings/shapes constantly. Some are more subtle than others and you might not really notice. This is why I believe if you want to take a real-life concept and replicate it, you either need to focus on the concept in a more generic manner and decide which parts of it you want to play all the time and which ones you can omit because maybe it's not a constant staple of the desired play.
Or if you want to be as specific as possible, then maybe focus on a specific time period of a particular game or certain events, where the desired style is really noticeable and prominent. I believe this is probably the easiest way to replicate styles/formations because you are focusing on very specific incidents or passages of play.
One of the advantages of creating tactics this way is that there is a wealth of information available for a wide host of teams from around the world and how they play. Both in terms of articles and actual video footage too so be sure to use Google and Youtube, they can be an invaluable sources of information.
Other Ideas
There are many ways you could create tactics and it doesn’t just have to be based on the above. Perhaps you’ve taken over a specific club and you want to create something around the players already at the club. For this kind of approach, you’d need to identify suitable formations by assessing the squad and knowing the positions you currently have and if something is suitable or not. For example, if you looked over the squad and identified who the best players are but then decide to play something like a 343 formation, then you’d need to have the numbers to be able to play this way. It’s no good playing that way but only having one striker and 2 defenders at the club unless you can retrain some of the players already there or afford to bring new players in to fill these positions.
Another way might be you just have one idea in your head that you want to try out and use as a base. This is what I’ve actually done for the formation I'll be using for this project which I’ll speak more about a little later on. No matter which way you choose to play though it helps if you do a little bit of research if you can unless you’re a tactical whizz or know-all.
Research and Knowledge - The Example
Along with this we also need to think about some other things and how it plays into our plans. If you’re a novice to the game or perhaps struggle with the tactical side of Football Manager then it’s likely better to stick to formations and shapes you know a little bit about already. Keeping it simple in these situations will be more beneficial for you to begin with. When you start feeling more confident or gain more knowledge, then start thinking about more complex settings, shapes etc. Let me give you a little example of what I’m talking about (this isn’t about the shape I will be using throughout this book this is purely just for example purposes)
I’ll give you a little example here of a 3-5-2.
3-5-2 General Overview
Pros
- One of the main selling points of the 3-5-2 is the use of two strikers.
- Wingbacks provide width.
- Three central midfielders allow you to match most opponents in the centre of midfield.
- Quick transitions going forward
- Commits numbers forward with an aggressive midfielder and both wingbacks venture forward frequently.
- Good support from the central areas and wide areas.
Cons
- The centre-backs can get dragged wide if the wingbacks are out of position or don’t deal with danger.
- Wingbacks can be exposed and doubled up on at times.
- Centre Backs can be wasted against one-man striker formations.
- That’s just a brief snapshot of the 3-5-2 in general. You don’t need to understand the player roles yet or even have any ideas about which ones you will use, that can all come later.
- Spending a few minutes just pondering the above will give you a much better chance of succeeding when creating a tactic. Or if you already do the above but in your own way then you are already halfway there. The above allows you to lay the foundations for what you are doing and more importantly creates some kind of reference point throughout the whole process. If you don’t have a reference point then you’re already on the back foot because you have no idea what you are looking for, how the tactic should behave or what to change should issues arise.
Think About The Shape.
The actual shape of the formation you use will determine how attacking or defensive you will be in various phases of play. It’s also worth noting that the shape you see on the tactical overlay may not be the shape you actually want to see when attacking. That’s fine, the roles and duties themselves will determine all of this but it is important to use a shape that will allow you to do everything you need. You might start off with a 4-5-1 for example and in defensive phases, you might be a 5-5-0. But in attacking phases you might be more of a 2-5-3 or some other variation.
One of the biggest issues I’ve found people tend to do with determining their shape is lets for example say; They want to play attacking football, then a lot of them go top heavy with the formations and focus on roles and duties which are really aggressive and sit high up the pitch. While this can work to some degree, support roles/duties and shapes that aren’t top-heavy can still be very aggressive and lethal. Not only that but it’s easier to sort out the defensive phases of play too because on Football Manager it is much harder to make players high up the pitch defend how you need them to in your own half. Whereas approaching it the other way around, it's slightly easier.
An obstacle people have with top-heavy shapes is they don’t know how to firstly create space and movement and secondly don’t know how to use it when they have created it. Unlike deeper formations, it’s easy to have your front players for example isolated from the rest of the team when using these kinds of shapes, especially on higher mentality structures. When you use attacking duties and high mentalities you push the players even further forward, which isn’t always a good thing. If players are too high how can you create space let alone use it?
Not only that but it also requires the deeper players to supply them the ball constantly because they’ll be too high and attacking to be involved in most build-up plays in certain circumstances. When this happens it puts a lot of pressure on the fullbacks and the central midfielders and requires them to work even harder than normal while still carrying out their own duties. Basically, you split your team into two different bands rather than a well-oiled cohesive unit playing this way. This brings lots of issues, which I’ll be talking about in great depth a little further in the book
Depending on how the opposition plays, top-heavy formations can naturally struggle to find space behind the opposition. Especially if the opposition is sitting deep and defending, then it gets harder to break these teams down. All the space that exists naturally is actually in front of the defensive line not behind. This means the role and duties you use here are vital in creating the space. Somehow you have to balance these roles out to offer the kind of movement you need.
It’s also true that a team can be too deep or too passive as well, so it's all about striking the right balance for what you need. Whatever this balance is will differ from person to person too. Try and think about everything as a whole rather than in isolation.
How do you want to play?
Now we’ve had a little think about all the above, it's time to decide what we are going to do. It is possible to walk into a club and start laying the foundations of how you want to play straight away but it’s highly likely that however you want to play should be the end goal, not the starting point. I’m not saying this is a hard and fast rule but it’s unlikely you can walk into a club and impose the style you are wanting straight away. Usually and more realistically this is something you achieve over time and is linked to player recruitment, finances, player development and evolving your tactics and so on. So my advice here would be to remember that your vision is what you are working towards over the course of the saved game. The speed at which this actually happens depends on how good you are at the game, to begin with. But it should be long-term for most people.
For me, I want to win games, pure and simple. I don’t want to set up not to lose, I want to set up to win games. This means I will have to take risks and not be as conservative in my tactical approach. Setting up not to lose is very different to setting up to win. Think of Jose Mourinho at Manchester United. He set up not to lose a game and didn’t try to win games that often. The same can be said about Nigel Clough when he was the Sheffield United manager. Both managers focus on playing in a negative way, I want to be a positive manager and take risks to achieve my goal. To do this I need to have a few objectives to aim for.
The objectives come down to;
- Playing to win
- Play a good brand of football
- Play a lethal possession game
- Focus on quality chances over quantity
Those are the main factors I want to focus on for this project and should give us a good tactical building block from which we can work.
On top of this, I also have two other things that I want to try and achieve based on player roles available in the game. Those are;
- Make a Mezzala a main goal threat
- Have a Segundo Volante be the driving force of the team from deep
These add a slight complexity to the main objectives I outlined above but, I like a challenge and it makes the content more interesting, especially when we get to the actual analysis side of things.
Making the Segundo Volante central to the tactic should be easy enough and isn’t that hard on its own to achieve. However, the Mezzala one is going to be more tricky because I’m not just talking about him scoring 10-15 goals a season, no. I’m talking about having him challenge the striker or striker's scoring rates and scoring 30-40+ goals a season. Now I could make this easy and have them on set-pieces, penalties and so on but that’s far too easy. So he won’t be doing any of that unless he takes a penalty after scoring a brace for example.
Now we have a rough idea of how I want to play and the things I need to incorporate. It's time to start thinking about the actual shape we want to use and possible playing styles.
The Shape
Due to wanting to use a Segundo Volante, this dictates that I need to use a shape that allows me to either use two defensive midfielders due to the role only being available to outer defensive midfielders. Or I need to use one defensive midfielder and offset the role to either the left or right-hand side of the DMC position. Some possible shapes we could use are;
- 4-2-3-1 Deep
- 4-1-2-2-1 Wide
- 4-3-3 (DM)
- 4-1-4-1
There are quite a few more too but these would likely be the more popular ones chosen by people. If I had decided to use one of these formations myself, what I am trying to create would no doubt work very well but the issue with this would be I feel like those formations have already had lots of discussions already across social media, forums, YouTube and blogs. So I wanted to talk about something that rarely gets talked about to add something different to the community.
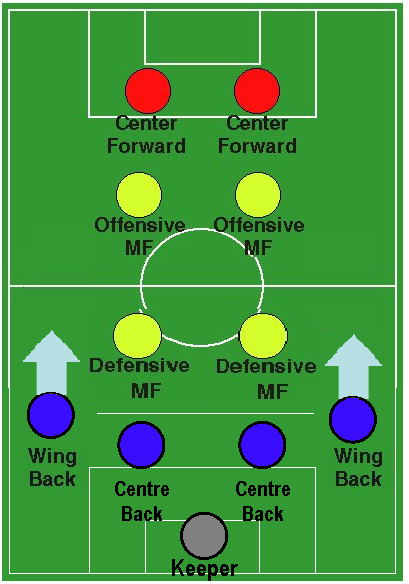
I decided to go with the 4-2-2-2 Brazilian box, also known as the Magic Rectangle or Magic Box. Something you might have noticed straight away is that I opted for two central midfielders over two attacking midfielders. There is a big reason why I did this that we will speak about a little further into the book.
What Does The System Offer
The shape allows a lot of fluidity and the system can become many different shapes during different phases of play depending on the roles you use. While this is also true of any shape you use, the benefit of the 4-2-2-2 is that you have a double pivot in front of the defence which can cover the wide areas and also protect the back four. This also allows the four more advanced players to push on and be more aggressive. While also allowing the full-backs to go beyond the double pivot and offer width.
The double pivots can be set up in a number of different ways too. While their primary goal is to link the play to the midfield and front players one of them could also drop into back two when the full-backs push on. This would then basically give you a back three.
Another benefit of the shape is the central midfielders. Depending on how you set them up with the roles and duties used, they can provide width, overlap/underlap and break lines by passing or becoming runners themselves. The shape overall is really good for launching quick devastating counterattacks.
One of the biggest reasons for playing with a 4-2-2-2 shape though is the central overloads you can create. With your two strikers occupying the opposition central defenders, this allows the two midfielders (whether than be the central midfielders or attacking midfielders version) to push further up to support the strikers and cause overloads, especially with the full-backs pushing into advanced areas and keeping the width too. This often creates an overload that consists of six players which can be hard to defend against for any side no matter how good they may be.
When in defensive phases of play the shape naturally lends itself to forcing the opposition wide when in possession because you crowd out the central areas. The 4-2-2-2 is also a really good shape to start counter-pressing from due to the sheer amount of players in midfield you have in and around the ball.
What Does The System Struggle With
As you can imagine we are naturally vulnerable on the wings especially if the fullbacks get caught high up the pitch. Even without them getting caught out of the position, we can still be vulnerable to the opposition creating their own overloads in the wide areas. The back line as a whole can become somewhat disjointed at times because the central defenders can also be responsible for protecting the wide areas too. So depending on how quickly your players revert back to their natural positions, it can have a massive domino effect elsewhere on the side. This is really evident if the opposition uses quick switches of play to the wings.
Another thing to keep an eye on is if you come across a set-up that utilises five midfielders. This can be somewhat problematic. The reason for this is the opposition will have a spare man meaning they create triangles to bypass your own midfield and pass around them.
It should go without saying but the fullbacks can also be an issue. The shape is very demanding on the fullback role which means if the player has a bad game then the system as a whole could suffer badly because you’ll lack any kind of width. The same can be said if the player gets a little knock or is marked out of the game. So you really need to keep an eye on him at all times throughout the game to know what he is doing. Then you need to be really reactive if he isn’t doing what he is supposed to do.
There is a lot more stuff than the above which we will get into throughout the book in more detail.
Playing Styles
Now we know the shape that I’ll be using, it's time to start thinking about the playstyle we want to create. The preset play styles that you have on the tactics creator are more than good enough to use if you wish to. You can also create your own if you believe none of those gives you what you are wanting. I’ll be creating my own but before that let's take a look at how I’ll decide what and how to create my own playing style.
While defensive or attacking football isn’t necessarily a playstyle on its own and there is a lot more to it than that, I want to simplify things to begin with as it’s still a good starting point for determining which category you want to fall in. Then it gets more complex as you go along when you start to consider if it's possession-based football you want to create, counter-attacking and so on. There are many different layers to creating a playing style but I want to simplify things, to begin with for the teams and player section below.
Teams and Players
The team you are and the game's expectations for those teams can impact how you can play from the off. Some styles of play or formations might require a specific kind of player or players for positions you currently don’t have. So the idea you have might be something you progress towards rather than starting out at. This doesn’t mean you have to abandon your ideas though, it just means you need to be realistic about what you can do straight away.
Any team can play any formation if they have the players to play the positions. But not every team can play an attacking style and be effective. The better the side you are the more creative you’ll be able to be with tactic creating usually because you’ll have more variety or players who are strong for a specific style of play. Plus you’ll likely have better finances with teams of that ilk.
A lot of people think you can’t be creative with weaker sides or with teams who are lower down the league pyramid. This isn’t true at all. You still can be creative with these types of sides but it could be to a much lesser extent normally due to the type of players you can attract as they’ll likely not have the required attributes needed and a lack of finances which means you can’t be as picky when it comes to player recruitment. The important thing to remember is that the player attributes are relevant to the level you are playing at. So it is still possible to find creative (or any kind of player you need for your style) players at any level and so on.
The point I am trying to make is that you don’t have to keep it simple in the lower leagues or with weaker sides. Just like you don’t have to be more creative in your thinking and application when you are on a much stronger side. Keeping it simple or being as detailed as possible in your approach isn’t tied to the level you play or the team you manage. They're separate things entirely. Whatever your idea, philosophy, playstyle and so forth is, it’s what you should be building towards long-term.
When deciding on the team you are going to be, it’s best that you have realistic expectations. For this, I break teams down into four different groups.
Weak Teams
Teams like Watford, Norwich and Burnley are classed as weak teams in season one. So to begin with, the options you have might be limited. You can still play any formation you wish, player and transfer budget allowing. However, the style which you play could initially be hampered. If you want to be attacking then you need to ensure you have a good knowledge of the system you’ll be using and understand its strengths and weaknesses. If not, then you’ll struggle especially against better sides and find yourself too open and exposed.
If the team you’ll be managing falls into the bracket classed as weak sides almost everyone in the league is better. So even before you start you’re already on the back foot. The good thing about being a weak side though is teams will underestimate you and try to impose themselves in the match and force you to adapt to them rather than the other way around.
That could be a good thing at times as this will mean regardless of how you set up the majority of teams you face will set up to be attacking and be slightly more aggressive against you and we know what that means don’t we? SPACE.
When bigger sides attack, they automatically leave you space to use somewhere on the pitch, it’s impossible to be attacking/aggressive and not concede space somewhere on the pitch or risk certain players being exposed at times. So, regardless of your side's limited capabilities, this is something you should be looking out for as you can really cause the opposition some difficulties if you can spot this.
Average Teams
These are sides that are expected to finish somewhere between the bottom three and mid-table. These kinds of teams are sides such as Brighton, Palace and Southampton. If they have a good season they could possibly have an outside chance of pushing for a European place. If they had a bad season they could be down in a relegation fight. The choice of tactics for these sides is vital and it’s important you get the players playing well in most games to avoid a slump down the table. I class these types of teams as bang smack in the middle of the roadsides. The opposition will be a mixed bag and while some sides might be really aggressive against you, other sides might be more cautious. If you play with a side like this then you have to be really aware of how the opposition is playing so you can understand what you need to do yourself to get a result from the game.
Good Sides
Newcastle, Wolves and Leicester are what I class as good sides. These sides have probably got too much talent to be relegated. But probably not enough to break into the top 4 on a consistent basis, to begin with. That’s not to say with a couple of new signings and the right tactic that you can’t push all the way for the title. A lot of sides you face will try being stubborn in their approach against you and could end up having men behind the ball trying to stifle your attacking threat. I believe it's these sides and the top sides that people have the most issues managing and the reason for this is space and movement. When managing sides like these any badly made tactics or tactics that offer no movement tend to get caught out and shown for their weakness much more than when you are a lesser side. The reason for this is it's down to you to create space and movement as teams are more cautious/reserved against you compared to when facing bigger sides who naturally give up more space.
Top Sides
Teams such as Liverpool and Man City can dictate how they play. They can also be creative in their tactics and approaches due to the quality of players they have available. You have much more creative licence when creating tactics for these types of sides due to most of the opposition playing defensive or counter-attacking against you and you normally have a much stronger squad than 75% of the league. Again, when managing a side like this you really need to understand how the roles and duties you’ve chosen all work together and how it all brings you the ‘final product’ you see on the pitch.
It’s really important you decide which category your team falls under. Then you should be able to be more realistic about how the team can actually play. Remember the above is simplifying things slightly and talking in a black and white context but this is just so you can decide what type of team you are. It is possible to be any team and overachieve/underachieve though. But what is important is expectations and often our own expectations don’t match those that the club has. So make sure to align your own expectations with the clubs initially as it’ll be a good base for you to judge how well your season is actually going versus how we think it should be going.
Once you know what kind of team you are managing then it's time to start thinking about the more complex side of creating a playing style, the attributes. This part can be quite daunting due to the sheer amount of attributes and combinations available. It is okay to ignore and use your own if you wish, these are just the things I look for in an ideal player. For most parts I know it's unlikely that a player will have all the desired ones, to begin with, and that’s fine. We just have to prioritise the ones we think are vital and what is needed before all the others. Try and create some kind of system or ranking order, it’ll make things easier long term.
Player Traits
A lot of people don’t realise that player traits can have a massive impact on what you see the player do during a match. These add a different dimension to the player and depending on what type of player trait he has will instruct him to do certain things like dictate tempo, curl ball, shoot with power and so on. So when creating a tactic and choosing a role for a player you really should take these into consideration because they may affect how he plays the role you’ve given him.
Playing Styles - The Attribute Side Of The Game
It’s not only the shape, roles and duties that you choose that determine how you can play either. When creating a tactical style you need to ensure you have players with the correct attributes to play this way. Below is a list of attributes I look for in players if I want to create some of these styles. They're not set in stone but remember these are just my opinions and this is aimed at those who might be struggling with the game or need to strip everything back because they’ve become confused. I’ve also only broken them down to more generalised playing styles for now just to give you a general idea.
Defensive Approach
To play a defensive type of game it is important that your team is able to keep its shape at all times. This will make it hard to break down and mean you are well organised. When playing defensive, if you don’t keep the shape it will mean you have holes in your tactics and the opposition will exploit them. Plus if you don’t keep shape then the whole philosophy is flawed, to begin with. The players must be alert for the full 90 minutes and be on the ball so to speak. Any lapse in concentration can be very costly, especially late in games. It also requires you to get men back behind the ball. Remember also that someone defensive-minded will be less ambitious with their passing.
Technical Attributes
- Tackling – This is important for all players who will be back behind the ball.
- Marking – You’ll want the players to be able to pick up their man and stick with him. One slips up by not marking properly and you could start to see gaps appear in your shape.
- Heading – Because you’re defensive the chances are a lot of balls over the top and crosses from the wings will be a big issue. So you’ll want the defenders to be able to cope with these. Heading across the field, in general, will be a big bonus but it’s vital for the defence to be able to deal with aerial threats.
Mental Attributes
To be able to stay focused and keep the team in shape, players need to be mentally aware of problems and potential problems. So they must have good mental attributes to excel under pressure and reduce the number of mistakes they make. It’s no good someone being brilliant for 85 minutes of a game then having a lapse in the final 5 minutes of the game as that would undo the entire game that unfolded before. Despite how good the team may have been for the rest of the game. You need everyone to be switched on the entire game and to play as a unit.
- Anticipation – Players need to be aware of the danger before it happens
- Composure – The calmer the player is on the ball the less hurried his next action will be. You want people who won’t panic on the ball and give possession away cheaply. Especially when in your own half
- Concentration – It’s no use having players who might switch off at any moment. You need them focused at all times.
- Positioning – You want them positioned well enough to force pressure if it’s needed. This also helps the players keep the shape of the formation.
- Teamwork – As the team will be playing as a defensive unit then it’s important all players are on the same page and working together while carrying out your tactical instructions.
- Workrate – Players need to have a good work ethic as they’ll have lots of running to do. You need players who will work hard for the result.
Physical Attributes
- Acceleration – You need people to be able to be fast over short distances to cover other players. Or for them to pick up any loose balls quickly. It will also help with getting across to mark a player or to close him down.
- Balance - A player who falls over easily and isn’t on his feet is out of the game. The high balance will allow the player to turn his body more quickly.
- Jumping – This will help in defensive situations.
- Strength – Having a high attribute for this will ensure he can hold his own against the opposition should they get close to each other. You don’t want your players to get out muscled and knocked off the ball.
- Stamina – You’ll want players who won’t get tired after 20 minutes of a game. The higher the attribute the more they can cope with high-level physical activities.
Some might argue that other attributes should be on the list and that could possibly be the case. But for me, these are the important ones for playing defensively. A few of you would have probably put decisions on the list and I'd agree but decisions are something you always want to be high regardless of how you set up.
A Normal Approach
A normal approach is neutral and doesn’t concentrate on one aspect more than the other. It will provide the right balance between defence and attack. Meaning the players are less likely to take risks defensively or attacking. So this approach is more neutral compared to the others. That doesn’t mean it's boring, it just means it doesn’t favour anything and treats it all equally.
Technical Attributes
- First Touch – You want the players to be comfortable when receiving the ball. This prevents risks if they can control the ball the first time asking.
- Passing – It’s important that the players don’t take risks and lose the ball needlessly.
- Tackling - The midfielders will need decent tackling so they can win the ball back and start attacks early.
Mental Attributes
- Anticipation – This attribute is important for almost everything. So it’s no surprise I think it's needed here again. Much for the same reasons already mentioned further up the guide.
- Aggression – Having a high attribute for this will make the player more likely to get involved in an incident and get stuck in.
- Composure – The calmer the player is on the ball the less hurried his next action will be. You want people who won’t panic on the ball and give possession away cheaply.
- Teamwork – It probably feels like I am repeating a lot of attributes and that would be the right assessment. But a lot of them do tie into all aspects of the game as hopefully, we are beginning to demonstrate throughout the guide. Teamwork is important in that you want the team as a unit. So anything that requires you to work as a team and not individuals will always require a high teamwork attribute throughout the team.
Physical Attributes
- Stamina – This is the only attribute I’d put for this part for the same reasons as the defensive one.
Playing a normal game means teams won’t excel at one particular area of the game. They should try to be competitive in all areas equally.
Counter Attacking
Counter attacking is a speciality and requires you to exploit space and get the ball forward fast and early. For this type of play, it requires players to be deeper than normal inviting pressure onto them before you hit them on the break fast when you outnumber them and have the player advantage.
Technical Attributes
- Crossing – Whether it is from deep or the by-line, it’s a weapon that you can use to devastating effects. An early cross to an attacker can instantly put the opposition on the back foot.
- Dribbling – To take advantage of any space that appears you’ll want players who are able to bring the ball forward.
- Finishing – To make the most of any move you’ll want to put it into the back of the net.
- Long shots – Players sometimes find themselves with a good opportunity to shoot from distance, especially when counterattacking.
- Technique – Technique is the aesthetic quality of a player’s technical game – how refined they appear to be with the ball. A player with the high technique will be more likely to pull off a tricky pass or a cross-field ball with greater ease than someone less technically able. This in turn affects a number of technical attributes – poorer technique will let a player down.
Mental Attributes
- Aggression – Players should want to be involved in everything. This can also help with winning the ball back early and starting quick counterattacks.
- Bravery – You don’t want players who bottle it when trying to win the ball back early do you?
- Off The Ball - Movement is the key to all attacking formations and play. If an attacking player has a low rating then he’ll be less likely to find a little bit of space and make the right movement to beat his marker before he receives the goal. Sometimes it can be the difference that gives you that extra yard.
- Work rate - Players will need to work hard both in defence and attacking situations. They will be up and down the field all day long, so should be prepared to put in the hard graft.
Physical Attributes
- Pace – I like to play fast-paced attacking football so for me pace is essential. Especially for players who like to drive forward and beat their man. It’s important for me that they can reach the top speed. Plus the players will be back and forth all match long.
- Acceleration – This will provide that little edge in gaining an extra yard on the opposition. This and pace are very important.
- Stamina – As the players will be up and down a lot, they need to be fit.
- Strength – Having a high attribute for this will ensure he can hold his own against the opposition should they get close to each other. You don’t want your players to get out muscled and knocked off the ball. It will also help you win the ball back.
Attacking
Attacking football is all about player movement and how well you distribute the ball and overload the opposition. You look to put pressure on the opposition and commit players forward. Then when the time is right you’ll look to carve open the defence with intelligent play and skill. While at the same time being aware of how open you are to the counterattack. This kind of play can be really risky at times though.
Technical Attributes
- Dribbling – You want players who are comfortable with the ball at their feet and who can commit defenders. This will help create space and openings.
- First Touch – This is a vital ingredient for any player playing attacking football. Players who lack good first touch will miss good opportunities for running at defences or important passes.
- Passing – You want people on the side who can distribute the ball well to take advantage of situations in the game. Poor distribution will lead to missed opportunities.
- Technique - Technique is the aesthetic quality of a player’s technical game – how refined they appear to be with the ball. A player with the high technique will be more likely to pull off a tricky pass or a cross-field ball with greater ease than someone less technically able. This in turn affects a number of technical attributes – poorer technique will let a player down.
Mental Attributes
- Anticipation – You’ll want the players to anticipate the movement of others around them as well as the type of ball they might be about to receive.
- Composure – This will help with how comfy a person is on the ball in hurried situations. So when under pressure from the opposition they will still attempt their ‘original decision’.
- Vision– For cutting open those defences you’ll want people who are creative. Plus it will help in spotting an opening or a different type of pass.
- Flair – This goes hand in hand with creativity so can’t have one without the other.
- Off The Ball – Movement is the key to all attacking formations and play. If an attacking player has a low rating then he’ll be less likely to find a little bit of space and make the right movement to beat his marker before he receives the goal. Sometimes it can be the difference that gives you that extra yard.
- Teamwork – Again this is needed to play as a unit. But if you have a few special talents on your side that might be better playing as individuals then this isn’t as important. But very few teams have that kind of luxury.
Physical Attributes
- Pace – I like to play fast-paced attacking football so for me pace is essential. Especially for players who like to drive forward and beat their man. It’s important for me that they can reach the top speed.
- Acceleration – This will provide that little edge in gaining an extra yard on the opposition. This and pace are very important.
- Agility – Provides the player with the ability to turn fast if needed. Ideally, all attacking players should be agile when playing an attacking game. As they’ll be receiving the ball a lot and sometimes might find themselves with it when they weren't expecting it.
The Passing/Possession Approach
Over the last few years, lots of teams have gone possession crazy since the likes of Barcelona and Spain both set the tactical trends of what we see now over 10 years ago. This type of game often involves a slow meticulous build-up of play where the ball is patiently passed around the pitch, often being played out from the back. The aim is to keep possession at all costs until an opening is created and there is a possibility of a shot at goal. This does require highly technical players who are composed on the ball so they can keep the ball at their feet until an opening occurs. It also requires patience and needs to have runners so you can do something useful with the ball. Having possession is easy but can you create something that retains possession and uses it in dangerous positions? This part is hard and might require a lot of time watching games and seeing how the players and roles interact with each other.
Technical Attributes
- First Touch – You need people who can control the ball and won’t risk giving it away by having a heavy first touch.
- Passing – You want people on the side who can distribute the ball well to take advantage of situations in the game. Poor distribution will lead to missed opportunities.
- Technique - As you are creating a passing game you need to ensure you have players who are comfy with the ball at their feet and can actually do stuff with it.
Mental Attributes
- Anticipation - You’ll want the players to anticipate the movement of others around them as well as the type of ball they might be about to receive.
- Composure - Quite a vital attribute for me as someone with low composure will have their decision-making rushed and could become flustered if they are being pressed/closed down heavily or have little time on the ball. You don’t want players who are likely to panic to have lots of possession as they will likely always be forced into making a quick decision that they aren’t capable of doing correctly.
- Concentration - Players need to be switched on for the full 90 minutes, any lapse of concentration could see them making more mistakes and these can be costly especially if you intend to retain possession.
- Vision – Again this is important as you need a player to be able to see his options around him. Someone with low vision is unlikely to see all the available options and could miss seeing the obvious choices.
- Off The Ball - You need players who are able to move around and find a bit of space so they aren’t static. This will help keep possession if players move around losing their marker etc as it means the player on the ball will have free options around him to pick out a pass.
- Teamwork - Again this is needed to play as a unit. But if you have a few special talents in your side that might be better playing as individuals then this isn’t as important. But very few teams have that kind of luxury.
Physical Attributes
- Agility - Provides the player with the ability to turn fast if needed. Ideally, all attacking players should be agile when playing an attacking game. As they’ll be receiving the ball a lot and sometimes might find themselves with it when they weren't expecting it.
- Balance - You don’t want players who can’t stay on their feet to see much of the ball as they’ll give possession away far too cheaply. You have to be confident that players who see lots of the ball don’t fall over or go to the ground easily.
- Strength - Not everyone needs this but it can be a good idea to have a few physically strong players on the side, especially in those positions where you might need the player to be creative and get stuck into certain battles. The higher the attribute the better as it means they should be able to shrug certain challenges off and not lose the ball so easily.
The Direct Style
A lot of FM users tend to think direct play equals long ball but that’s not true at all. Direct play is different because it means getting the ball from A to B as quickly as possible with the aim of finding a teammate who can then try to finish quickly or maintain possession (whereas a long ball is more about hitting it in the hope one of your players can hold it up). Passes seen in direct play can be all different kinds of passes, they can be on-the-ground passes, high passes and so on. The aim is to exploit a sudden weakness in the opposition's formation such as a player being in the wrong place or being out of position. Or it could be you’ve created a great bit of play and some space has opened up so you look to get the ball to the player who is taking advantage of this as quickly as possible.
Technical Attributes
- Crossing - You want players who are able to cross the ball quickly whether it be from the byline or from deep. It can help you get from route A to B a lot quicker.
- First Touch - Players should be able to control the ball for the first time. This will enable you to quickly try and do the next required action as the ball would be under control. A low first touch attribute could mean the touch taken is too heavy and the player could lose a few vital seconds in trying to recover or even lose the ball.
- Passing - You want people on the side who can distribute the ball well to take advantage of situations in the game. Poor distribution will lead to missed opportunities.
- Technique - Technique is the aesthetic quality of a player’s technical game – how refined they appear to be with the ball. A player with the high technique will be more likely to pull off a tricky pass or a cross-field ball with greater ease than someone less technically able. This in turn affects a number of technical attributes – poorer technique will let a player down.
Mental Attributes
- Anticipation - You’ll want the players to anticipate the movement of others around them so they can pick out the runs or see where the player will end up being able to get the ball to them without wasting time.
- Vision - If you are being more direct and looking to make things happen quickly, then vision is vital as you need players with the ability to see all of their available options.
- Flair - This will allow certain players to attempt the more difficult types of balls or the more spectacular ones.
- Workrate - Players will be expected to run, make movement off the ball, work the channels and in general be a workhorse. Having a high work rate will mean the team has the work ethic and seeing as you are attempting to move the ball from A to B in the quickest possible safest way then you need players who can work hard.
Physical Attributes
- Pace - This will help for those players who have to chase the ball or are expected to run onto certain balls.
- Acceleration - This will provide that little edge in gaining an extra yard on the opposition. This and pace are very important.
- Agility - Provides the player with the ability to turn fast if needed. Ideally, all attacking players should be agile when playing an attacking game. As they’ll be receiving the ball a lot and sometimes might find themselves with it when they weren't expecting it.
Parking The Bus
This is where a team invites the opposition to come at them and aims to soak up the pressure. When the ball is lost, the team retreats back to its own half of the pitch and only attempts to win the ball when the opposition moves over the halfway line. Two distinct lines or units of players close to their own penalty area mark the opposition. This approach differs from the defensive one as the aim of parking the bus is to make it as hard as possible for the opposition to break you down. The emphasis is on not conceding above all else and this can come at the cost of any attacking play. It can also be a very risky and dangerous strategy to use if the players aren’t capable.
Technical Attributes
- Dribbling - For the odd occasion where you might find yourself out of your own half then having someone who can run with the ball at their feet can be a good way of relieving pressure.
- Marking - Players need to be able to stick to their man and be capable of dealing with him and sticking with him.
- Tackling - You’d expect players to be doing a lot of tackles during the match and if you want to have more chance of winning those tackles cleanly without giving away dangerous free kicks or picking cards up then you’d want as high as possible for this attribute.
Mental Attributes
- Anticipation - Players have to know their surroundings and need to second guess what the opposition players are going to do next before it even happens.
- Composure - This will help with how comfy a person is on the ball in hurried situations. So when under pressure from the opposition they will still attempt their ‘original decision’. This is important for this strategy as it will revolve around absorbing an intense amount of pressure.
- Concentration - Every single player needs to be switched on as you’ll be deep in your own half, normally camped on the edge of your own area. So any individual errors can be costly as the likelihood is there'll be no second chance to attempt a recovery.
- Positioning – If this is low then players will be incorrectly positioned between the ball and the man they are marking. This could lead to things like players being on the wrong side of the player they are marking or it could mean they aren’t in the correct position, to begin with. This can actually cause the team to lose its shape or for a hole to appear, even if it's just the one player who is positioned wrong. Everything has a domino effect and if he’s out of position and can’t recover then that means someone else will have to but then who is going to cover for him?!
- Teamwork - Again this is needed to play as a unit. But if you have a few special talents on your side that might be better playing as individuals then this isn’t as important. But very few teams have that kind of luxury.
- Workrate - hard-working players are an essential part of this strategy, you can’t afford luxury players who aren’t willing to put a shift in as this could cause huge amounts of issues.
Physical Attributes
- Pace - On the rare occasions you venture forward you might find that if players are slow then they struggle to regain shape and fall back into position when possession is lost.
- Acceleration - This will provide that little edge in gaining an extra yard on the opposition. This and pace are very important.
- Strength - You need to be confident enough that someone isn’t going to get charged off the ball easily especially if it's happening close to your own goal.
Aggressive Pressing
Teams try to win the ball back as quickly as possible wherever it is on the pitch and as close as possible to the opposition goal. It does require the whole team to push up at the same time as the pressure is placed on the opposition player. So playing as a unit is essential so roles and duties should compliment this style of play if not it can cause you massive issues. Teams who play this way also tend to use the offside trap due to how high up the pitch they tend to be playing. This strategy and style of play are mentally and physically demanding.
Technical Attributes
- Marking - Players need to be able to stick to their man and be capable of dealing with him and sticking with him.
- Tackling - You’d expect players to be doing a lot of tackles during the match and if you want to have more chance of winning those tackles cleanly without giving away dangerous free kicks or picking cards up then you’d want as high as possible for this attribute.
Mental Attributes
You basically want as many mental attributes as possible here.
- Anticipation - Players have to know their surroundings and need to second guess what the opposition players are going to do next before it even happens.
- Composure - This will help with how comfy a person is on the ball in hurried situations. So when under pressure from the opposition they will still attempt their ‘original decision’. This is important for this strategy as it will revolve around absorbing an intense amount of pressure.
- Concentration - Every single player needs to be switched on as you'll be high up the pitch, so any mistakes or lack of focus and you might find the opposition get in behind quickly.
- Decisions - It’s really important that the player can pick the correct decision. You don’t want him to suddenly decide to leave his position and go chasing someone who isn’t a threat do you? The decision attribute affects everything the player does so it's vital he can always choose the correct decision more often than not. So you should aim for as high as possible.
- Bravery - You don’t want players who shy away from challenges, tackles or who only enter those situations half-arsed. You want committed players who aren’t afraid to get stuck in.
- Aggression - A little bit of aggression is useful as the player will look to involve himself more which is ideal for a high-pressing game where you want to impose yourself on the opposition and give them little room to breathe.
- Teamwork - You want to press as a unit plain and simple!.
- Workrate - Hard-working players are an essential part of this strategy, you can’t afford luxury players who aren’t willing to put a shift in as this could cause huge amounts of issues.
Physical Attributes
- Acceleration - This will provide that little edge in gaining an extra yard on the opposition. This and pace are very important. I’ve not listed the pace this go, though, as in situations like this players should be pretty close to the ones they are closing down anyway so this is where acceleration is more useful because it's the initial burst of speed a player has.
- Stamina - One word, Vital! This strategy is very energetic and players are expected to consume lots of energy. So if their stamina is low then they are very unlikely to finish the full game.
- Natural Fitness - If you’re using this as a full-time strategy then having players who have a high attribute for this will allow them to play more games in a shorter period of time as it's basically a player's recovery rate.
Understand the roles, duties and team instructions
Now that we know a little bit more about playing styles, it's time to take this information and build our own. Now is the time we begin to think about player roles, duties and team instructions and really begin to shape our tactics.
Piecing It All Together
A little bit earlier in the book, I listed six things that I wanted to include in the tactic.
Those objectives were;
- Playing to win
- Play a good brand of football
- Play a lethal possession game
- Focus on quality chances over quantity
- Make a Mezzala a main goal threat
- Have a Segundo Volante be the driving force of the team from deep
Before we start to add the actual team instructions I think it’s better to think about the roles and duties we want to use. Then use the team and player instructions to refine those behaviours if we feel it's needed. For me, this is probably the most important part of the entire process and not something that can be rushed. It’s like building a puzzle and all the roles and duties we use all have to fit together to create our playing style and bring us the results we need.
We already know that I want to incorporate a Mezzala and Segundo Volante into the system which leaves us with eight more outfield roles to sort out.
Defence
The goalkeeper's job is simple, I just need him to roll the ball out to the defenders and come off his line and act as the last defender when out of possession. Automatically this means we want him to be a sweeper keeper and possibly an attack duty.
As for the central defenders, I don't need anything fancy here either, I don't think. The main task I want them to do is distribute the ball to the defensive midfielders. This will allow for us to play out from the back and give the fullbacks time to go forward. A player doesn’t need a fancy role to pass the ball, they’ll do that regardless of the role. So for this role, I’m thinking of just a standard defender role to keep it simple.
I expect the fullbacks to provide width down the flanks as well as be supporting options for the defenders to distribute the ball to them. They should also offer support to the midfielders and more importantly, provide a supply of the ball to the two strikers. As I use a 4-2-2-2 it means any natural width comes from these players, if they fail to do this then it can become very narrow and crowded in the centre. So the responsibilities look a bit like this;
- Provide width.
- Offer support to the defence.
- Supply the ball to the strikers.
- Link with the midfield either distributing the ball to them or providing support.
Again for the fullbacks, I don’t need anything fancy, which is why I’ve gone for just two attacking fullbacks, to begin with, to see how they behave before deciding if this is the correct decision or not.
The way the defence should work with all these roles is that the goalkeeper rolls the ball out to the central defenders who then pass to the double pivots. In theory, this should then allow the fullbacks to venture forward and offer the support and width the team needs. It doesn’t need to be any more complicated than that.
Midfield
This is where things get interesting and can become a little bit tricky. We already know one of the defensive midfielders has to be a Segundo Volante so that’s fine. But for the other role alongside him we have three options;
- Normal defensive midfielder
- Anchor-man
- Half-back
Each one of these roles offers something slightly different so we need to consider which one offers the better balance. An anchor-man will basically sit deep and protect the back four. A normal defensive midfielder will do a bit of everything. While a half-back will drop back into back two and make it a three at times. Out of all of these, I’m leaning towards the half-back initially as this offers a bit of protection out wide should my central defenders have to deal with any issues towards the flank. In the middle of the park, I’m confident we have the numbers to deal with most threats so this makes more sense, to start with.
A little earlier in the book I mentioned, that I was choosing two central midfielders over two attacking midfielders. I’ll give you a full explanation of why I went this route and the benefits of doing so a little later on. But for now, I’ve gone for a Mezzala role and an advanced playmaker. This should give me some much-needed creativity in the final third and both players will provide support to the strikers. Both these factors will be vital in the success of the formation because, without them, both strikers could end up very isolated.
Strikers
The strikers will stay high up the pitch but also they need the ability to fashion their own chances and create for themselves. This will lessen their dependence on the midfielders should they not be able to support the strikers for some reason. I will be using two basic roles here, one who drops deep to help link with the midfield and is able to help create chances and the other striker will stay high up the pitch. This is why I’ll be using a deep-lying forward on a support duty and an advanced forward. In theory, this should give the front line much-needed balance and synergy.
Understanding Player And Team Instructions
We also need to take into account the player and team instructions I will use too. I always start with the team instructions first and use player instructions to refine roles or to add something the role is perhaps lacking. But we don’t know this part until we actually play a game and analyse it. That's why it's much simpler to start with the team instructions.
When creating a new tactic I always select the Clean Slate option as this comes with no instructions attached to it. The presets are a good starting point though if you want to use those and should be more than adequate for your needs. However, often they come with instructions attached to them that go against what you are trying to do or have no benefit for you. That’s why I go this route. I also start with the defensive team instructions first and sort out the way I want to play without the ball before anything else.
Out of Possession Team Instructions
The idea here is to create a style of play that tries to hassle the opposition as much as possible and not allow them time to settle on the ball. This is actually a very risky strategy because Santos isn’t a big club on Football Manager 2022 and there are plenty of teams better than them. While they might have players who have the potential to be very good in the future, the starting squad is somewhat lacking. There are around 8 teams or more all currently better than them. So trying to impose this style of play upon them, will bring up some issues. But that’s a good thing as it shows what we are building towards for our end goal. It also comes down to risk vs reward and how far you’re willing to go.
Much Higher Defensive Line
ProsPushes the defence higher up the pitch, making them closer than usual to the midfield.
ConsSusceptible to balls over the top and through the middle.
Strikers playing on the shoulder of the defenders can leave us vulnerable.
The pace of the opposition players, if they're faster than my own, can also leave me vulnerable.
Much Higher Line of Engagement
ProsMake the strikers press from the front and as early as possible.
ConsIt could mean that if the strikers don’t force an error from the keeper or defenders, they could be too advanced to help out defensively further down the pitch.
These two settings prevent shorter goalkeeping distribution and trigger press much more often, allowing me to play in a high block. With the aim of winning the ball back quickly or forcing the opposition to clear hastily in the hope, that my players recover the ball. This will also leave me vulnerable or susceptible to long balls over the top and is one of the reasons I selected a sweeper keeper on an attack duty when setting up the player roles, to lessen the impact. It’s also the reason I think it would be wise to also add the offside trap to offer another safety measure.
I did consider defending in a mid-block which would have seen me lower the defensive line somewhat and the line of engagement. But I think being aggressive can be rewarding and I’ve written about less aggressive systems many times before.
As for defensive width, this is really interesting because I’ve not seen it discussed elsewhere really but I’ll be asking the team to force the opposition to the outside. On the face of it this might seem a weird choice considering we are vulnerable down the flanks but it isn’t really. I’m happy to give up play on the flanks because for the opposition to score, they still have to get the ball central and I have lots of cover here. Yes, I know that showing the opposition to the outside might not necessarily mean they end up on the flanks but it is pushing them in that direction. If you force a player onto his outside then he’s going away from goal, which is a good thing.
In Transition
Due to wanting to play out from the back so the defenders can play the ball to the defensive midfielders and we can progress the ball from these areas it makes sense to distribute the ball to the central defenders and ask the goalkeeper to roll the ball out. I’ll also ask him to slow the playdown, as I feel I’m already being aggressive enough in the approach I’ve taken throughout but I also want it to mean something and not be wasted. By allowing the goalkeeper to slow play down I’m attempting to take control of the game and not rush things unnecessarily.
Counter Press
ProsHarass the opposition, unsettling them.
Press much sooner, giving the opposition less time on the ball.
More chance of forcing the opposition to make errors in their own half.
ConsPlayers can be too aggressive and leave space.
We can lose our shape.
Players are caught out of position.
With the counter-press, it's all about wanting the players to press as soon as possible. This is why I also went with a high defensive line and high line of engagement as it should make us like little Yorkshire terriers snapping at the heels of the opposition looking to force errors. However when we win the ball back I don’t want us to immediately counterattack either, so I’ll ask the team to hold the shape rather than counter. Much like the goalkeeper situation, I want to try and take a hold of the game and be calculated in what we do when we have possession of the ball. I feel if we countered too much it would be wasteful, so I want to have confidence in the roles and duties I gave to the players and allow them to dictate how we play rather than trying to force the issue by countering.
In Possession
You should be able to start seeing the philosophy I’m trying to create come to life now and have a good idea of what to expect from the team and how the players should behave when we don’t have possession of the ball and from transitions. Now it’s time to think about what we actually want to do with the ball when we do have possession. This is where we really begin to shape our team's true identity.
The instructions I want to use here are self-explanatory really and don’t need bullet points. Earlier in the book, I mentioned I wanted to create meaningful possession. Possession football seems to be a desired playstyle amongst the Football Manager faithful, yet it seems to cause a lot of confusion, especially with higher mentality structures. While possession tactics on Football Manager are simple to create, they’re not if you use a higher mentality due to higher the mentality, higher the risk and faster the play will be, generally speaking.
When thinking about possession on Football Manager you immediately think lower mentalities are better suited because they are more cautious. While this is true to some extent, it’s not the only way of having lots of possession. You can create possession tactics in multiple ways and each one will have a different challenge attached to it, especially with the way you attack and use the possession. It’s also worth noting that some formations are also naturally better suited to keeping possession automatically too like the 4-1-2-2-1. Some formations require more work and attention paying to them, for it to work.
Generally speaking, any formation that packs the midfield in the central areas is easier to get high possession numbers with initially on Football Manager. That’s why the 4-1-2-2-1 (Wide 433) is a popular choice. The 4-2-2-2 formation should be in the same mould too but also harder to make the possession meaningful because we are very narrow and centralised due to the system's shape.
So to help me create the style of play I want when in possession, I am going to use the following instructions;
- Fairly narrow attacking width
- Play out of defence
- Work ball into the box
All of these allow us to play out from the back with the ball and not rush anything. It could be overkill and focus on ball retention too much but I think these instructions coupled with the player roles and duties, we should be fine. As roles like the Segundo Volante and Mezzala will focus on movement naturally and then the advanced playmaker will utilise the ball and hopefully give me enough ball progression in the middle of the pitch.
The overall tactic with the roles, duties and instructions now looks like this;
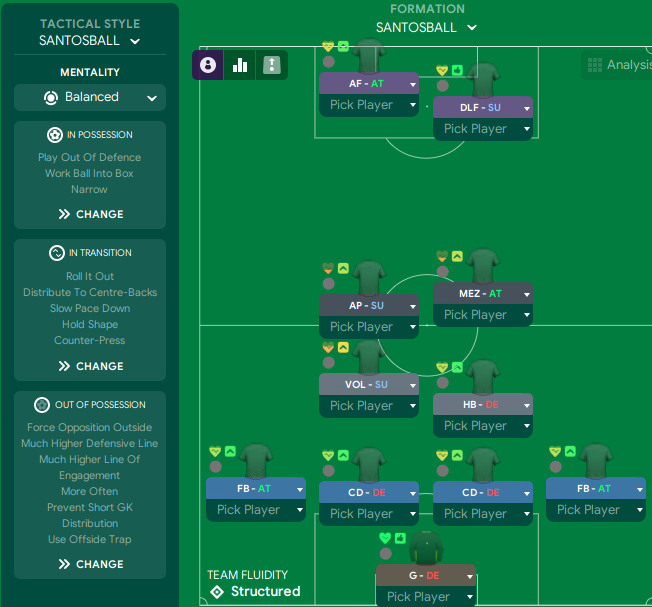
Can you see how all of the above changes player behaviour, the team's general behaviour and changes the base tactic you started off with? It’s why when you see someone who is using lots of team instructions, you know they have no idea how it changes the behaviour of the players as it’s almost impossible to keep track of everything that changes. Most tactics that use lots of team instructions are just blagging it and hope they stumble across something that works. It’s why I advise those who are struggling to keep it simple and only use team and player instructions to create or refine a playing style or to get a player to behave differently. Every single team or player instruction you add complicates things and adds complexity. They all drastically change the player roles you use. The more you use, the more knowledge of the match engine you need in order to understand how they all work in conjunction with each other and to understand what you’ve really changed.
I’ve tried to take into account the player roles when deciding what team instructions to use and envision how they should work. I should point out here that it could fall flat when we start to actually play games but I’m fairly confident it should work somewhat and perhaps just needs little adjustments here and there. The reason I’m confident is that everything I’ve used has a reason behind it and I’m not using something just for the sake of it. It’s also based on logic and common sense, so I’m hoping it gives us a good head start when we get to the analysis sections.
Mentality
One thing you will have noticed that I’ve not spoken about yet is the team mentality. The reason for not mentioning this topic yet is because, for me, it’s the least important part of the whole tactical creation. I know other people value this aspect as being really important and that’s fair enough but for me, I want to keep it simple.
In simple terms, the mentality is the base attacking intent of the team. This may be described as a measure of risk-taking. More positive mentalities instruct the team to take more risks, and more defensive ones instruct the team to take fewer risks. Essentially it's a risk modifier that affects a number of other teams and player instructions like width, passing directness, tempo, line of engagement and defensive line. The higher your mentality the more risk your players are willing to take in these specific areas of the game.
The team mentality also impacts individual player mentality, you can see the change this has on the player and his role by going to the player on the tactic screen, clicking the position, and then clicking his player instructions. You’ll notice when you change team mentality his own mentality is adjusted to reflect the change.
Like I said above, rather than overcomplicating things and making out mentality more complex than it actually is, I always play with a balanced mentality. This doesn’t mean I don’t take lots of risks or play conservative, I can still be as attacking if not more than someone plays on an attacking mentality. Sounds strange, doesn’t it? But not really if you think about it. It all comes down to efficiency and how you use the ball and make the most of it. Being more aggressive doesn’t equal more attacking.
I’ll show some analysis of how mentality changes impact the 4-2-2-2 box formation when we get into the actual analysis parts. But for now, some time ago I wrote this about the 4-2-3-1 and it should give you a good grasp of why I play with a balanced mentality with actual examples. I have debated adding this or not but I think it is useful and relevant to tactical building and because I’m trying to show step by step what I do, I think it fits.
For the purpose of this analysis, I compare a balanced mentality against an attacking mentality only.
Now, these average position images might confuse people at first and you’ll think I’ve got them the wrong way around.

That is the attacking average position map which looks deeper than you might imagine. There is a reason for this and we will come around to that a bit later in the analysis.
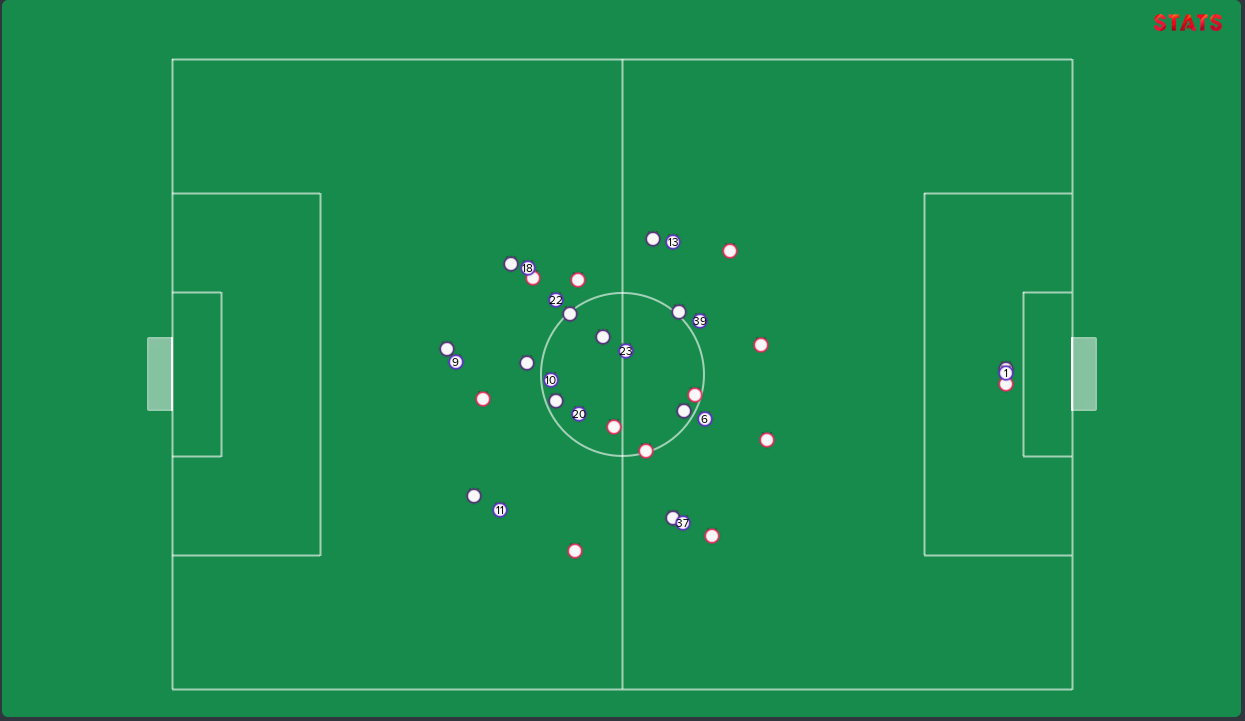
Believe it or not, these are actually the average positions for the players in the standard mentality structure that I am using. Yet it’s more attacking face value and players are positioned a lot different compared to the first screenshot I posted. A lot of the players are more attacking. The average positions are interesting in both screenshots.
You’d have expected the attacking mentality to be a lot more aggressive with the average positions for when they had the ball (the purple icon with the number in it). Yet it’s actually the standard mentality screenshot which looks more aggressive. In the first image, you can see even the defence is deeper when out of possession too.
There are a number of reasons why it could be like this;
The attacking mentality is making defenders hit the ball earlier than normal as they look to hit the front players a lot more quickly decision-wise than you’d see in the standard mentality. This is entirely plausible. In the standard mentality system players likely have more time and spend longer on the ball, meaning they move upfield much more because they aren’t looking to rush play.
In the standard system, players seem to be more spread out, especially in the central areas. One of the reasons behind this is likely the initial space a player has. In the standard one, the space is likely in front of the players, meaning they have time to work the ball and play with it at their feet. In the more attacking system, that space likely doesn’t exist due to its aggressive nature. The higher mentality should on paper push them further forward but as you can see in the images, this isn’t happening. This suggests the space isn’t there and the players are having to drop deeper to find space or by them being closer to the opposition players, it’s involuntary pushing them deeper and negating the actual attacking mentality.
Those are some of the reasons why this might happen and are the likely causes. But now let’s add some more context and briefly show the match stats to see if there is much difference between the two.
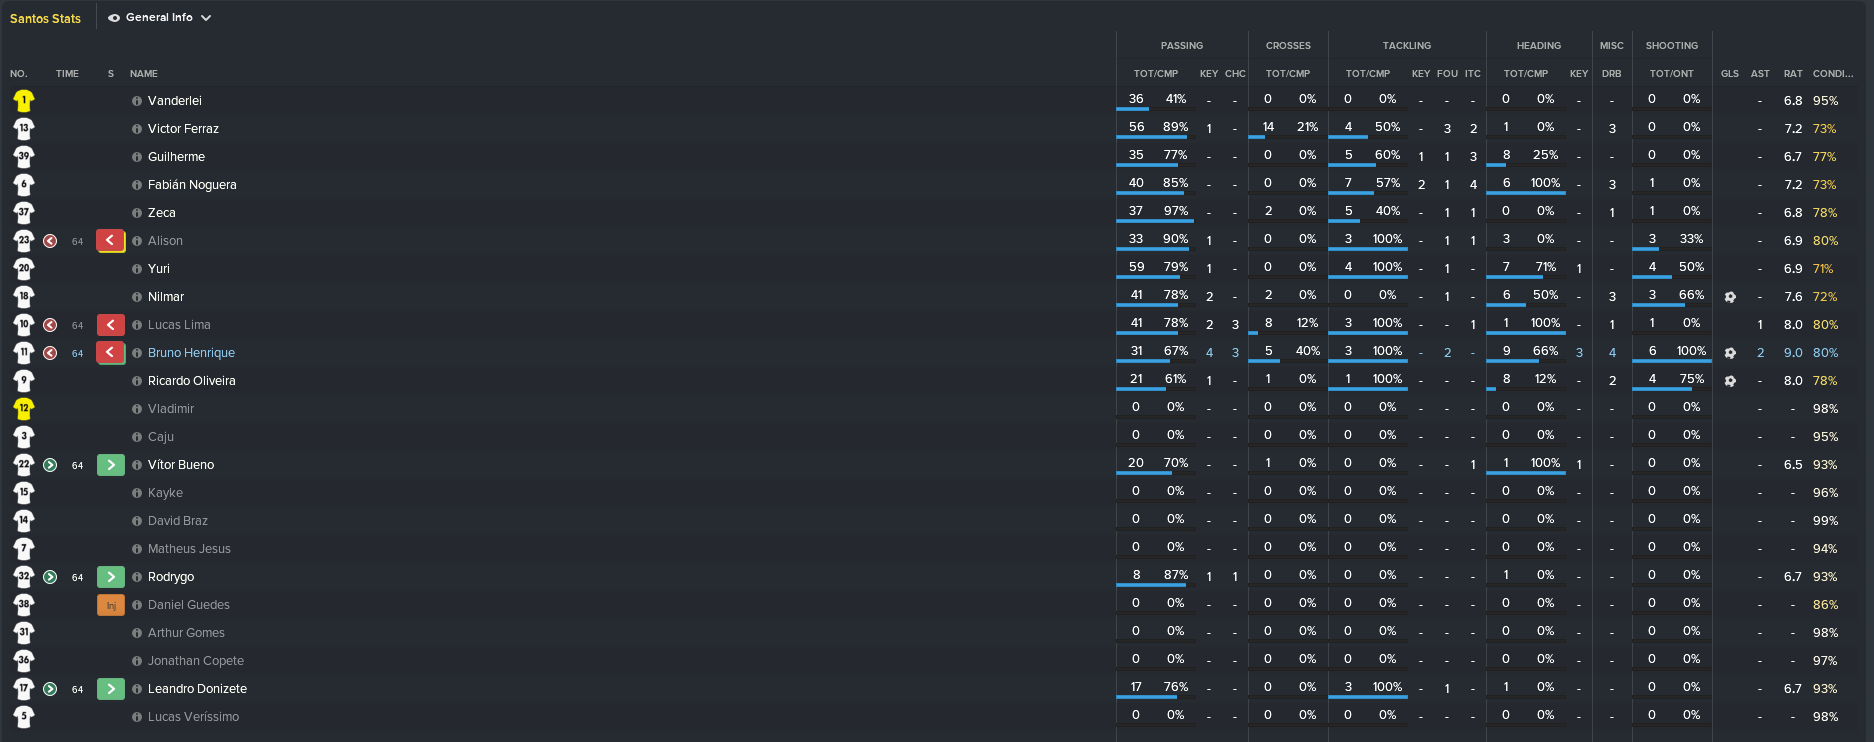
Attacking Mentality Stats
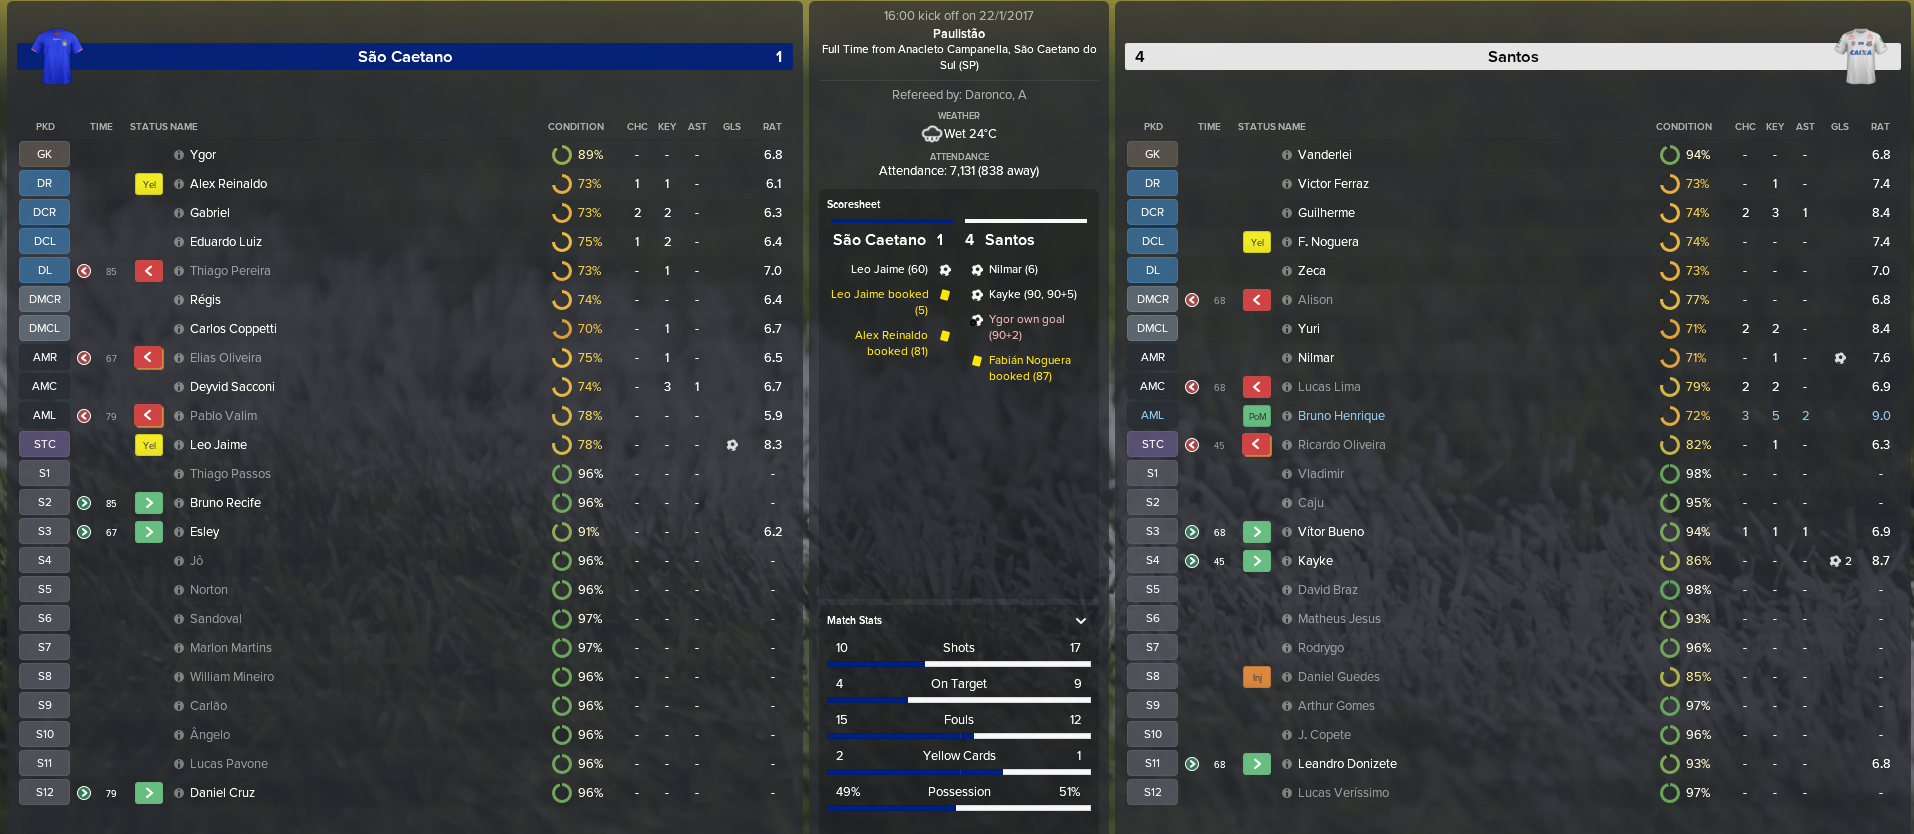
You can see I won the game 1-4 and despite the scoreline, I was incredibly lucky in terms of the score. An own goal and two goals on and after 90 minutes really flattered us. We played well on face value with the score but that doesn’t tell the true story.
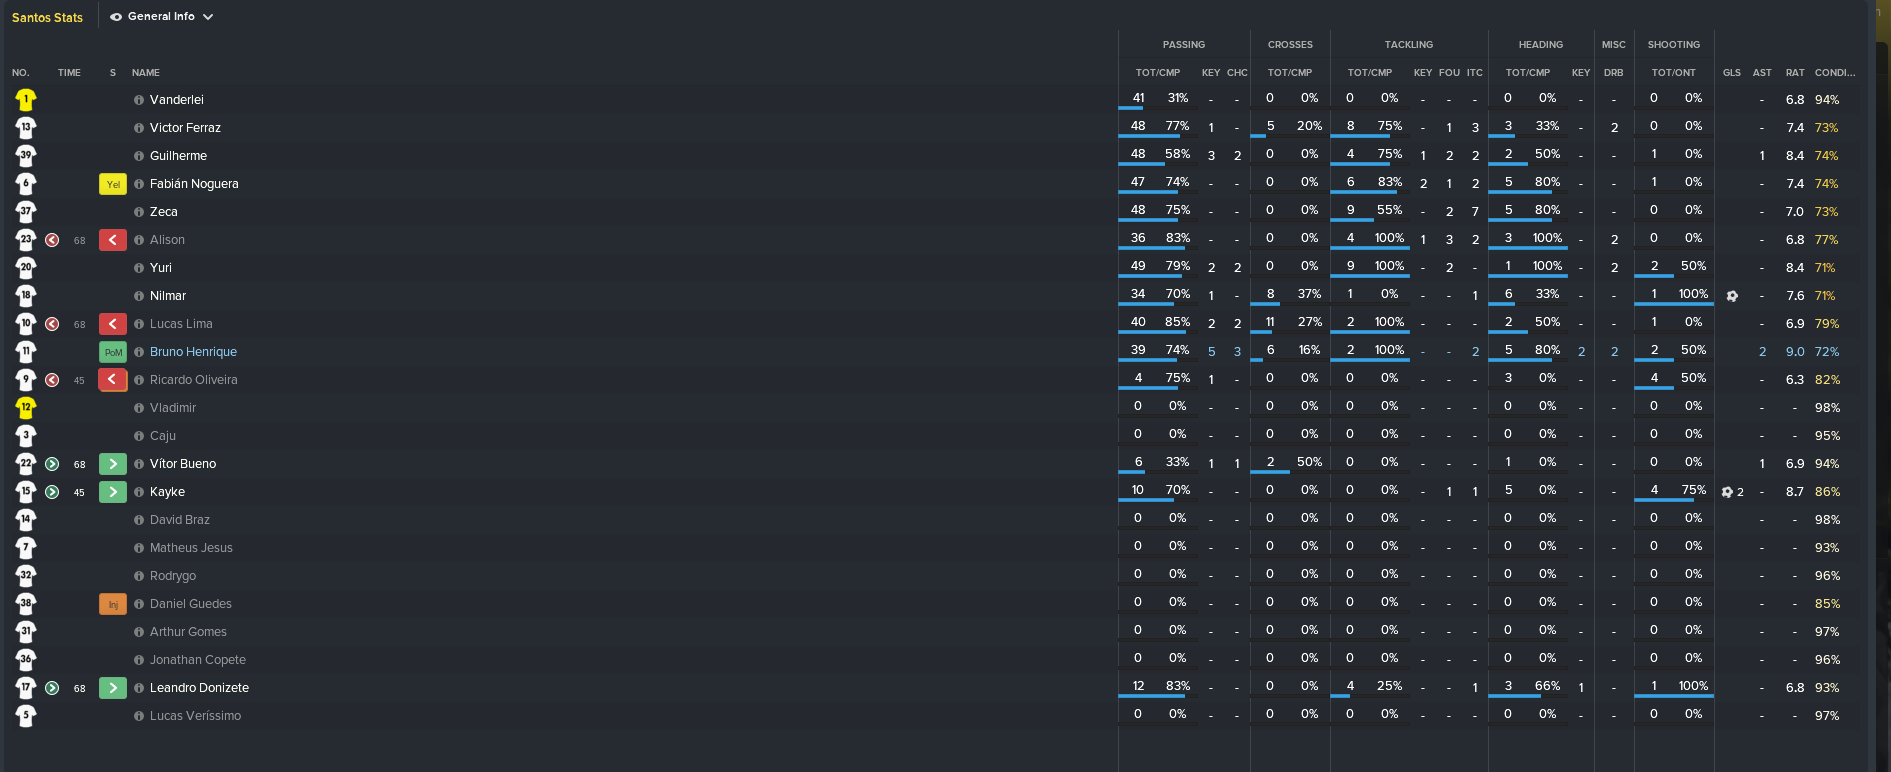
The individual stats show us a little bit more of how the players play. Interestingly I notice the keeper's pass completion and have just realised that I’ve not actually set it up so he distributes it to the defenders. I’ll have to look into this more and see if his long distribution is worth the sacrifice for passes completed if it puts us on the front foot quickly.
The player's condition is also in the low 70s for most people. I’ll need to compare this with the standard mentality one and see if there is a drastic difference.
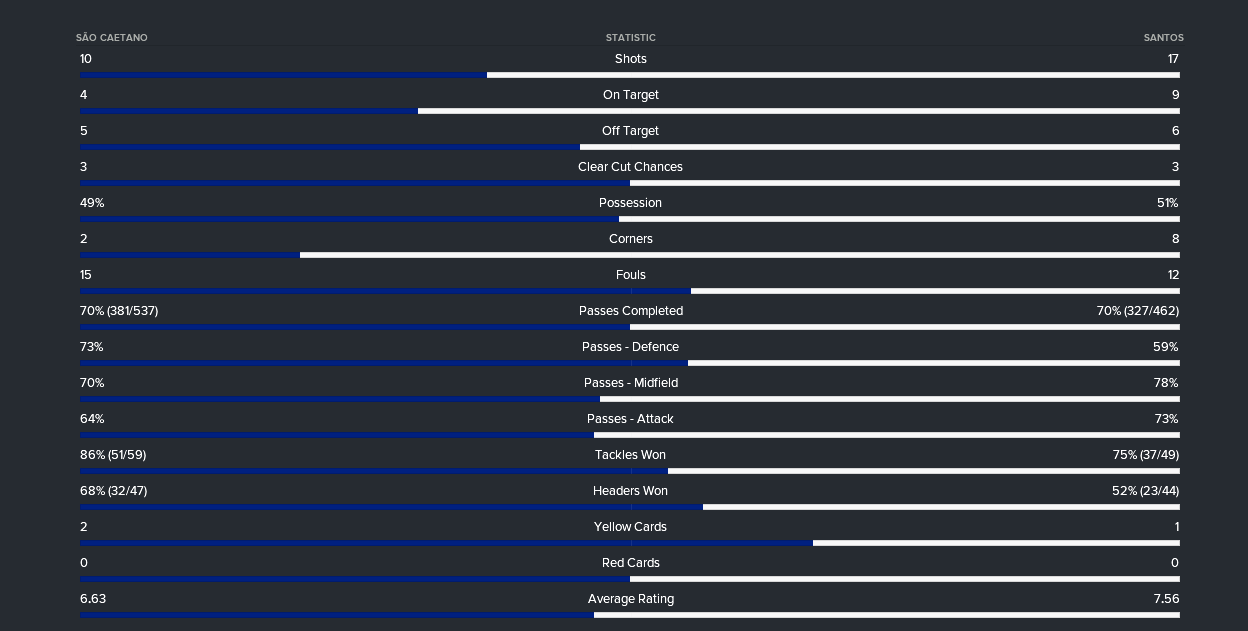
Standard Mentality Stats
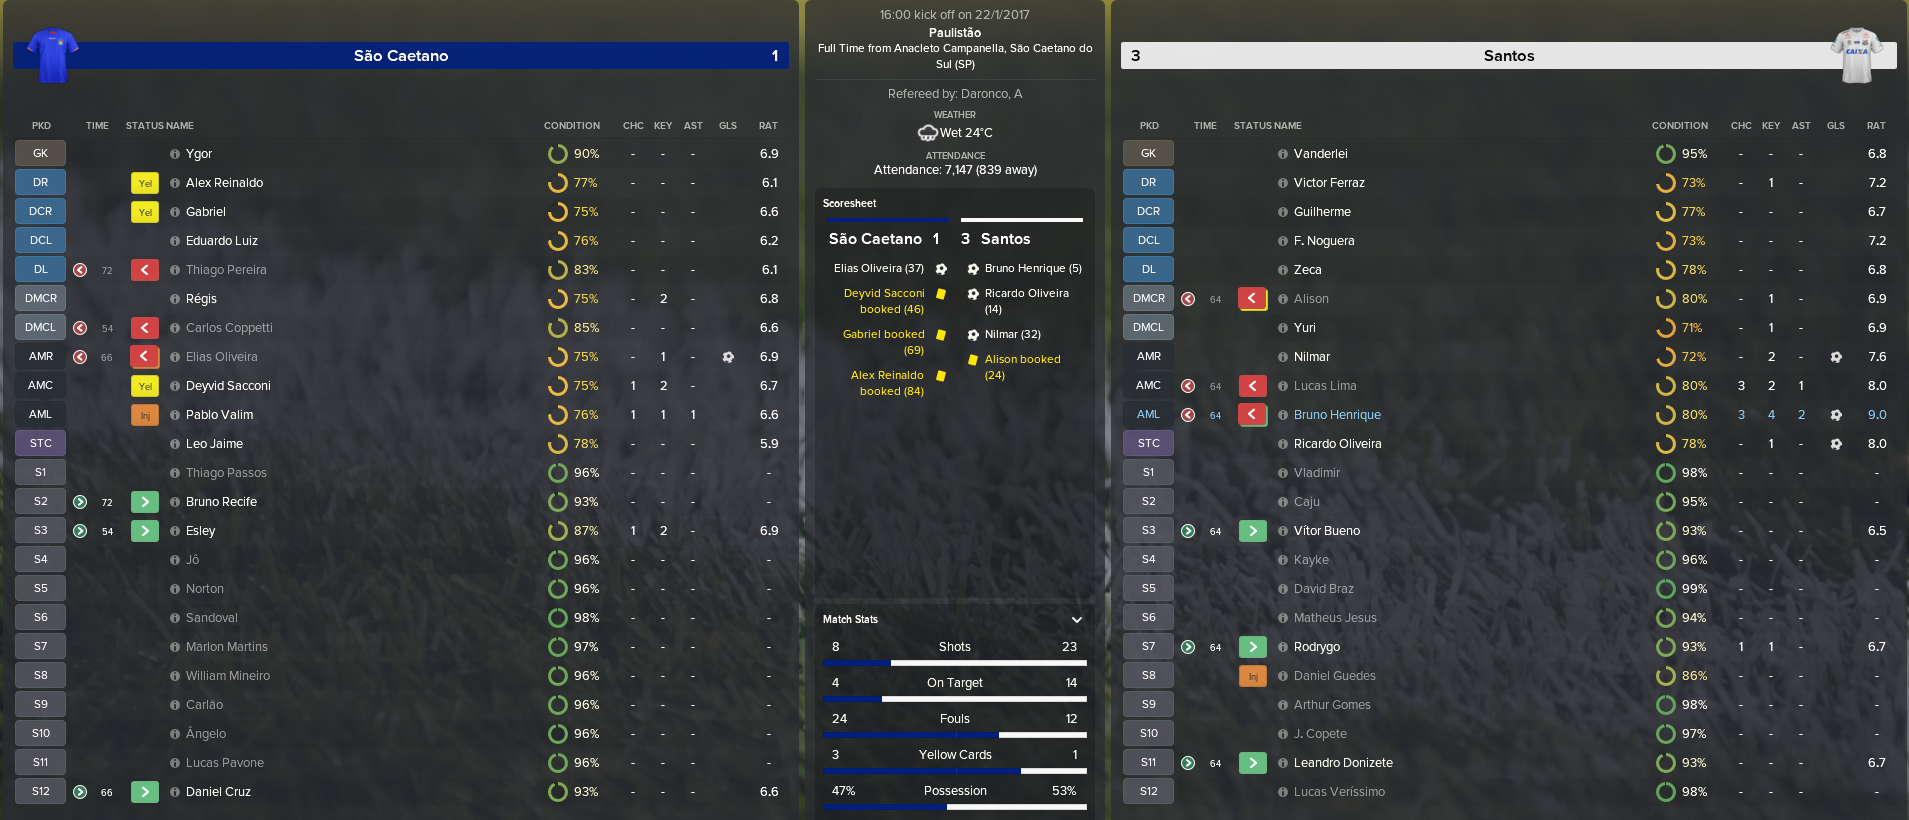
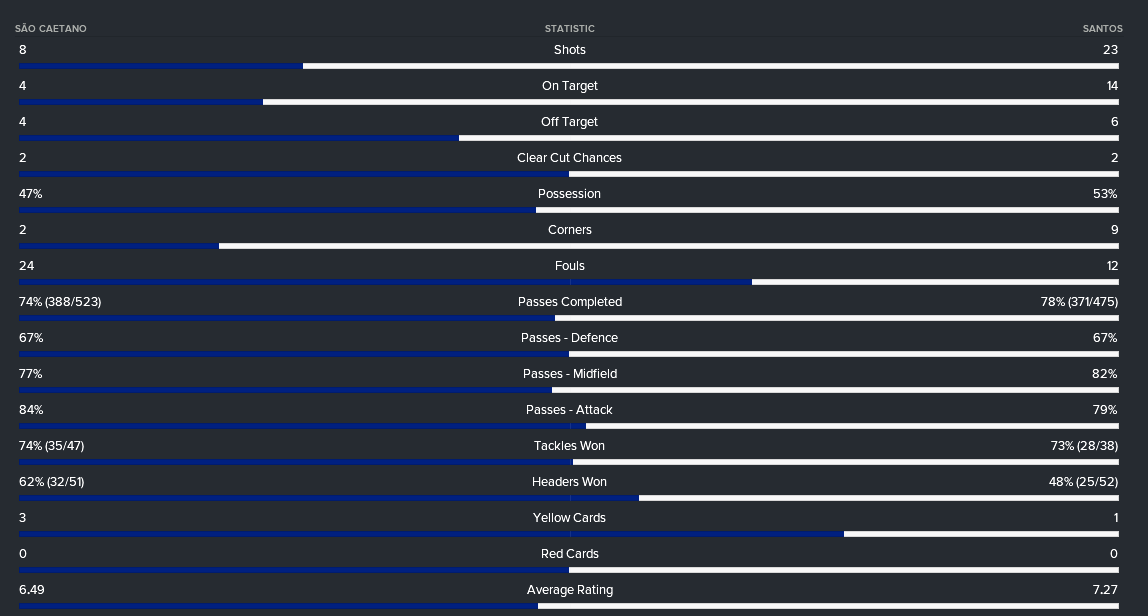
We created a few more chances but overall there isn’t much difference between both sets of match stats and the score. We won the game 1-3. The times of the scoring were better though and it looks like we didn’t leave it to the last minute or rely on our own goal. Could this be a sign of the way we attack? Possibly.
I think the biggest noticeable difference is the condition, players seem to end the game with a much higher percentage left compared to the attacking mentality one further up. This is expected because they are less gung-ho in their approach and should conserve energy better. But due to the average positions above, it wouldn’t have surprised me to see it a little lower than it actually was.
The goalkeeper's distribution is still the same as I played the match the exact same way with the exception of one being done with an attacking mentality and one without.
Attacking Mentality Match Analysis
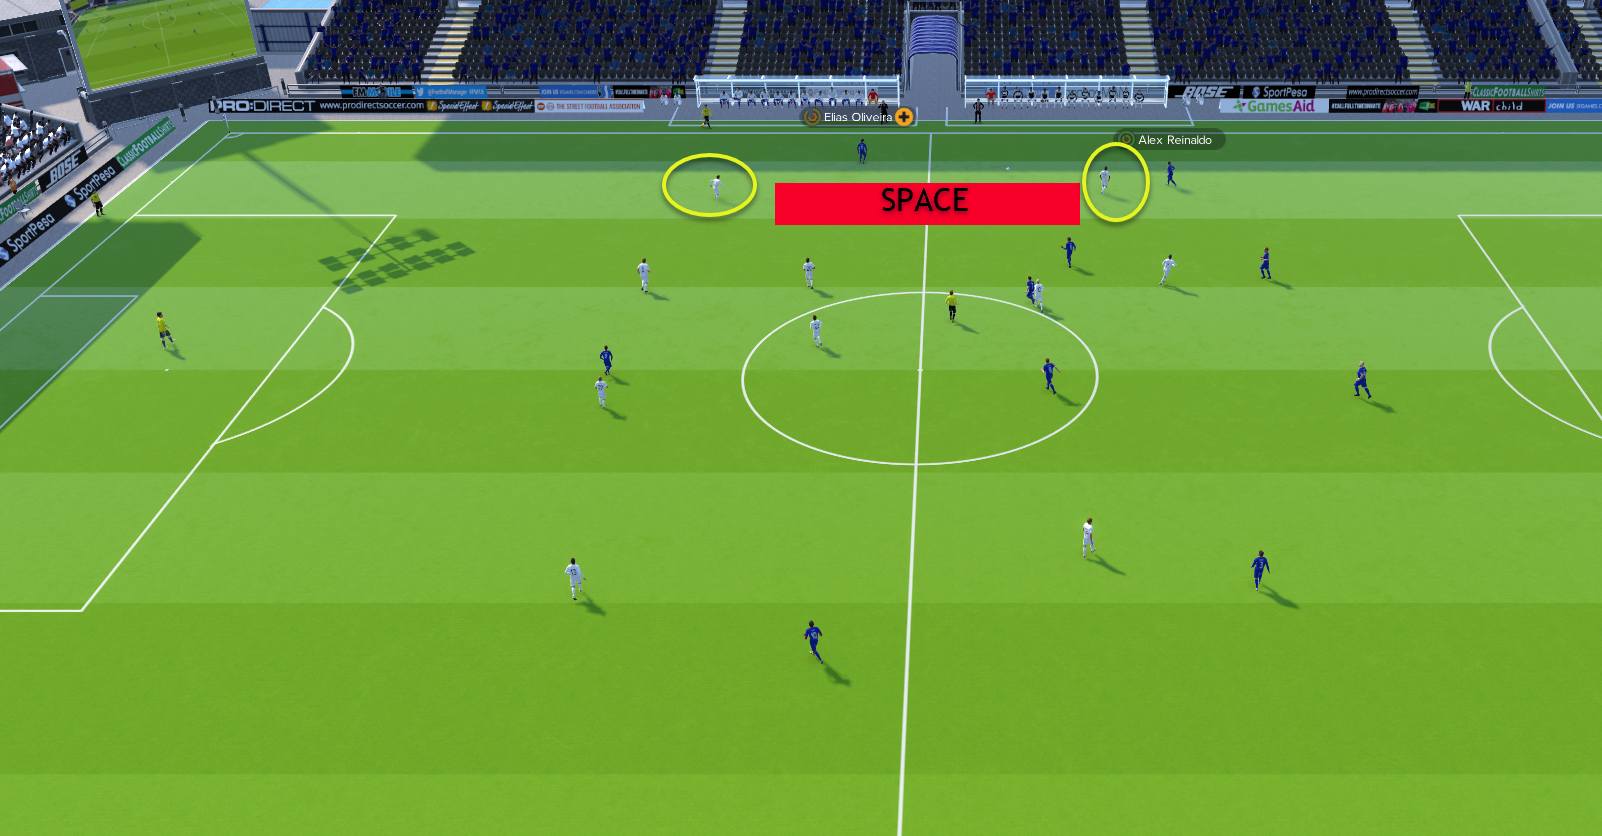
Here we can see just how much space there is between the fullbacks and the inside forward on my left-hand side. It’s quite the distance and one simple ball from the opposition's fullback to the wide player takes out my inside forward from this phase of play. It puts me on the back foot immediately because now my midfield has to shift across and deal with it or my fullback is left with a 1v1 situation. Or alternatively, my inside forward could try and sprint back to make up the ground he has lost.
If you want that to happen then it seems pointless having him so high, to begin with. You could play him deeper by the use of a different mentality and help him conserve more energy as well as reduce the space. We can also use the player's settings or role/duties to manipulate this but that brings up a host of other issues and isn’t really an option for this demonstration. The reason being is I need and want this space that appears just not as much of it. Space and time are what will win me the game by creating intelligent movement.
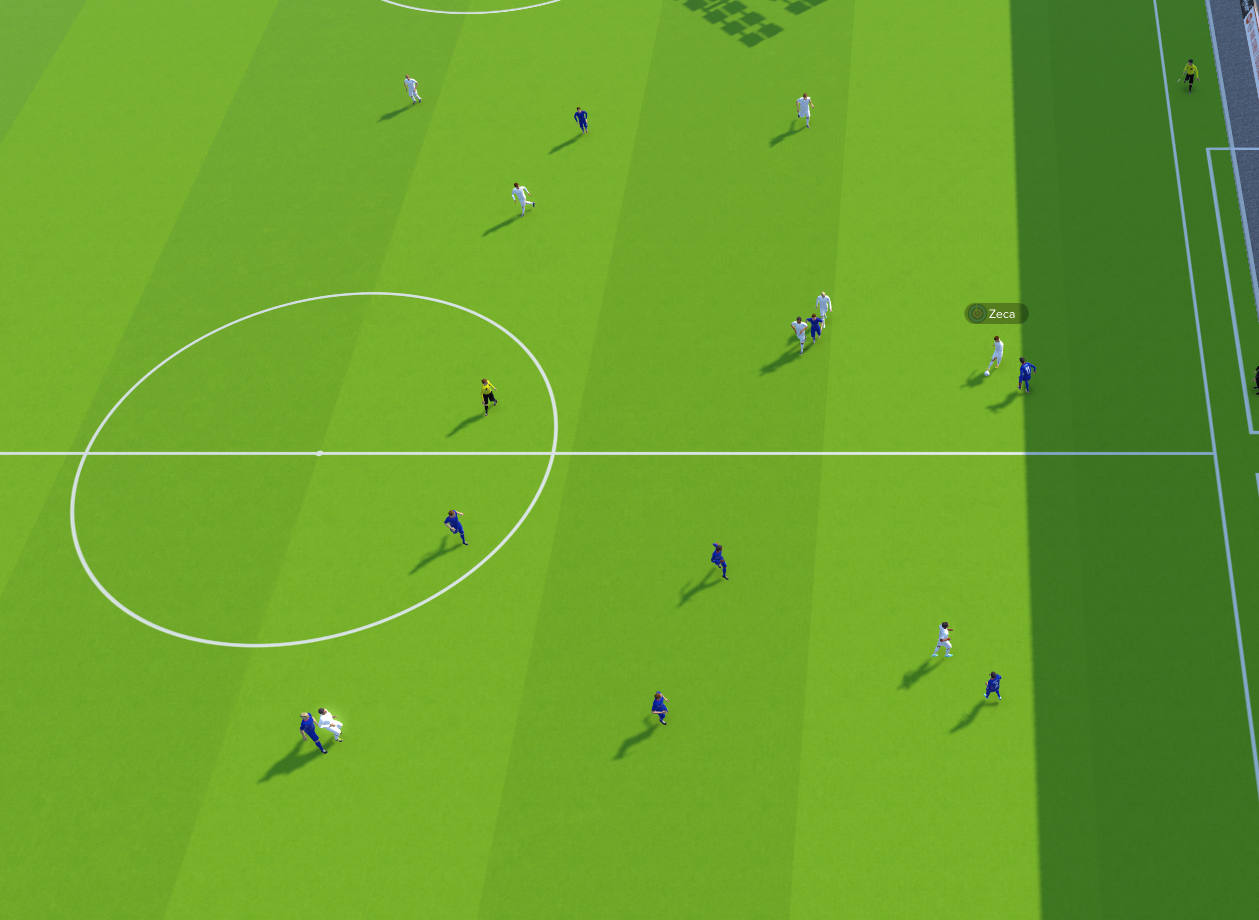
Here we have my left wingback Zeca on the ball. Instead of driving forward with the ball, which he can do because he has the space available and the time ahead of him, he is already looking to launch it to the strikers. However you can see the striker and inside forward aren’t positioned the best, nor are they really making a run forward, especially the one in front of him, that’s the inside forward he is launching the ball to. This is an issue as this inside forward is going towards the sideline rather than away from it. So when the ball is played what can he really do as he is going away from goal? Not only that but the opposition has plenty of cover to now allow the fullback to be caught in a 1v1 situation.
This is a rushed decision and my side is wasting good opportunities where the player can venture forward more. Instead, they’d rather look for the longer option regardless of how those players might be marked or what positions they are in. This is because the mentality is also a risk factor, the higher the mentality the more likely a player will take risks, or as most people would say, do dumb shit. I’m not saying on the lower mentality there isn’t a chance that this doesn’t happen as it very well could. However, if you’ve set the roles up correctly and have the right balance in the set up then it’s less frequent that you’ll see this happening. Whereas currently, this is very common to see.
At times when this kind of pass works, it's great and we look deadly but it doesn’t happen enough and for most parts, wastes the move or just cheaply gives possession away. Another thing is that when this happens, it also means the striker or inside forward isn’t making those dangerous runs because they’re not getting the chance to do them. Instead, they get backed into corners or are surrounded by too many of the opposition's players. So trying to move the ball forward quickly isn’t always the best for this reason. It also makes it harder for the supporting players to catch up with play and is often why you might see people say things like their striker is very isolated and not getting a good supply. It might not be for this exact reason but it’s likely it’s something along these lines.
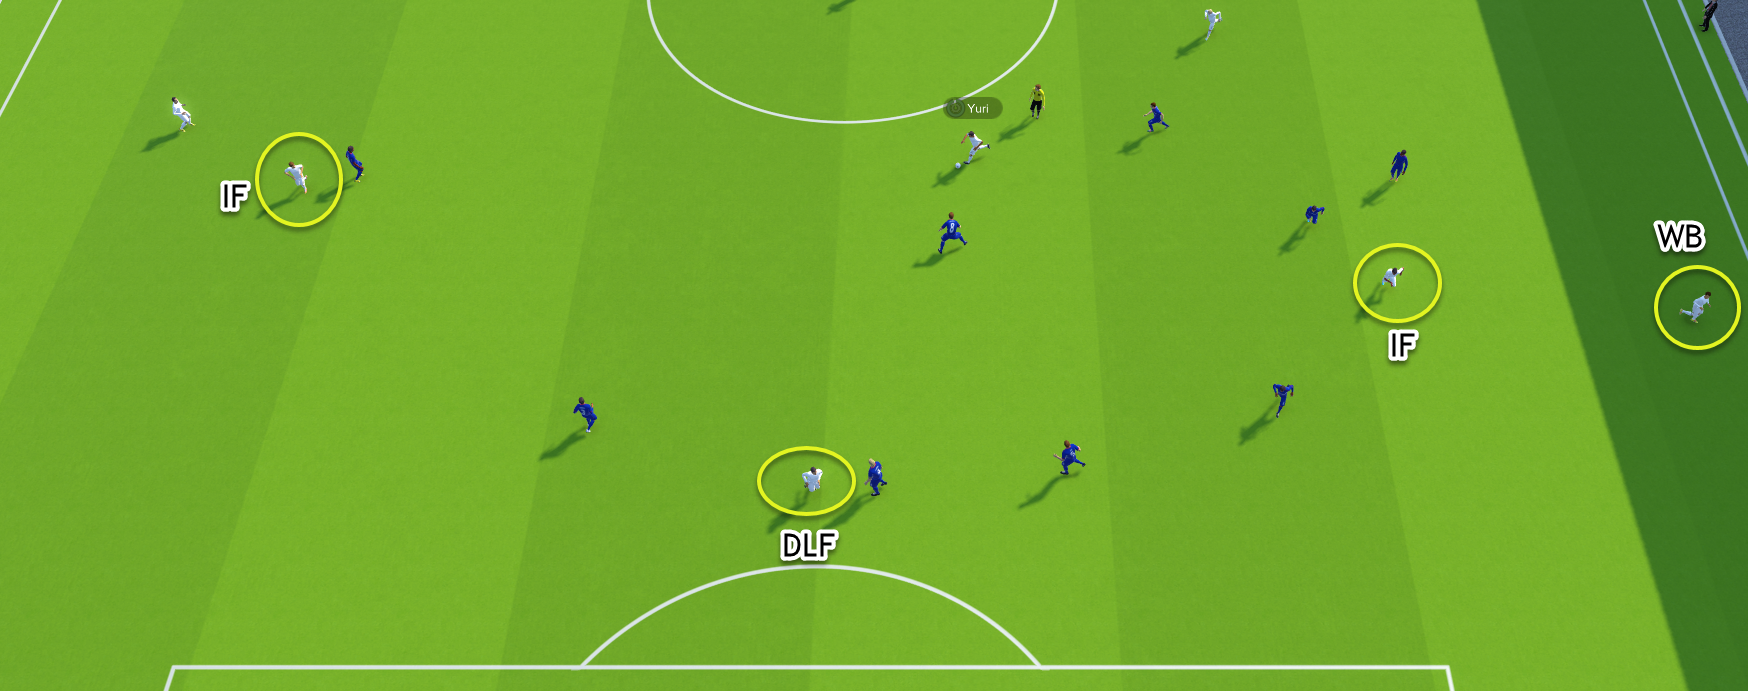
In this situation, we have a move where the wingback is pushed on and is offering width. Then the inside forward is making a run forward too as is the striker. However, my Segundo Volante who is on the ball (Yuri) is driving forward with it but he has no real support as players are positioned too high on this occasion or surrounded by players who can easily cut out the pass or make the tackle. This is the downside of an attacking mentality when players get positioned too high, it means they have limited space to work with due to the high starting points.
It also makes it incredibly difficult for the player on the ball to pick out a pass and often sees him just crack a shot from distance. Which happens on this particular occasion. I also see posts relating to this and people pointing out the good positions they think my inside forward, wingback and even striker have taken up. I guess they have if you look at it but when you add context to it and the player's position on the ball, it’s clear to see he is isolated with what he can do. The attacking side of things is cut off from him. Not all the time though and it comes back to the frequency aspect of how often something happens. You’ll find that in attacking setups this is much more common.
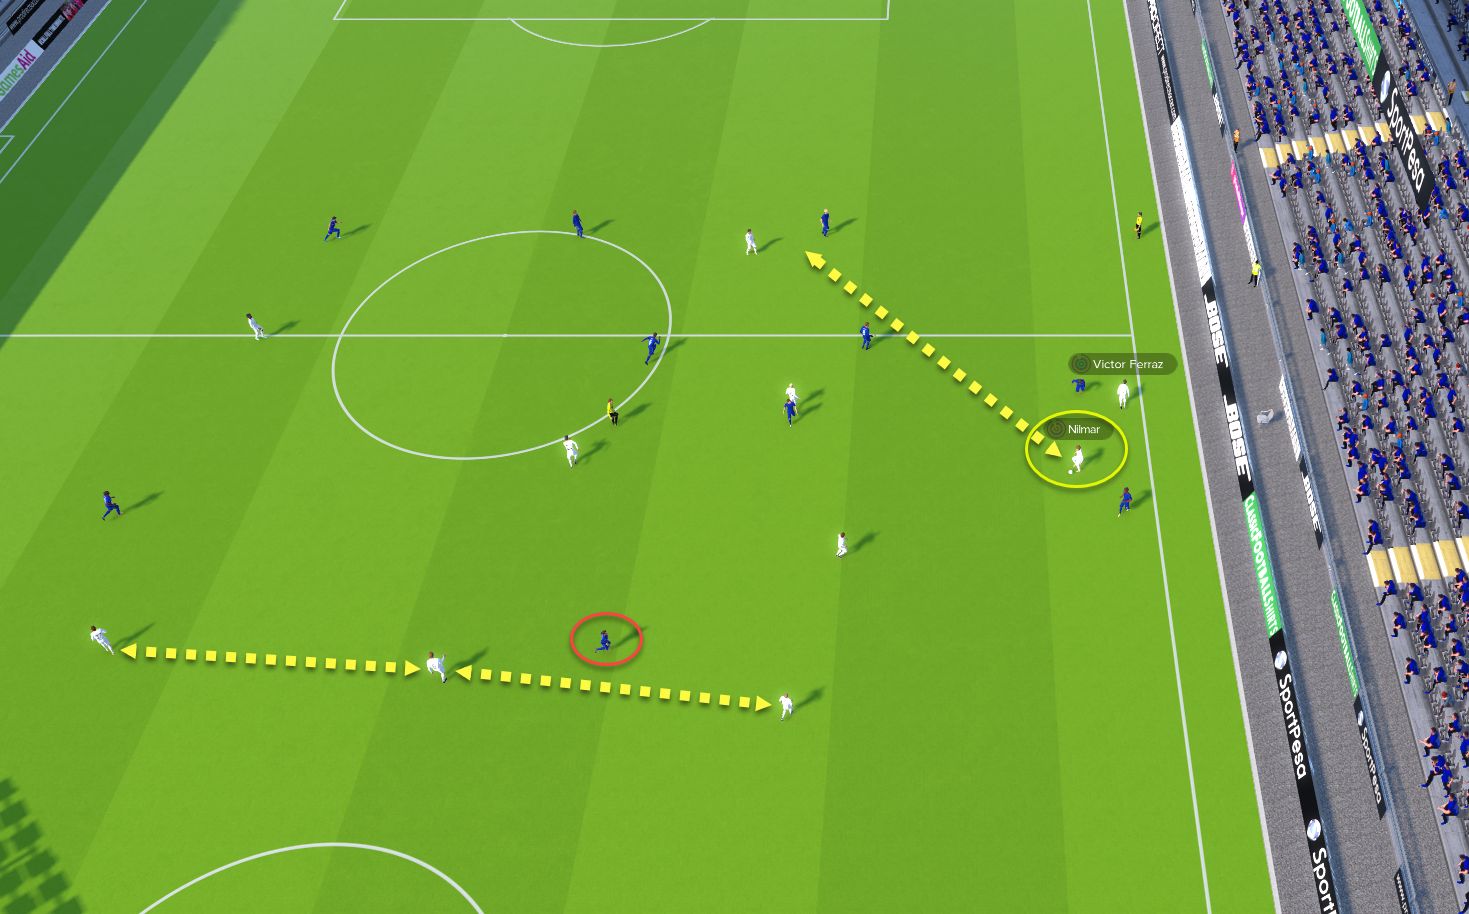
In this screenshot, we can see why my defence is deep and that is because the opposition striker is very deep in my half, admittedly we’ve just won possession but we won that at the halfway line. So we see that the defence is deeper than everyone else and likely too deep. This is because of the space the striker has, he’s making them stay deeper than they should. Also, using the Segundo Volante role doesn’t help here as we have possession of the ball so are already looking to attack. And it’s a role I want to use, however it looks like it's too aggressive for this set-up and how attacking it is. He is making more risky decisions and being overly aggressive. The role is very aggressive, to begin with, and then the added mentality isn’t helping the situation. He’d be better by playing deeper and slightly more cautious than usual.
That would then provide two things. One would be to cover for the defence and pick up the opposition players who are playing between my centre-backs and the defensive midfielders. Secondly, it should allow the defenders to push up more because the defensive midfielders would become responsible for picking up the striker instead. At the minute due to the aggressive nature, the defensive midfielders push up and leave the defenders playing as a separate unit to the rest of the side. Again there are ways to combat this slightly by the use of different roles, maybe an even higher defensive line but I’m supposedly already playing with those anyway. And changing roles defeats the purpose of what I’m creating and how I want to play.
Another thing happening in this screenshot is that Nilmar, who is my inside forward is the one who won possession back and as soon as he gets the ball he is already looking to hit the striker with those more direct/long balls. The issue with this is when that happens my striker becomes isolated or the ball is cut out by the opposition defenders. Support is lacking because Nilmar is supposed to be the support player. Again if he looks around though, he has space and time to play and decides against it. You can see when we get the ball my players are looking to get the ball forward as fast as possible. This is what mentality does on the higher ones, players take more risks and look to get the ball to the front players in the quickest, fastest possible way.
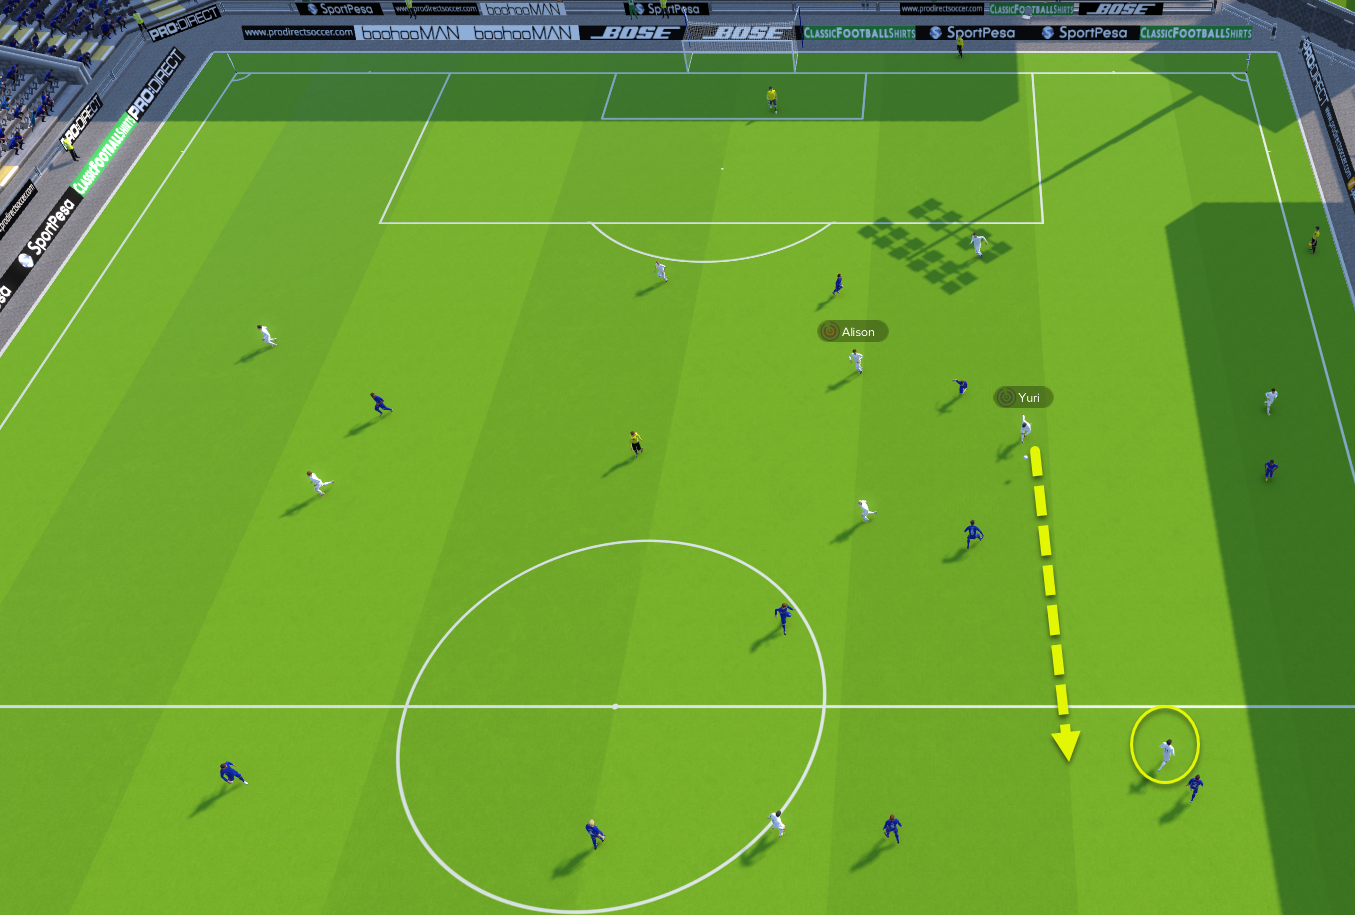
Yet again another situation where the side is looking to get the ball to the front far too quickly again. This time we see Yuri do a long ball up to where the inside forward is. Typically the ball is cut out and instantly we are on the back foot again. We aren’t being clever with the ball at all and aren’t using it wisely. When these kinds of passes are pulled off properly it's a thing of beauty but it happens nowhere near frequent enough. Not only this but it’s making the whole side deeper than it actually should be. Every time we get into situations like this, the same thing happens. We look to go from the front to the back in the quickest possible way. But because the ball gets cut out time and time again players are always deeper than they should be. Hence the average positions we saw at the very start.
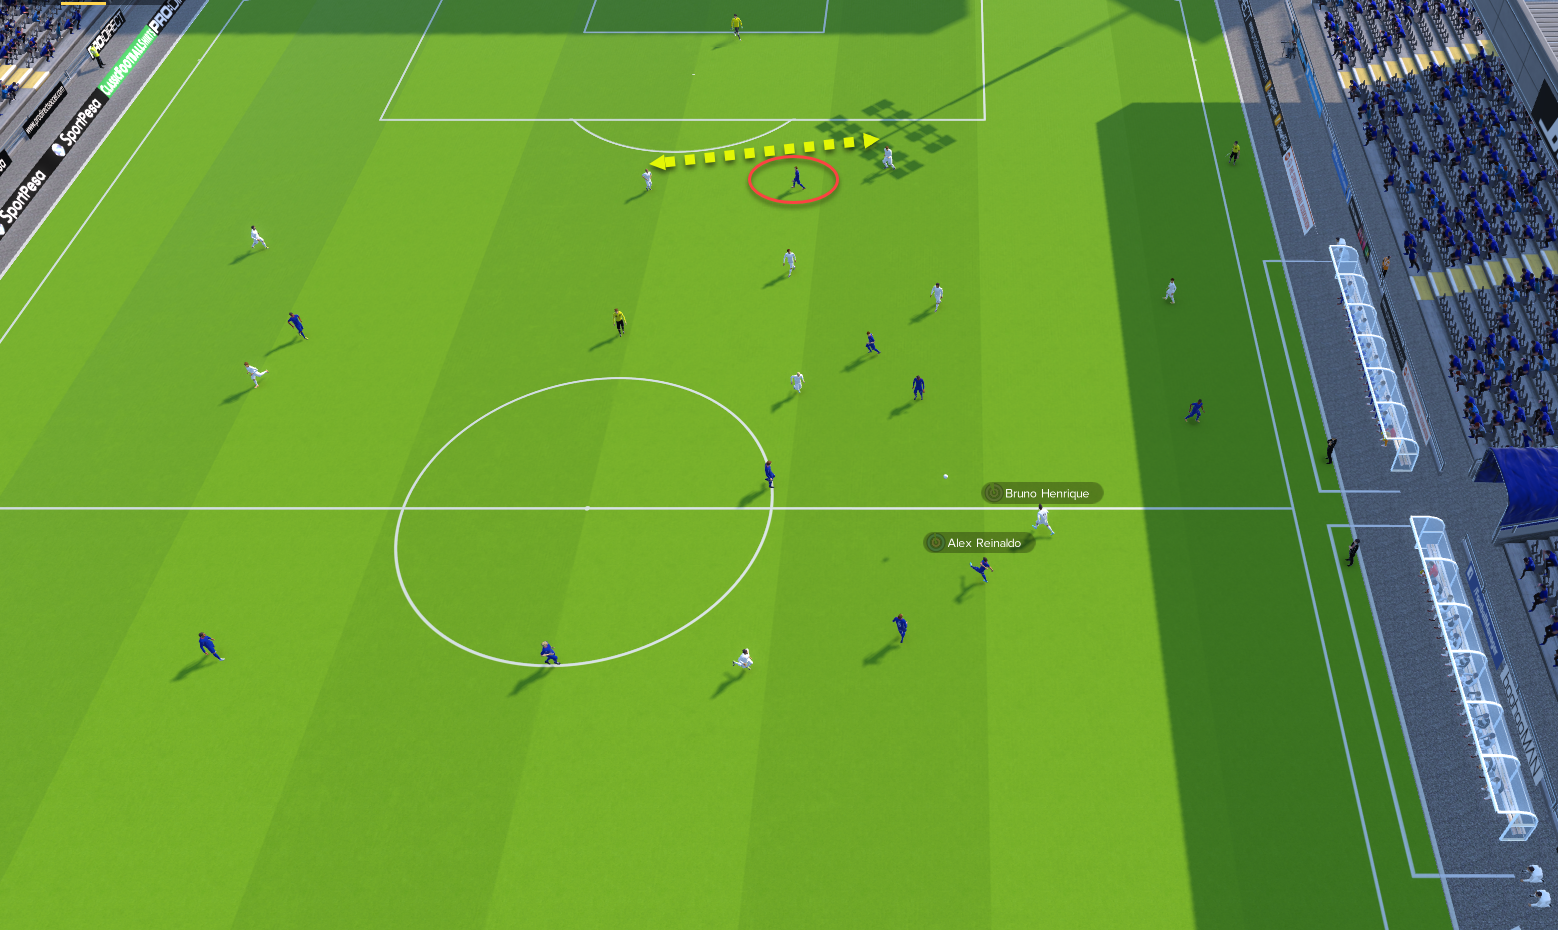
Here is another perfect example of what happens when we attack recklessly at speed and without precision. The ball is lost and a simple ball back into my own final third means my defenders yet again cannot push up because they have to deal with the opposition striker who stays high up the pitch. It’s killing my play because it's not precise and well-thought-out football. The players highest up the field are isolated or drifting too deep because the rest of the side just cannot push up and are being bogged down.
It just goes to show though that because someone is meant to be positioned high up the pitch because of his mentality, doesn’t mean he is. All sorts of factors play a part in why he might be higher than normal or deeper than usual. So far in the examples, you see players dropping off the front for two main reasons;
- Bogged down and can’t move upfield because we move the ball too fast for anyone to catch up. Going from a to b quickly isn’t always beneficial.
- The second reason is, that it’s hard to find space so players come deep in the hope of finding it.
It’s like a never-ending cycle, for this game at least. We still won the game and scored four goals but like I pointed out at the start, the score line is flattering when you take into consideration the own-goal and the two very late goals. On a different day, this could have been a 1-1 draw without those bits of luck.
I’m not saying never play attacking football with this shape, far from it. It’s more about understanding how the shape plays on different mentalities and how it differs. If you want to play attacking football then play it. Just beware of how everything links together. Also, remember that attacking doesn’t always translate to attacking.
Standard Mentality Match Analysis
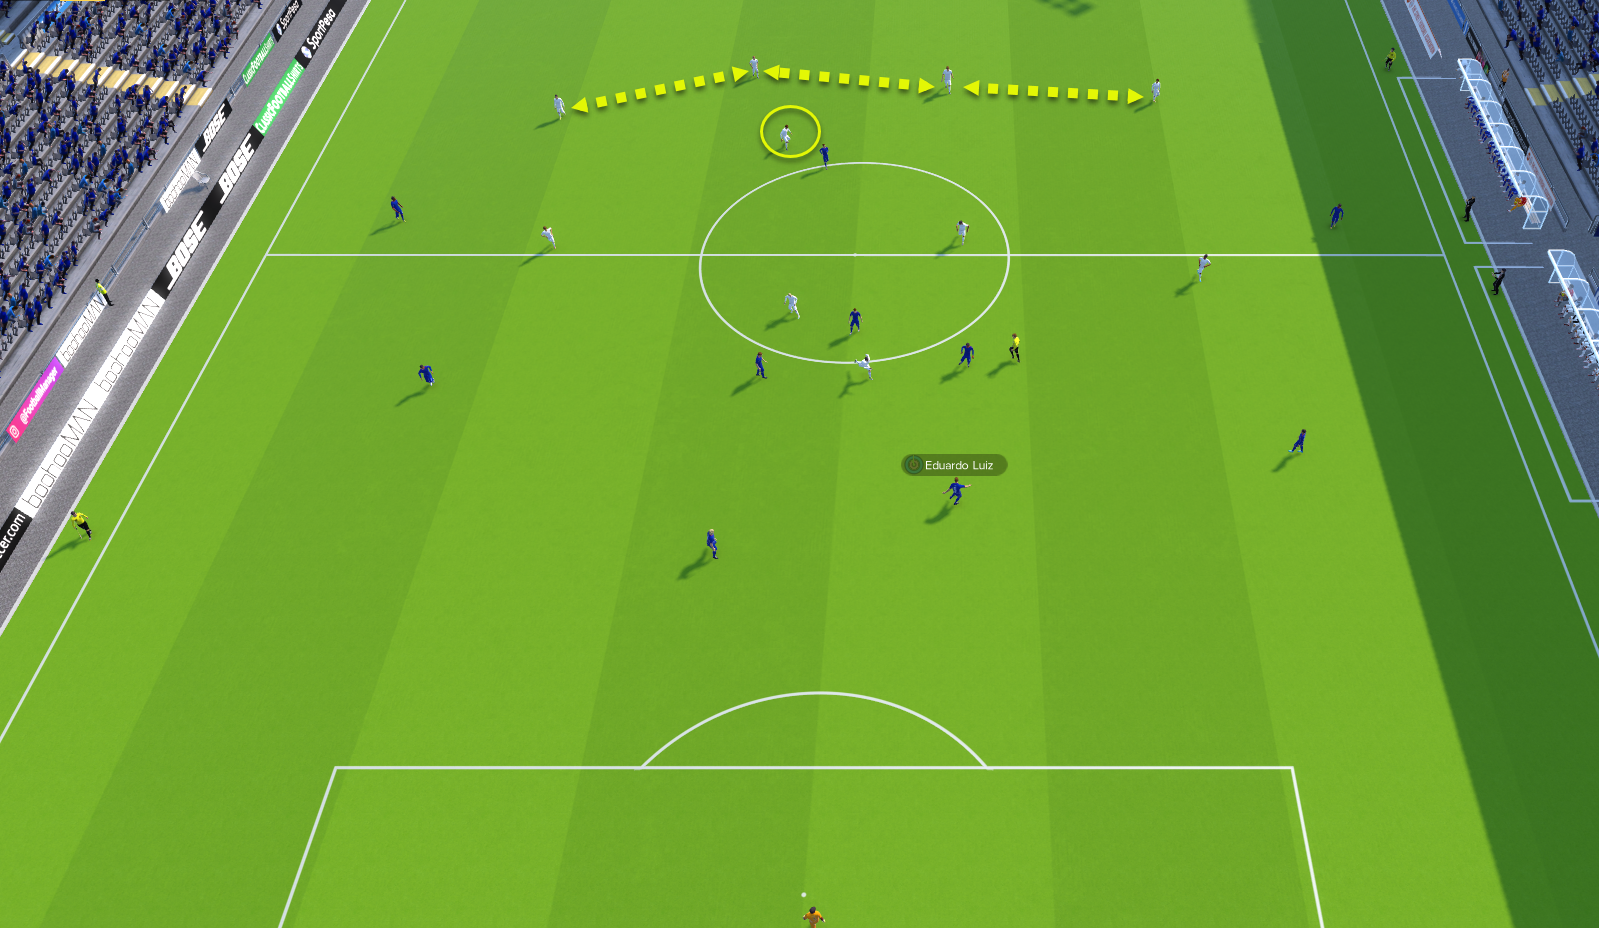
It’s early in the game but you can see how deep my entire side is. Not only that, but my defensive midfielder is also picking up the opposition striker meaning my defence can stay intact and start moving higher up the pitch. My side is closing down and chasing the ball but I think you can already see how the small difference of the defensive midfielder picking up the striker is helping my back line and freeing them up, so they can push higher up. This is allowing me to reduce the space the opposition has in my own half as the defence is moving advanced upfield towards my own midfielders.
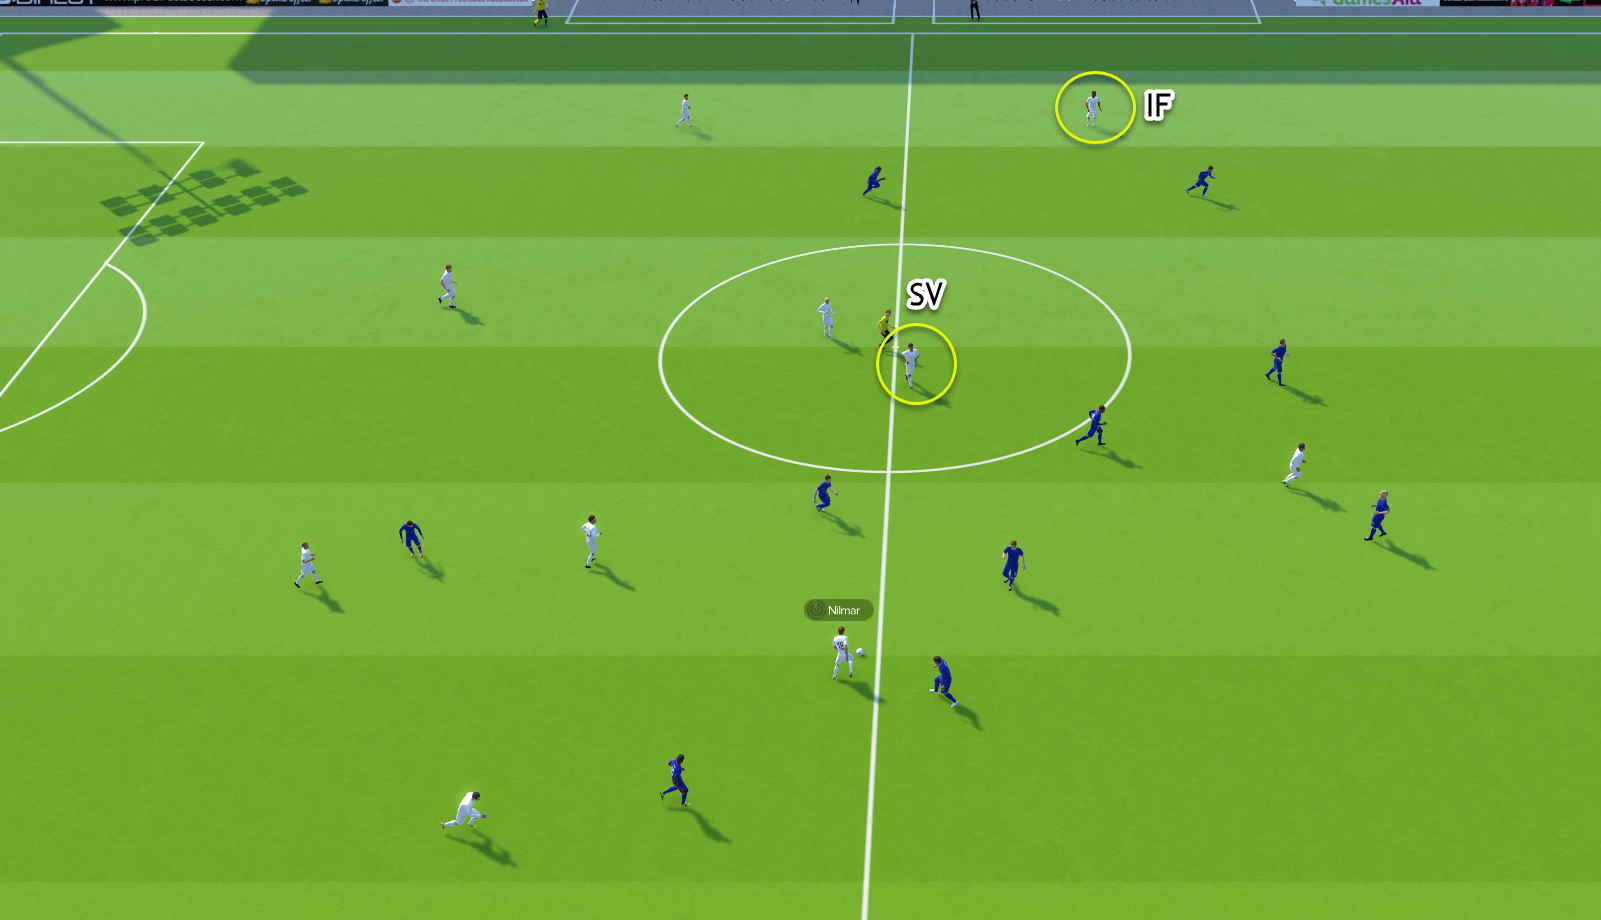
Nilmar has the ball and this time drives infield because he isn’t rushing. And my Segundo Volante is in acres of space in the centre of the pitch and is a little bit more reserved in the build-up play and isn’t looking to attack constantly when we get possession of the ball. He’s being more clever in his play.
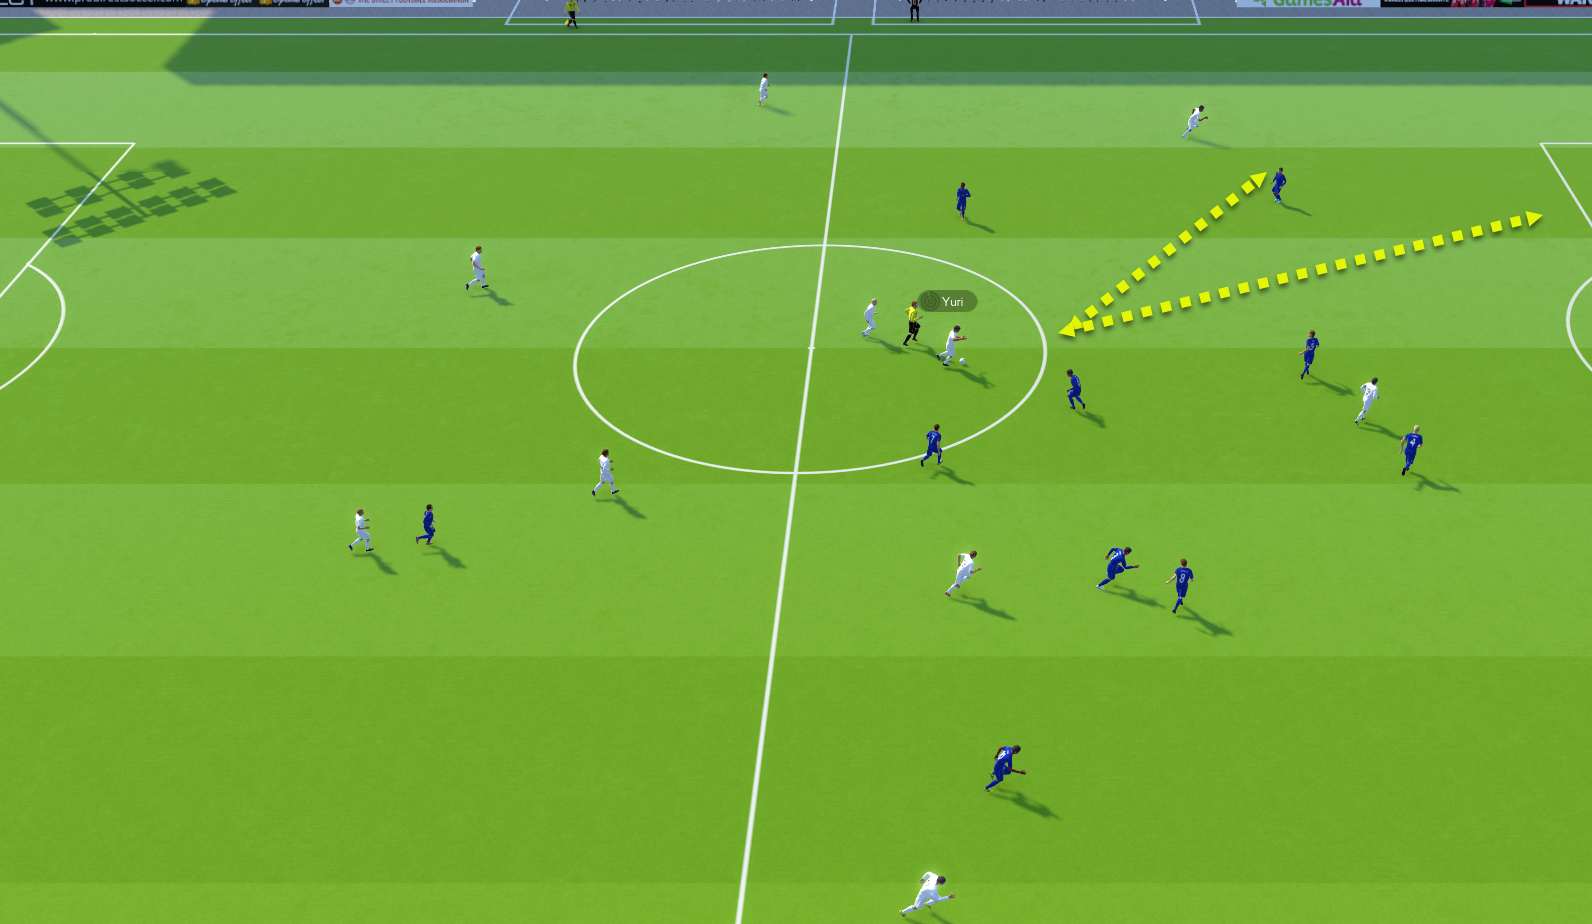
Due to the team, not all advancing forward and beyond the ball, it means we actually have space to run into and people creating and using space as we all move together. In this picture, we have Yuri who can drive forward with the ball or play two different kinds of ball. One is a through ball straight down the middle for the inside forward to run onto. Or he can play it straight into the patch of the inside forward which is actually the more risky pass in this scenario due to how the opposition defender near the inside forward is positioned.
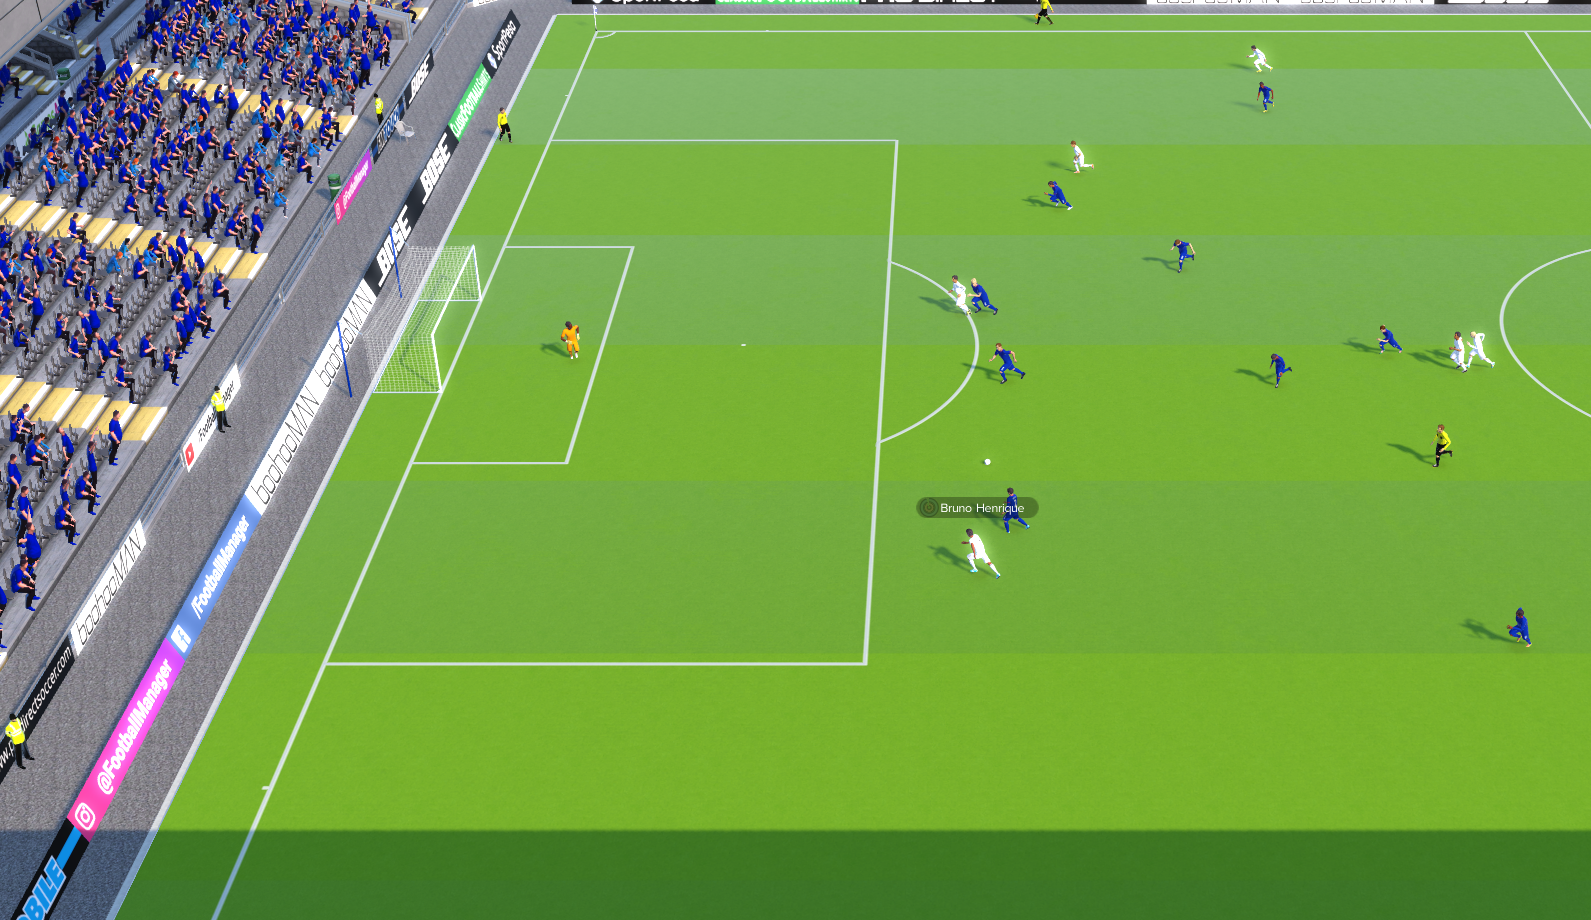
Yuri passes the ball through the middle, so basically a through ball for my inside forward to run onto. Now had the side not moved together and at a relatively steady pace, this move wouldn’t have happened. Or if it was on a higher mentality than standard, the chances are the ball would have been played the first time from Yuri instead of him driving forward a little with the ball at his feet first. Our play now is more dangerous because we are playing as a unit, all of the team moving up and down the field at the same time. This is one of the reasons why the average positions in this mentality structure are actually higher than the attacking ones. Because we are moving and working as a cohesive unit.
Bruno manages to get onto the end of the ball but is fouled literally on the edge of the box and we win a free kick in a dangerous place.
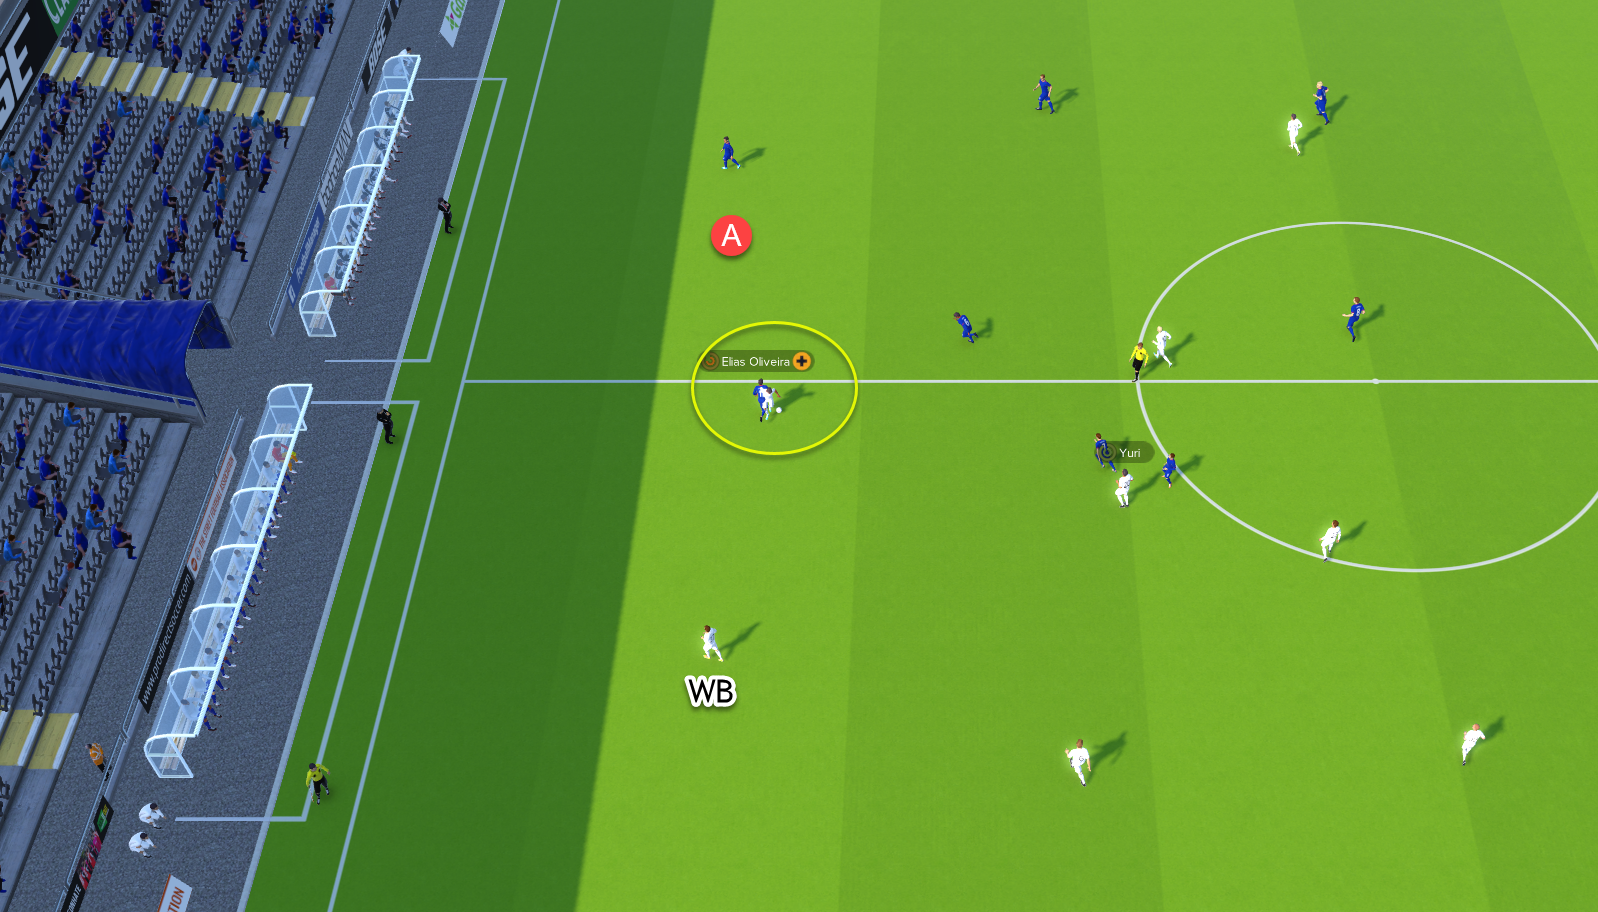
In the attacking section further up, I showed the inside forward playing closer to the opposition's fullback(A) and leaving my own wingback exposed and susceptible to 1v1 scenarios. However now, we can see my inside forward is much deeper and inside my own half picking up the opposition's wide player. This means my wingback is free and can recover any loose balls or pick the player up should my inside forward not get the ball. Less pressure on the wingback is great as it means he is less likely to be exposed. Not only this but if he wins the ball back, he can also run with it down the wing and channel, which would put the opposition on the back foot.
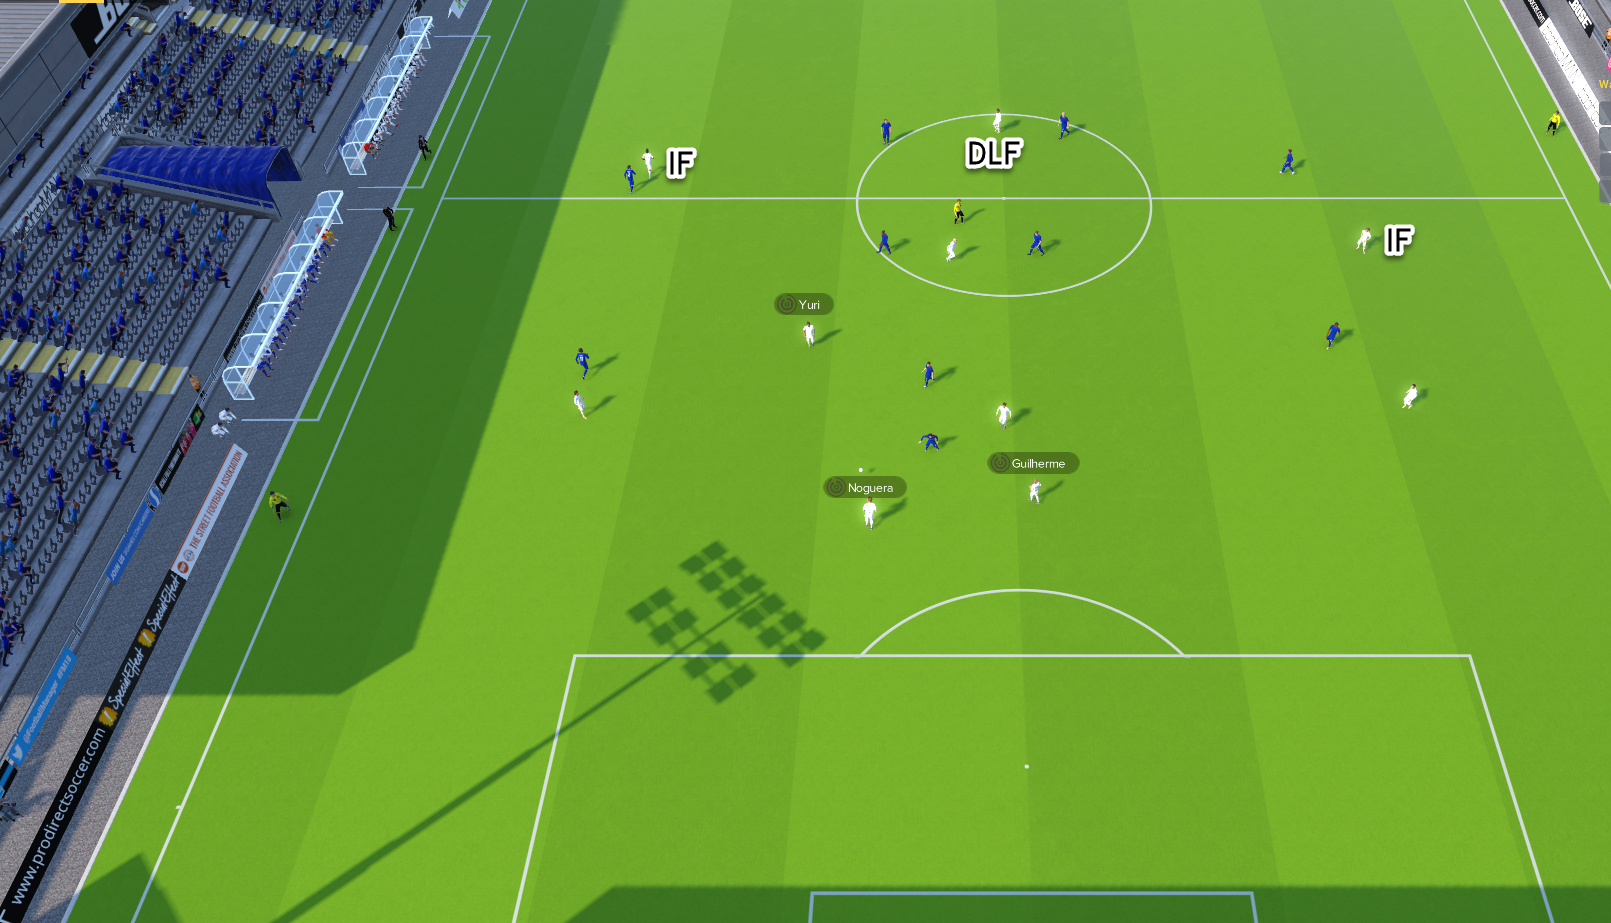
I win possession of the ball back here deep inside my own half. But if you look at my players' positioning, it’s not bad because they have space. The left-sided inside forward and the deep-lying midfielder are already doing their job. The inside forward is pushing up behind the fullback into where the space is. While the deep-lying forward keeps the two central defenders busy. Yuri the Segundo Volante can be seen unmarked in the centre of the pitch. So my defenders play him the ball.
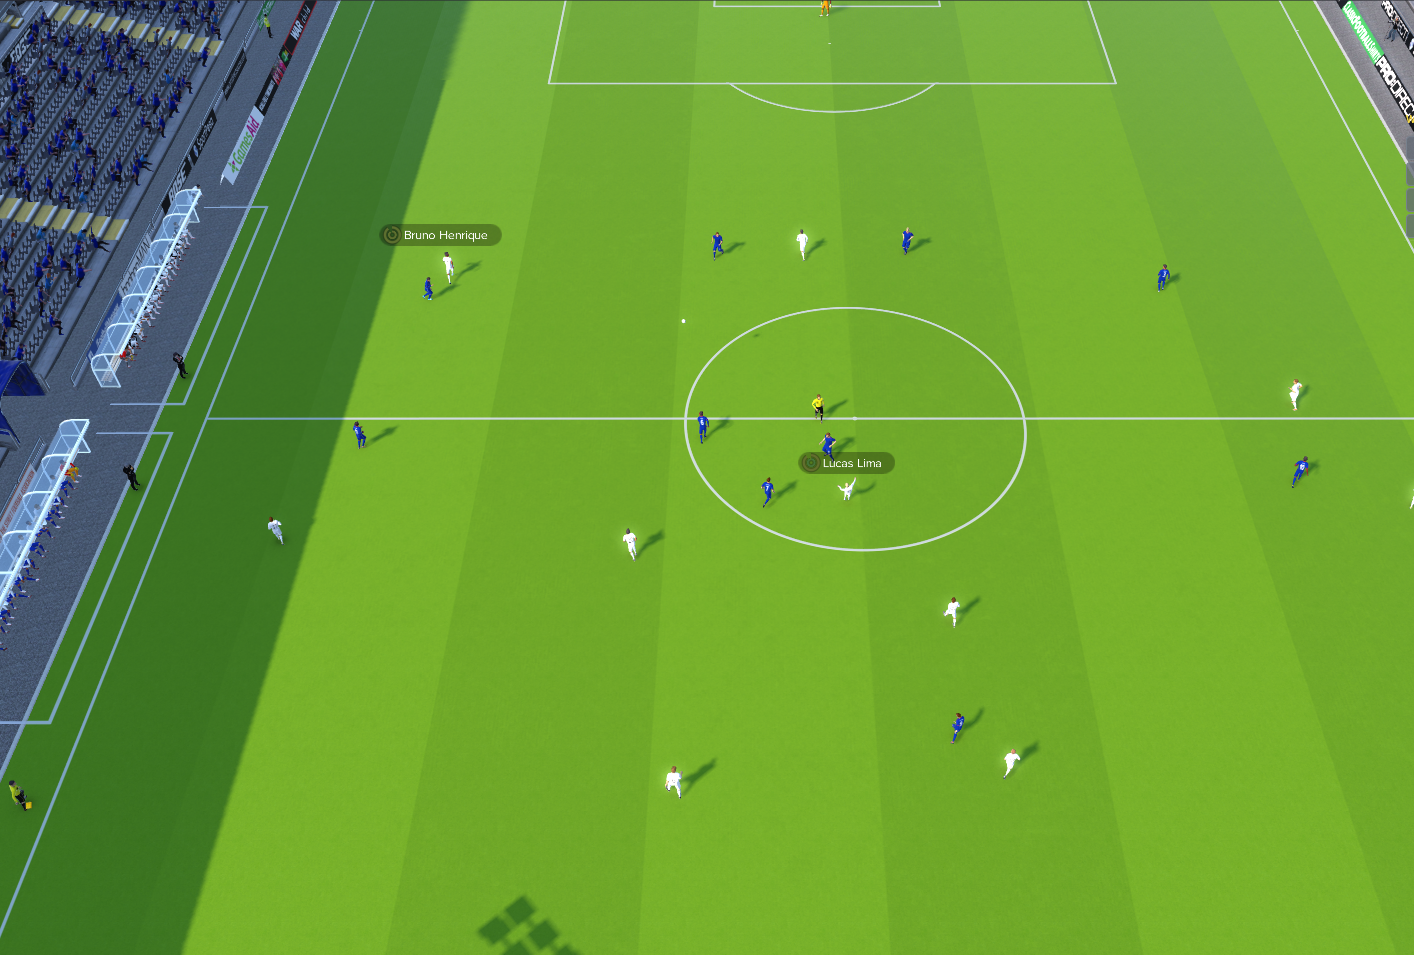
Yuri passes the ball to the attacking midfielder, Lucas Lima. He then hit it the first time into the path of the inside forward because he was already aware of his run. Now Bruno Henrique is onside and away causing them all kinds of problems. You will have noticed that in attacking mentalities the space is in front of the opposition players and when playing on lower mentalities or using players further down the pitch, then the space exists behind the opposition. This is a prime example of what I’m usually talking about. Due to me being deeper this makes the opposition higher up when they break forward. So when they lose the ball we get situations like this and I can hit them with clever counterattacks or clever direct forward balls.
There was no chance of this happening on the attacking mentality because the player was either too advanced or forced to come deep because he was marked, bringing the marker with him. Also because it encourages getting the ball forward quickly, Yuri might have bypassed Lucas Lima in this move and looked to hit the striker or even the inside forward much earlier. This can make moves break down. On this occasion though we are more calculated in our play and it’s not rushed. Instead, the players are deciding when to take risks and the risks they do take are more likely to be successful.

This is the same move just shown from a different angle to better illustrate it. The inside forward Bruno Henrique drove forward with the ball when he received it from Lucas Lima. You can see that the opposition centre-backs have been split, one of them has gone very deep leaving the striker alone in space. While the other one has gone across to deal with the inside forward. Now Bruno Henrique can do a simple sideways pass to Ricardo Oliveira who has lots of time and space. He drives forward a little bit after receiving the ball and lets go of a fierce shot which flies past the goal by inches. It’s a brilliantly worked team move which should have seen a goal scored. It all started with my central defender too.
I’m not saying people can’t play on higher mentalities far from it. But you have to realise how they differ from the lower mentalities. Not only this but it’s vital you understand how the mentality works with the roles and duties you use. If you use aggressive roles and an aggressive mentality like a Segundo Volante on an attacking mentality, then you’ll see him venture forward constantly with disregard for any danger he might be leaving behind. While on a lower mentality you should see him play slightly differently and work better and make more intelligent runs and passes. He will still take risks but those risks will happen as and when he believes the right time to take them. Rather than allowing the mentality of the team to decide he should do it more frequently.
AM vs CM
Earlier in the book, I stated I’d explain why I prefer to use central midfielders over attacking midfielders. Before we get into that analysis though I must stress that whatever you use should be fine, this is just my personal preference. The only things that really changes is how you use the ball and space but even so, this changes the dynamic of the roles and duties you use. Which impacts how your tactic functions overall.
Attacking Midfielders
For these examples below, I use the same striker roles as I use in the central midfield version of the tactic I posted earlier in the book. The attacking midfielder's roles are as follows; the left-sided attacking midfielder is an advanced playmaker with a support duty. While the right-sided attacking midfielder is exactly that but with an attacking duty.
One of the biggest changes you see if you use attacking midfielders (in the Brazilian Box 4-2-2-2), is how your strikers interact with them. Obviously, the roles and duties you’ve used will also impact this but ultimately regardless of those one of two things will happen;
1 - Assuming you use well-balanced roles and duties on the attacking midfielders this means one is likely to drop off the front and one push up. The same is likely said of the strikers too. This creates both space and movement and forces the opposition to react and can at times, help to drag the opposition's defensive line out of position. If they don’t react then the player is basically free meaning he has no pressure on him. If they do react and follow him via marking, closing down etc then this leaves gaps in the opposition's defensive set-up.
Even if you don’t have balanced roles and duties there is still a very high chance they drop deeper themselves because all build-up play is happening behind them. Having four players really advanced means that in most cases the ball has to be played to them to get them involved. I believe this kind of play is much easier to play against because you don’t have that many options with the initial build-up.
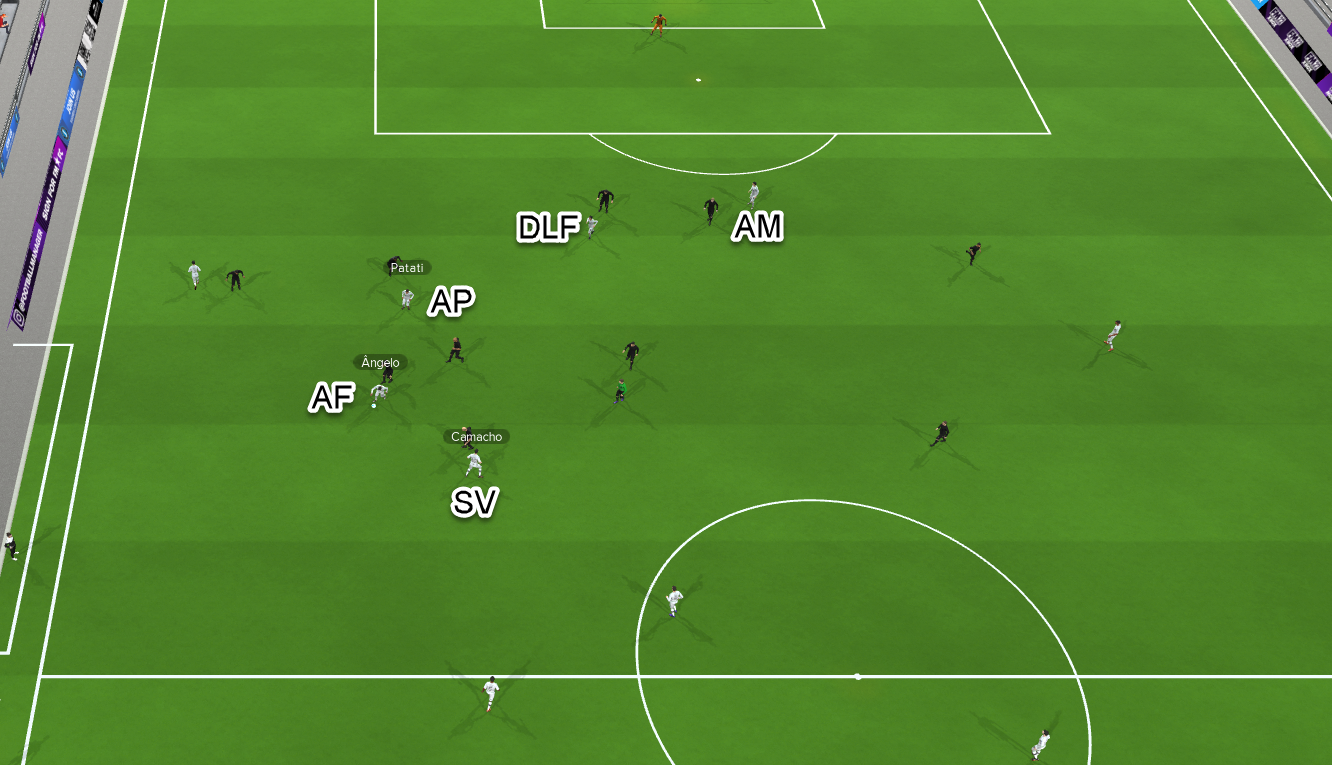
There are lots going on in the picture above but it highlights how the strikers and attacking midfielders interact with each other like I was speaking about. There’s more to it than this though as the isolated screenshot doesn’t actually explain how this functions or works. But I just wanted to show a quick image of it working. As I don’t want people to get the wrong idea about the attacking midfielders and you think it can’t work and it’s all bad because it isn’t. It’s a very valid way of playing, it’s just my personal preference.
2 - Players can become quite static the more advanced they are due to them having less space to play in. Or due to them not being in the initial build-up phase. This can be offset or amplified based on the formation you use. A good setup will see this happen less than a bad set-up. If you have four players really advanced in a system then you need to make sure you can supply them the ball and offer them support. If not then you could see your team split into two bands, which can be a bad thing. Ideally, you want the team playing as a cohesive unit, with players doing specific things you need while also moving up and down the pitch as a team and working together.
You’ll see one of the two above playing out quite often (or maybe both at times) when viewing games and watching the match. Obviously, I’m using a 4-2-2-2 formation so I could possibly use two attacking midfielders and two central midfielders. But this then adds another complexity to the set-up, especially from a defensive standpoint. We will discuss this more later though in the analysis parts as it's hard to explain without showing you examples.
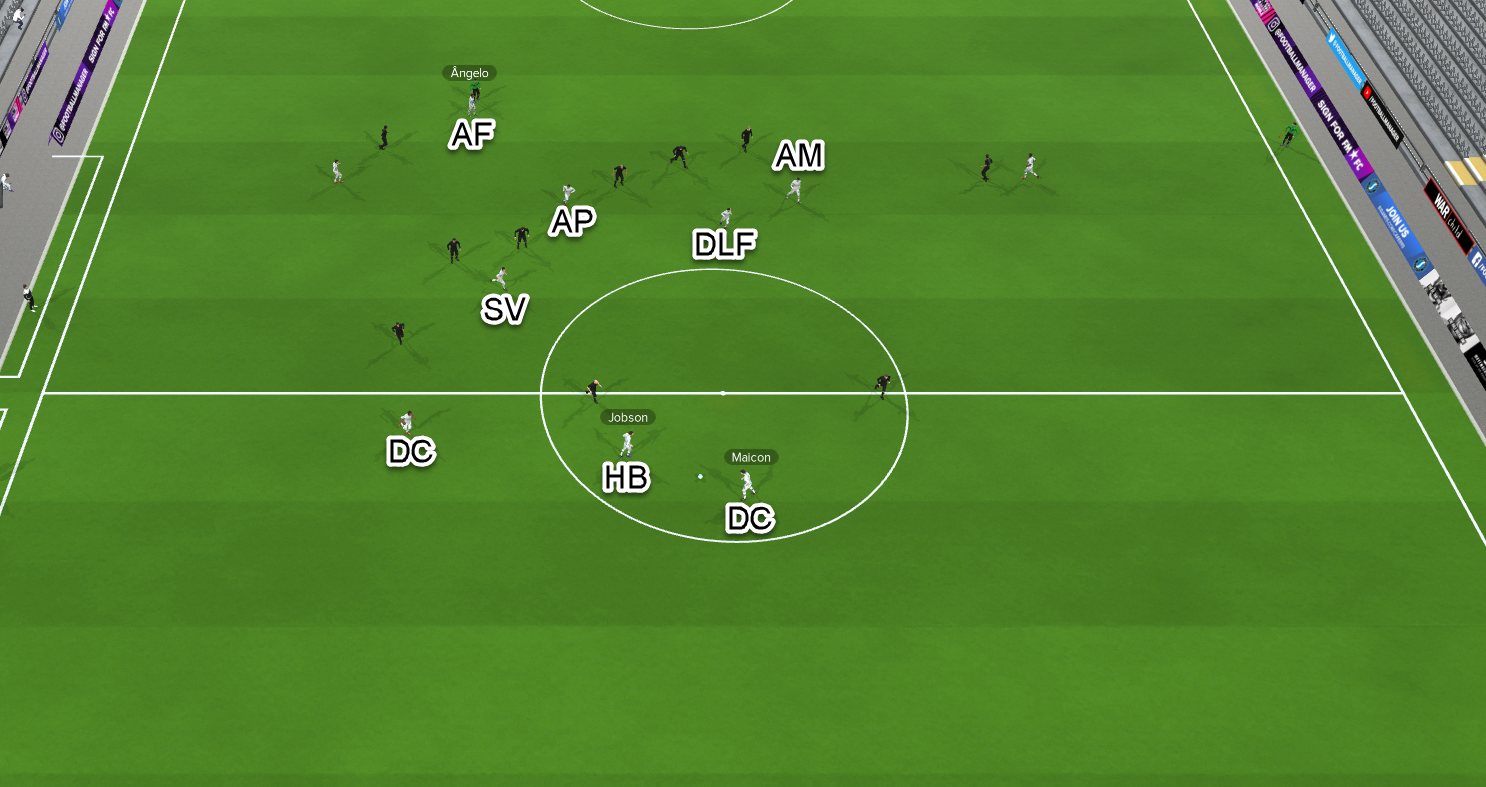
This screenshot highlights what happens when there isn’t much movement upfront when space isn’t there. The ball started off deep in the opposition's half but due to a lack of movement, the players started to drop off in search of the ball, due to us playing the ball all the way back to our defenders. You perhaps can already see how having central midfielders here would be better placed to recycle the ball and stop up being as deep.
One of the downfalls of having over a third of your team advanced is when you don’t have options the only real option is to go backwards. That in itself isn’t too bad as long as you retain possession but that isn’t what always happens either. It’s much easier to give the ball away in situations like this as it now becomes about the players themselves and their attributes rather than the settings you’ve instructed them to carry out.
If we did lose possession in any kind of scenario like this, then you can already see how we have given up the entire central midfield areas. In the screenshot above the opposition doesn’t have a player there so that’s fine for now. But during another passage of play later in the game or against different opposition and formations, this could be problematic. I do have two defensive midfielders but because the wingbacks push right up, my defenders spread to cover the space and the defensive midfielders go forward due to needing to provide the front players the ball.
Some of this can likely be offset by changing player roles and possibly duties but then we’d start to lose some of what I was wanting to create originally. So it becomes a bit of a balancing act and that’s why I prefer central midfielders.
Central Midfielders
Using central midfielders also comes with negatives too. There is more focus on them progressing the ball forward, providing support with runners and then getting back into position to help out in defensive phases too. As the attacking midfield variant is easier to get the players to attack due to the nature of their starting position. But like shown above, that comes with negatives attached to it too.
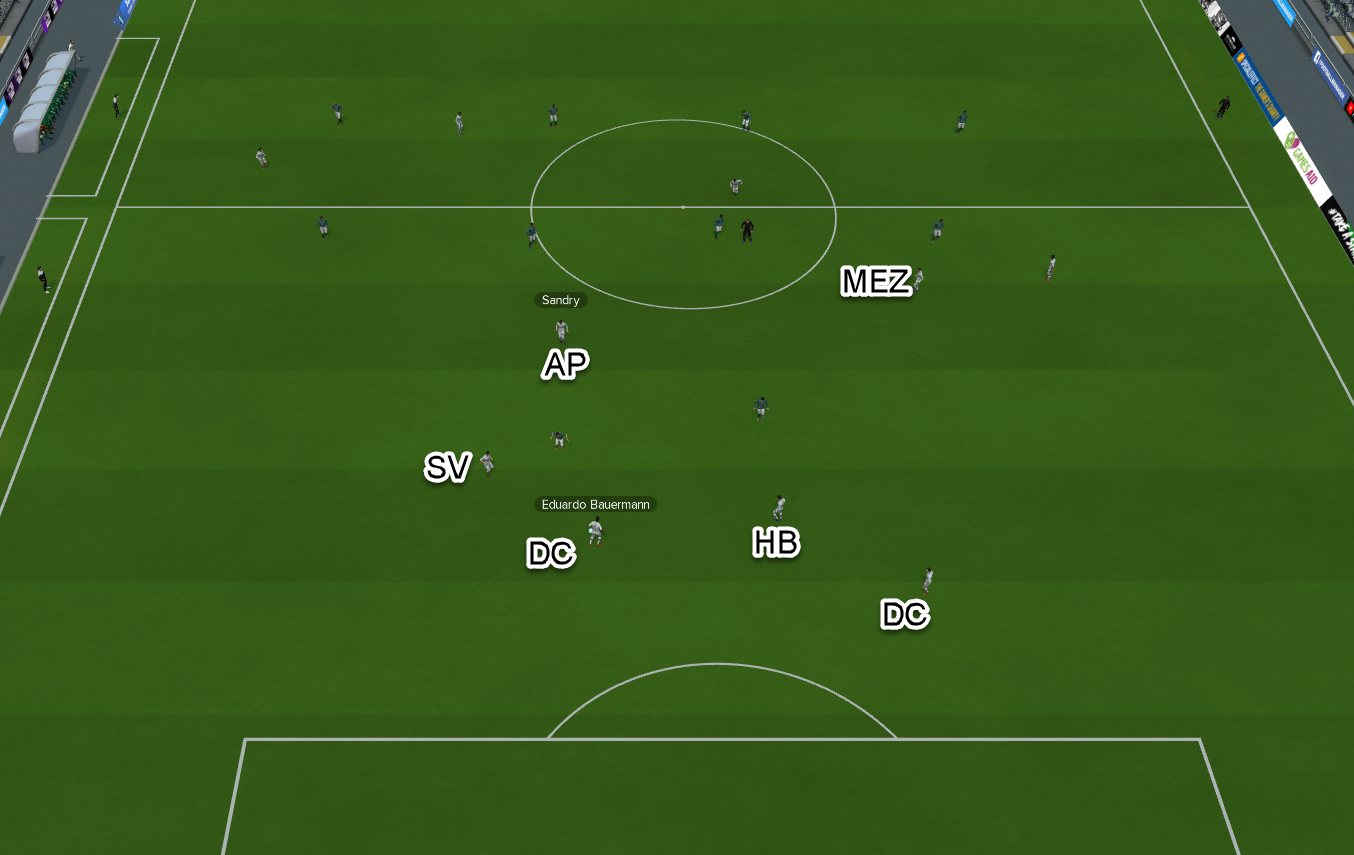
That is me progressing the ball from the back, as you can see we are in a deeper area compared to when we did this in the attacking midfield version. This is because the team is naturally deeper in shape and the defensive midfielders have less ground to cover. What this then means is the two central midfielders are responsible for linking the midfield to the attack and offering support. There’s plenty of space and options ahead of the players to progress the ball.
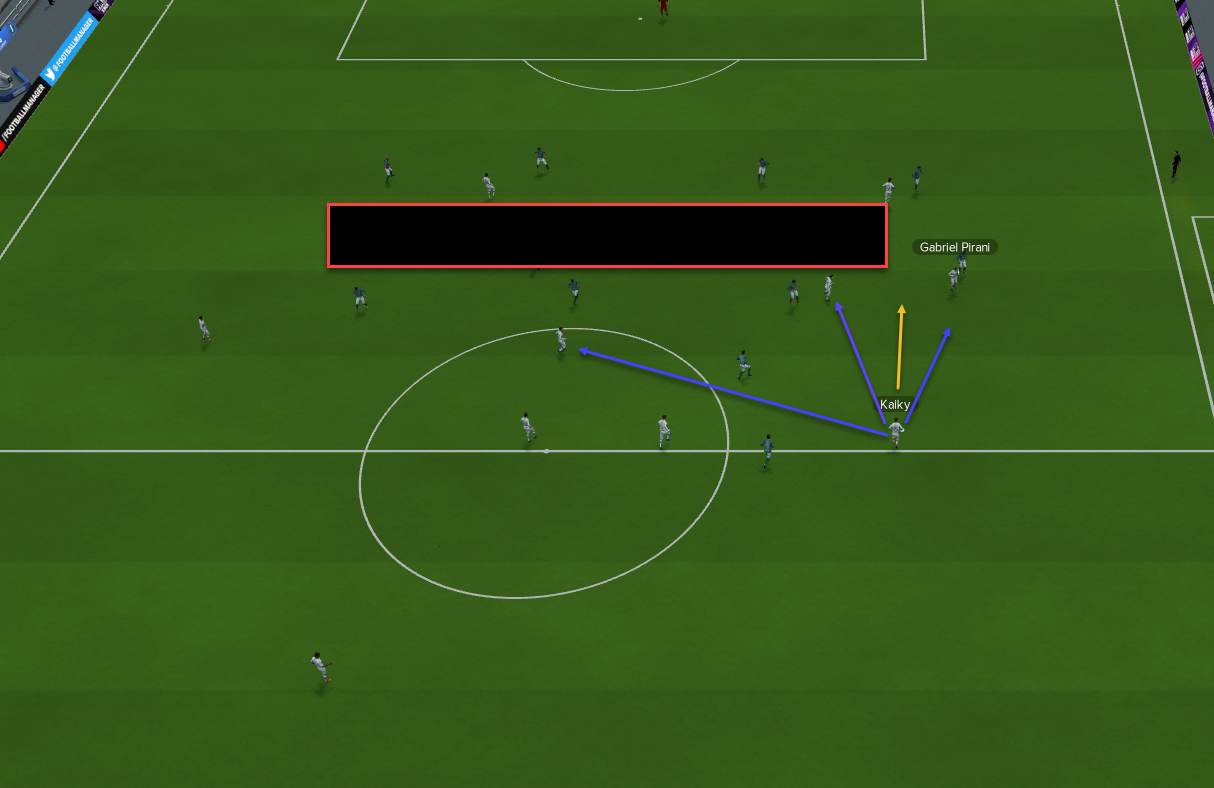
This is still the same move and the centreback has a couple of forward options he can utilise if he wants. The two purple arrows indicate passing options, while the yellow one indicates he has space to carry on his run if he wants. Either option here will force the opposition to react to whatever they do. This in turn will create space, and movement and the opposition will have to readjust their defensive plan.
The black box indicates space we give up compared to the attacking midfielder variant of this tactic. Here I don’t have many players initially due to moving together more as a cohesive unit from much deeper areas. The downside of this is, that if you don’t get the balance correct here with the roles and duties then the opposition will easily defend against this kind of play. You can see the opposition's defensive line isn’t in much trouble at all initially.
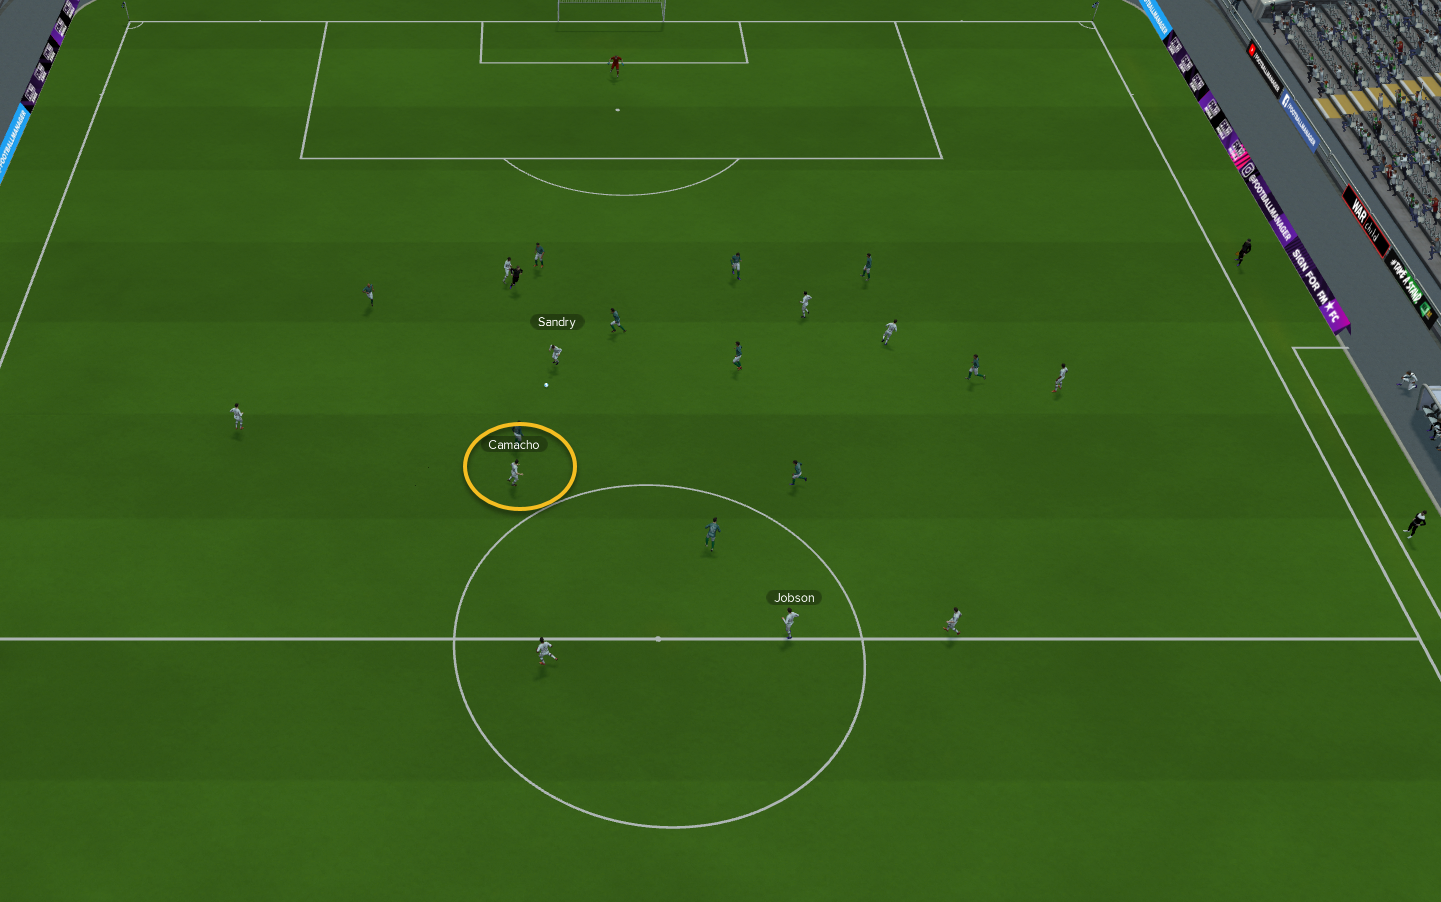
Kaiky was quite smart here as he waited a while with the ball then passed it infield to Camacho, the circled player as he was about to get pressed. Camacho then took a second on the ball and played it to Sandry. Now we can already see the movement we have created here and the solid defensive line of the opposition doesn’t look so solid anymore. Due to us starting in deeper areas, most of the players we have are now making runs in dangerous areas, rather than coming away from the goal.
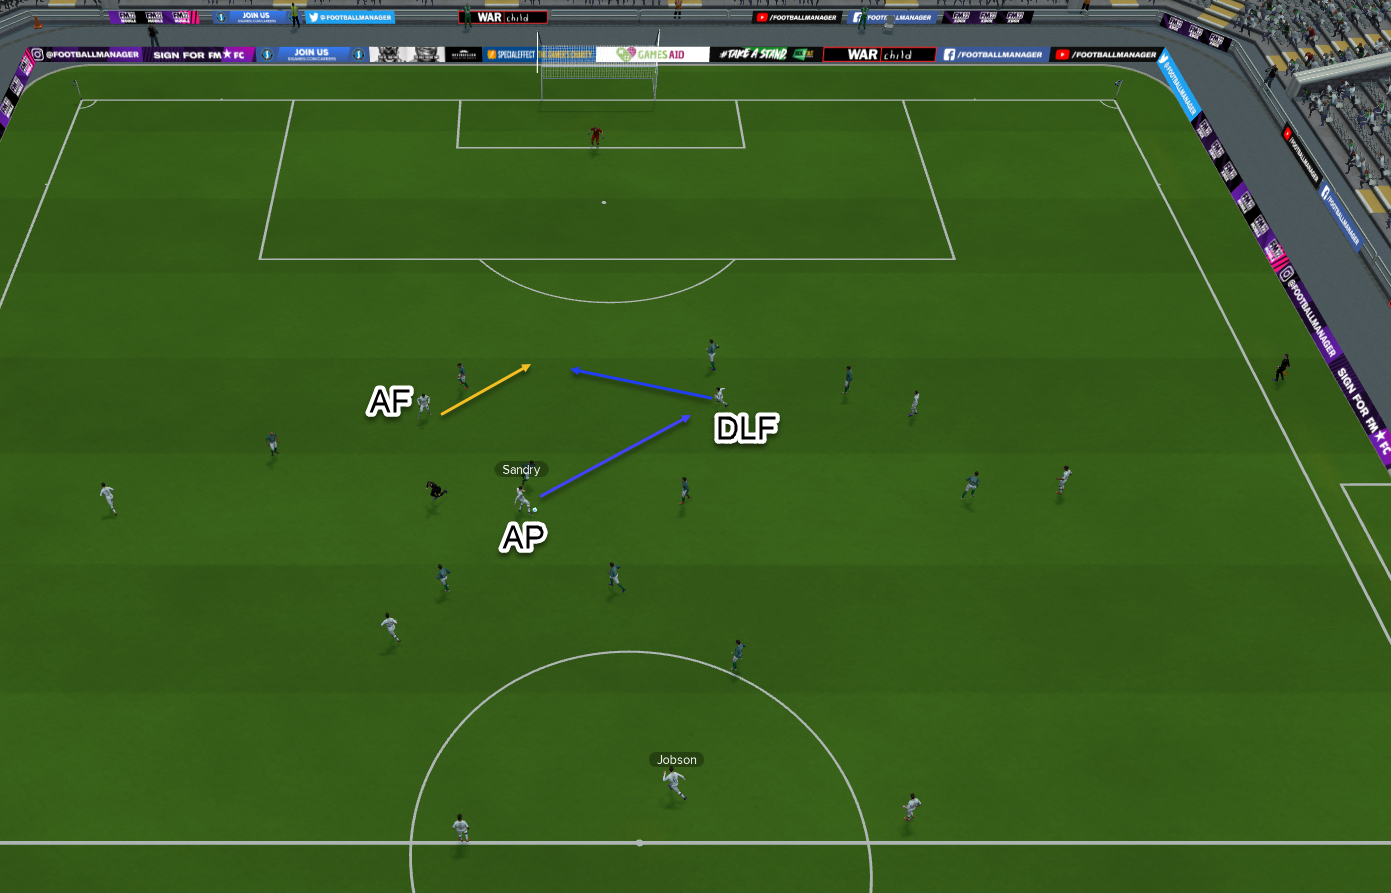
When Sandry receives the ball he quickly turns and is looking for options ahead of him. He sees the deep-lying forward is free so passes the ball to him. He then slides the ball between both defenders for the advanced forward to run onto and score. In the end, we carved them open far too easy but this comes from us using the ball intelligently and having players cause havoc by being runners from deep areas. It’s much easier to create good play from deeper areas more consistently than it is in higher-up areas for me. This is because we are working as a team and not split into two separate bands as I mentioned earlier.
Using the pitch to move the ball quickly means the opposition has to react to this and shift across to cover. This then creates space and players try to cover the threat. Add to this runners from deep and gaps appear like in the above example that we can take advantage of. This is the main reason why I prefer deeper formations initially as I believe you are more dangerous when moving towards the goal when the space is in front of the player and not dropping off the front because the space is further down the pitch.
Training the Eye
When I used to be more active on forums and write more often on my Football Manager websites, I got asked frequently how I identify issues while watching games and how I fix them. Firstly identifying the issues is the most important because if you haven’t or can’t identify issues then you’ll never have an idea of how it might be possible to fix them. People often say they don’t know how to identify issues because of their lack of understanding of the game but in all honesty, you don’t need an understanding really. You just need to watch a game it really is that simple. Hopefully what follows below will show you how simple it can be and doesn’t need to be as daunting as people think it is.
When I am trying to spot issues I keep it very simple and split it into two categories;
- With the ball
- Without the ball
That’s it, nothing more. I don’t even pay attention to what the opposition is doing which is what people seem to get hung upon and confuses the situation. The reasons for not paying attention to the opposition are simple, it will always be different in every match so instead of focusing on an area that is always changing I’d rather focus on my own style and philosophy that I am creating at the club. This then allows me to focus on what my players are or aren’t doing during a game which is a lot more helpful than focusing on the opposition. By also doing it this way it allows me to focus on my team as a unit and see how all the roles, personal instructions, team instructions and the general shape all work together to provide the defensive cover and attacking threat that I need.
The reason for splitting what I am looking at during a match into with and without the ball is because it shows us what’s happening during different phases of the game. Just because you defend solid or cause the opposition a massive threat in the final third, doesn’t mean you have balance and can do both simultaneously. It also makes it a very quick process to identify issues because you have a lot less going on.
Analysing your tactics can be quite tricky and is something I see people get frustrated with regularly. I understand why it’s frustrating and sympathise with those people and hopefully, this will go a long way in helping these people not only spot potential issues but give ideas on possible solutions they could use to fix them too.
I like to keep it simple when analysing games and reviewing my tactics, I don’t overcomplicate things if it isn't necessary. What I mean by this is, don’t analyse too much in one go as this can be daunting or be information overload. If you want to study the opposition or are more comfortable doing it that way then by all means do it. Football Manager is all about doing what is best for you and that differs from person to person. Just because I find it simple this way doesn’t mean someone else will. So try and develop a system that suits you over time and one that simplifies the game for you. Breaking the game down into chunks will make it all so much smoother when trying to analyse things.
So what I did was create a system of some kind to help break things up, so I can analyse them in stages. Some of those stages look like this;
- Friendly games
- Competitive games
- 15 mins
- 30 mins
- 45 mins
- Without the ball
- With the ball
These aren’t all the stages I use but are probably some of the most common splits I use. Depending on what type of save game I am playing or restrictions I’ve added myself to make the game more challenging, I might focus more than the above or at times less.
Friendly Games
I believe the results of these games or the manner they are played in should be taken with a pinch of salt. For me, these are mainly used for fitness for all the players that will be used during the season. It’s important that everyone is in peak physical condition and ready for the season to start.
In terms of actually telling me much about the tactics I’m playing, I don’t really put much stock into anything that’s happening. The reasons for this are players aren’t in peak condition and will likely be nowhere near match fit (especially on new save games). Another point is, the players know the difference between a friendly game and a competitive one. Some players due to personality or hidden attributes might be more dismissive towards a friendly game than a competitive one. Which makes it hard to judge if something is a player, tactical, or personality issue. If you want a more clear picture of how things work then I tend to use competitive matches to get any kind of real feedback or info. I’d never make a change based on what happens in the preseason or a friendly game.
I tend to play 5-7 fixtures like this just to build confidence and morale of the players and give them a good workout in which they can enjoy themselves. For these reasons I also only play weak teams in general as players will build the same fitness regardless of which team I play. So personally, I see no reason to make things hard for my players before the season even gets underway.
Competitive Games
These are the most important games of all, especially if you want to learn if your tactic plays how you thought it would or whether you need to make changes and adapt your initial ideas somewhat.
I like to play three competitive games without changing anything. Even if something isn’t working, I don’t change anything. The reason for this is that when I’m creating a tactic I like to get a feel for it over several games. This way, you can see if something is a one-off or whether you see patterns in each game of things that aren’t working. You don’t want to make knee-jerk reactions and change things without knowing if it's a one-off or not. Friendlies can kind of help with this but I believe competitive games are better because players know the difference between a friendly and a competitive game.
Once the three-game period is up, I then look back over the games. There’s a reason for this. When you watch a game in real-time and when the result matters, you may rush decision-making or don’t think properly. So it’s important for me to take my time and make sure I look over all three games and gather all the information I need, without feeling the result matters.
I know some of you will be sitting thinking that this sounds like too much and fair enough it might be. But then you’re probably the person who doesn’t need the use of this whole series. However, the point is, if you spend time now learning how your system functions and works then you can play at a faster pace once you have that understanding. Putting a bit of effort in now means you’ll be able to make changes on the fly in the future or be in a better place to know what’s gone wrong and why.
15 mins, 30 mins and 45 mins
Splitting the game into time sections when viewing it back can be really useful. By splitting the time up, you can really push your focus. It’s also easier to spot potential issues in shorter spaces of time than in longer ones. My favourite time period is the first 15 minutes of a game, I believe the game is won or lost in this time and that it's very hard to recover from a bad opening.
In this time I will have identified the main issues I’m likely to face. Most of the changes I do are actually done in this period of time, I still change things throughout the game if I feel it's needed but the actual way I’ll set up and play is done in the first fifteen minutes. I feel you can get a great sense of how the game will unfold the rest of the match during this time.
A lot of people like to plan how they’ll play before a game and if that works for them, then fair enough. However, for me, it’s no good doing all the prep for a game before the actual kick-off as all your preparation could be all for nothing as the opposition might not play how you envisaged. Or other factors might play a part. The only way you can tell how you need to play and set up is by viewing the game itself.
For me context is everything and this is why watching the first fifteen minutes are vital. You don’t always have to do this but I do this an awful lot. I guess it comes down to how comfortable you are with what you’ve created and how much you actually understand how it really works. People might think this is time-consuming and it can be, but the way I play isn’t and it’s actually fast. You can play it at any speed you like. At first, doing it at a slow speed might be better until you become more familiar with the method, then increase the speed to a faster one as you start to become more comfortable.
Before you start it’s always worth remembering you don’t need to rush and can take your time with things. You can pause the game and rewind and also use the stats if needs be. Just find a way that suits you and how you play, that’s the most important thing to remember. My ways might not suit others but they might give you a different view or give you ideas for you yourself to use in your own game.
You don’t have to stick to these time periods though, you could use anything that makes sense for you. This is the good thing about analysing, you find what works for you and the way you play. If you wanted to you could analyse the first 15 minutes of the second half, to see if your team talks have helped or not. You could analyse a specific period of time after you make a change to check how it benefited/restricted you and so on. Find something that works for you.
With and Without the Ball
When viewing games and looking for what my players are doing without the ball this includes both defensive and attacking phases. So immediately you can see the positions the players take up when defending as well as seeing how they move off the ball when attacking. I’ve banged on about this for the past 10+ years but the most important aspect of trying to identify these issues is using the pause button. Pause the game at random stages throughout, to see what positions the players have taken up and to enable you to see what is happening around them. Not only that but also use different camera angles to view things as it gives you a much better picture of what’s going on by seeing incidents from a different view.
Focusing on the play when you do have the ball is just as easy as the above but remember you want to look at the positions of the players not on the ball too as everyone who is currently on the ball needs support.
The Set Up
To be able to analyse stuff we need to have the information available at our fingertips. This is likely one of the most important factors, at least for me.
Widgets are probably one of the most important things available to use for relaying what’s going on during a game. How you set these up totally depends on what you are focusing on and why. You should spend some time sorting these out to suit your needs.
The most important widget on the screen above is the opposition formation one. Regardless of how you set up your own widgets, this one is a must-have because it allows you to see any formation changes the opposition makes. This becomes more vital and allows you to quickly react to changes late in games too as the AI will likely go chasing a game or look to defend a lead at some point. So always keep an eye on this one.
The other ones I use are;
- Team ratings for both sides
- Team performances for both sides
- Match stats
These are the only ones I use as they tell me all I need to know. Other people like to use the body language widgets too but I don’t really need that one. But is it a useful one to use because it allows you to see which players are nervous etc.
The widgets I use above allow me to keep an eye on the game’s stats. This means I have a quick overview of how the game might be going and if I’m being aggressive enough or not.
The team ratings let me see who is having a good or bad game. Depending on what type of saved game I am playing or tactic I use, you can then use this information to your advantage. You can target the players having a bad game and try to overload them by either role changes or by using team instructions. There are many different ways you could do this though, that is just one example.
The performance tab lets me see who is having a good or bad game via descriptions rather than the team ratings above. This allows for better judgement when used with the ratings one above. The performance tab updates every four minutes in-game, so will always be changing based on what’s happened.
So spend a few minutes setting this screen up and configuring it, to show you all the information you think you need to know.
Without The Ball
When viewing games and looking for what my players are doing without the ball this includes both defensive and attacking phases. So immediately you can see the positions the players take up when defending as well as seeing how they move off the ball when attacking. I’ve banged on about this for the past 10 years but the most important aspect of trying to identify these issues is using the pause button. Pause the game at random stages throughout, to see what positions the players have taken up and to enable you to see what is happening around them. Not only that but also use different camera angles to view things as it gives you a much better picture of what’s going on by seeing incidents from a different view.
Have Options
I wrote a bit of this next chapter a few years ago but wanted to include it in the book as it discusses the options we have available in-game and talks about Plan A, B, C, D and so on.
A few months back I was reading an article titled ‘No Plan B’ and it was a great read, written by Peter Prickett who I interviewed on this blog recently. In the No Plan B article, Peter raises some good questions and gives examples of managers who are deemed to be classed as having no plan b and shows how they actually do have them. It’s just that we don’t always notice the changes as sometimes they are subtle little changes and other times, it might be a total change of shape which then is more noticeable. To give you a better idea of what I’m talking about, here is a link to his article that I’m talking about;
No Plan B – Always Football
Then a couple of weeks after reading the above article, I was reading something else, an interview with Jürgen Klopp (it can be found here Jurgen Klopp: The talk of a Plan B 'shows a lack of understanding' - Eurosport ) and he was talking about plan b too. This is what he had to say on the matter;
We had two major issues in January obviously: not enough confidence as we should have had in ourselves, and too many injuries plus Sadio [Mane] being away at the Africa Cup of Nations while the games didn’t seem to stop,” Klopp said.
Then in February, we suffered from the intensity of the month before, and we were back in March. We won games again, but then people were saying, ‘it’s not the same football, they are struggling,’ and this again gave the players doubt.
They listen to these voices, the whole club listens to these voices that go ‘oh, it’s again like this, they don’t have Plan B for deep-defending sides, they can only play one way.'
We smashed teams at the start of last season by altering our style in different ways to play to our strengths and minimise the opposition’s like against West Brom at Anfield. We limited their set-piece situations, which we know they are really dangerous from.
The talk of Plan B shows a lack of understanding. In the moment when you are not feeling confident, you cannot change too many things - that’s insecurity.
It’s not about showing what you can do - like ‘hey, here is Plan D, F, Q!’ My job is not to prove that I can do 1000 different techniques or no-looking coaching or whatever, it is to do what is best for the players I have, with our skills, in the situation we are in.
Both of the things above are tied to something I've wanted to do for quite some time now. I’ve wanted to explain my approach to tactics on the Football Manager Series and focus on my Plan A and Plan B and explain how they can be the same thing but I just never had the time until now.
Now if you’re active on the SI forums or on the FM social media side of things you’ll often see people sharing their own plan b’s and the things they tend to do to nullify the opponent's specific threats or to change the course of a game. The majority that I see that do this always tend to have a different shape as a plan b option and tend to change the shape based on expectations for the upcoming match, regardless of whether it's the correct decision or not. It involves a lot of guesswork. I’m not saying these people aren’t right in playing this way, I'm purely talking about my own preferences and play style here. That’s why for me, this blind faith approach doesn’t work.
I like to make any changes based on what I see happening in the game and react accordingly. Now if I made any decisions based on pre-match odds, expectations or current form then how would I know if it's the correct decision for what is happening in the game and how it's unfolding. I possibly can’t, that’s why I do changes as I watch the game unfold. On top of this, I like to create a specific brand of football and while this could work within many different tactical shapes, I don’t see the point of making the game even more complicated than it really has to be. That’s why I always play the same shape, I don’t have a need to have different formations.
This doesn’t mean I don’t adapt on a game-by-game basis because often I do, other times not so much because I feel it doesn’t need it. However some of the changes I make, many of you wouldn’t class them as being a plan b because the changes are minimalistic and very subtle at times. This actually brings it back to real-life football for a second, just because you don’t notice something drastic doesn’t mean that the manager isn’t adapting constantly. It might just be a case of not seeing what he actually did.
Personally speaking, what I do I wouldn’t class as a plan b even though it is. Instead, I call it a match plan or game plan. It equates to the same thing though. So what is a game/match plan?!
Game Strategies
Before I start with my own plan b’s let's have a look at some of the game plans that other people might or could use.
Before a game
A second formation is something people often use when they feel a team will play a certain way based on the pre-match odds, scout's reports and the analyst's reports. Others might just take a stab in the dark and decide they need to change shape based on how they believe the team will play irrespective of what the reports or odds are.
- The use of team instructions is also another popular one, people might add more of them or remove some if they already use various ones. One of the reasons for adding or removing them is to either counter or nullify a possible threat.
- The use of player instructions also ties in with the above and people might want specific players to do something slightly different from normal for the reasons highlighted above.
- Changing player roles seems to be one that I see people talk about frequently. They’ll change the role to get the player to change the way the team usually plays. Again it comes back to trying to take advantage of a possible opposition weakness or to cover the weakness of the user's tactics.
- Match plans are not something I see people talk about but they can be used to create a specific set of rules for certain points or circumstances in a game. You can use them for certain scenarios you anticipate might happen.
- Using different players is one I see from the odd time. Someone might use a slightly more defensive/attacking player for a particular game because of a certain type of danger or to take advantage of a weakness in the opposition's lineup. Player selection can also be used to target certain individuals in the opposing team.
Those are some of the ways people do and can utilise certain tools available, as well as showing a variety of ways to play before a game has even started. Some users even do more than one of the above before games.
During a game
Some of the changes you can make during a game follow a similar pattern to the above.
- Changing the shape during a game is a drastic change. Nonetheless, a lot of users still seem to do this. They change shape to either protect a lead and see out the game or because they are chasing a result. A change of shape can see them be more aggressive or passive.
- You can use team instructions to change the style of play and to either try and win the game, protect a lead or even take advantage of a weakness in the opposition. They can also be used to cover up your own weaknesses.
- If you want something just as effective but less drastic than affecting all your players like team instructions though, you could attempt to use player instructions instead. These allow you to tailor players and select different instructions which are available depending on which role and duty someone has to give you something different that you might currently lack.
- Swapping player roles is also another good one to use as it allows you to make players more or less aggressive depending on what you need. If you want to hang on to that 2-0 lead but your midfield is very aggressive and leaving lots of space to be exploited, then a quick role or even duty change can make all the difference.
- One of the other things people do is make tactical substitutions and swap out those players who might be underperforming, tired or just because you feel someone else might do a better job.
There are other ways to change games too but these seem to be the most common ways that get discussed. None of them is better than the other and they all can be viable options to utilise at some stage. Which, though, tends to be based on the user's playstyle and which fits best with that. Some of the above are what I class as really extreme though, especially changing shape during a game. I understand why people do it but it’s not something I’d ever contemplate doing but that doesn’t mean those who do, are wrong. It just doesn’t suit my own playstyle.
My Own Playstyle and Strategies
So how do I play the game? I don’t micromanage half as much as people believe I do. I’m more of a subtle change kind of game. In reality, my plan A is my plan B, C and everything after. Obviously, if I’m creating a tactic then I take a slightly more hands-on approach until I believe it’s balanced enough and offers me the style of play I was aiming for. After that point, it’s all about keeping it as simple as possible in order to fly through the seasons in the quickest possible time.
What this means for me is that, if I make changes it’s purely based on what my own players are or aren’t doing. I totally ignore the opposition and just focus on my own side, some might think this is strange because AI is a big part of the game and they’d be correct. However, you don’t always have to set out to play the perfect game and adapt constantly for the AI. You can make subtle changes to achieve this and you don’t always need to be drastic. Also by focusing on your own side, you can stick to the style or brand of football you are creating without constantly trying to adapt and match the opposition.
This allows me to stick to my own game plan. Giving up space to the opposition is fine, in fact, giving up space, in general, doesn’t have to be a bad thing as long as your side is doing everything you want them to do. This is what I focus on. If my sides do what I want and expect of them, then in 90% of situations I will get a result. Let’s break it down and give a few examples of how I adapt in-game for certain situations.
Before I play I never change anything. I stick with whatever my base formation is and choose the best starting eleven I can field. This means I don’t look at the match odds, I don’t pay much attention to the scouts or analyst reports and. There is no adding or removing of team instructions, or player instructions and I don’t even change player roles.
In-game changes
During a game, I don’t tend to tweak much truth. I try my best to stick to the things my team does well, even if I go behind in a game. If I go behind in a game then the context and the manner in which I am currently playing is the most important thing. Even if I go 2-0 down, the context of why is everything. You can be playing extremely well and go behind due to bad luck, or just for the fact, the opposition made a great move. It happens and at times no matter how well you are playing, you have to accept you’ll concede goals against the run of play.
If a game isn’t going well though or I am chasing a result then I do have a hierarchy of sorts that I try to follow;
- Substitutions.
- Player instructions.
- Role change
- Mentality change
- Team Instructions.
That’s the order I tend to follow. If I get to 3, 4 or 5 on the list then shit has really hit the fan. I’ve not used any of those in any of my saves so far for quite some time though. I tend to stick to the first two mainly as it’s simpler for the style and the way I play the game.
Substitutions
90% of the changes I do in games are based on substitutions. For me, this is my playstyle and allows me to influence or change games by doing substitutions. The way I squad build and develop players allows me to use this as a tool because I don’t buy/develop players who play the same position and are similar to what I already have. What I like to do is either find or develop players who will play the role differently from what the others who I have in the squad play.
Rather than getting hung up about someone not having role suitability or that the attributes determine a player can’t play a role, I focus on the opposite. Football Manager isn’t restricted just because someone can’t play a role based on the suitability on their profile screen. Any player can play anywhere, you’ll just find his decision-making may take a hit and it’s not up to the standard of someone more familiar with the role. However, that doesn’t mean he can’t play it and cannot be successful or good at it. If someone has the attributes to play a role he doesn’t have listed in his profile, still play him there. It’s the attributes that make up the skill set of a player so he will be fine.
If we take the striker as an example and for argument's sake say he is a creative (creative as in player attributes) advanced forward. I will build a squad in a way that allows me to also have two other types of players who can play as my advanced forward too and each one of them brings a different skill set. The other two players I utilise in that role could be, one of them offers me a more physical presence and is more akin to a target man above all else. He’s like a battering ram. The other one is your more stereotypical advanced forward. Each one will play the role vastly different and give you a new take on the role.
Now if I was chasing a result and needed to change things around and I knew the advanced forward position wasn’t doing what I wanted, I’d make a change. The player I brought on though would depend on what I felt was the right move. If the creative player was being bullied then obviously I’d bring on the target man type of player so he didn’t get bullied as much and could hold his own. But if I felt I just needed a simpler method and nothing too fancy and flash, in other words, nothing too specific then I’d revert to the good old-fashioned type of advanced forward instead.
That’s just one example and I don’t restrict myself, it could be any player I changed really. It all depends on the context of the game and which players I felt were struggling to do what I expected. This is why I build to bring in and develop different kinds of players, so I can have a lot of variety on the side with players I can bring on in any position and they’ll offer me a different take on that role.
Another example might be that of my defensive midfielders. I have the usual type of player for the role but I also have a very creative player who lacks the usual defensive skills for the role. But more than makes up for it with his creativity. I tend to bring him on if I feel my defensive midfield is doing okay but getting caught in possession time and time again and slowing our play down. I might also use him if I feel that the defensive midfielder is struggling for time on the ball. I’d sacrifice the defensive side of things for someone who can distribute the ball better and might be a calmer head under pressure while having the ball at his feet.
Now I could simply do a role change but that would usually impact how my tactic functions and would have massive knock-on effects elsewhere. So changes like that are usually the last resort and why do I change the player instead. It’s all about finding what works and fits in the way you play the game to simplify things for yourself.
If you were watching me play the game and I made a substitution you’d likely just think I was changing a player and don’t realise it would be a tactical tool that I was using. And switching things up to get a different outlook. It would be very subtle but in most cases, would make a huge change to how the role was functioning before.
That’s my number one method. For my second way we look at;
Player instructions
There is nothing fancy or complicated here but rather than impact the entire team and use team instructions, I might focus on an individual from time to time if I see them doing things I don’t like. An example would be if my midfielder was getting pressed heavily and didn’t really have time on the ball but he had short passing. I might decide that going more direct might help him better and release him from the pressure he is currently under. So depending on the situation or scenario, this would impact what I change.
This isn’t something I do frequently though and in my current save is something I’ve only done four times in six seasons.Nonetheless, it’s still an option.
Role/Duty changes
Now we are treading squeaky bum territory and things are starting to go very wrong. Things aren’t that bad yet but they’re well on the way to being disastrous at this point. So if my usual methods highlighted above had not worked then I’d look at changing player roles to give me whatever I was currently lacking but this has drawbacks too. In most cases, my tactics are set up to play a specific way and what might seem like a simple role change would mean somewhere else, another role was likely to be changed.
An example would be if my roaming playmaker was having a rough time and he usually is the one supplying the ball from midfield to the front players. Not necessarily being a creator as such but more that he was the link and the one bridging the gap from midfield to attack. If I changed his role to let's say, a central midfielder on a support duty then the whole dynamic of what the player offers the team changes. It’s clear that what usually works wasn’t either and a change has to be made so now he’s a CM support.
What I then have to look at is how does this impact the forward players? If they struggled to get a ball from the roaming playmaker but were seeing it the odd time, how are they now going to get the ball from the CM support? He’ll not link in the same way, which was one of the reasons I initially changed him from an RPM. But exactly how does the CM fit into the current play and now where does the supply come from, to the front players. I need to identify this and see if it’s going to be a major issue and then begin addressing it.
My options would be seeing if any of the other midfielders could possibly supply them the ball and if they can, how does this impact how we usually play and how do we make it work. Another option may be asking a striker to come deeper for the ball but then again I have to ask who is then scoring the goals? Sure, a deep striker can score goals but now the way we attack has totally changed which will impact how we score.
While you can make this work, for me, this is one of the most complicated changes I’d make. It’s probably one of the most drastic things to do that is on my list. But it’s not at the bottom of the list for one very simple reason, sometimes, just a simple duty change can be enough. You can make the player more/less aggressive with a quick duty change.
To give you a quick example, if we go back to the striker coming deep. Let’s say we started out that way and I felt the defensive unit of the oppositions were having an easy time because my striker was dropping off, so they didn’t really have any defensive duties to do. I’d maybe give the striker an attack duty if possible and instantly he would be higher up the pitch and suddenly the opposition's defenders would now be occupied.
A duty change is a lot more subtle than a full role change and in most cases has less drastic consequences elsewhere because the role is still essentially the same, it’ll just be starting higher up the pitch or lower down depending on the duty.
Mentality
Changing mentality is relatively simple and you can change the way you are playing in an instant. However, you need to remember that it changes it for everyone on the side and will impact your defensive line and tempo as well. The higher the mentality the more risks you’ll take and the lower the mentality the fewer risks you’ll take. But this is far down my list due to me normally creating a specific style of play and changing mentality would change everything on the side yet again and mean I’ve possibly strayed away from my style. Now I know what you’re thinking, stop being a stubborn prick and change if it's needed and you’d be correct. However, I am trying to keep things simple and change as little as possible. So this doesn’t really fit that due to how it changes every player's behaviour as we spoke about at the very start of the book.
Team instructions
Team instructions are a great tool to use but again this falls in line with the above, I’m not keen on using things that change the entire team's behaviour unless I really have to. This for me is the last option I’d use and is my ‘out of ideas’ approach. Now I understand how the team instructions work and I understand what they actually change under the hood but for me, it’s still a farce using them. I’ve normally got team instructions selected more than likely anyway based on the style I was creating. Adding more or removing them would take me away from that style or add another layer of complexity to things which I can do without.
So this is how I approach games and think and view the game. It’s probably a lot less micromanaging during games than you were expecting though right? I guess that stems from the guides I normally do but you have to remember, those are normally targeting those who struggle with certain aspects, want to learn more about how the game works or discuss certain footballing philosophies and concepts. So they go into more details than your usual stuff.
Don't Panic
This is something else I wrote about a bit back too but want to include it because it’s so relevant to everything we do. It focuses on if we really understand the context of what is happening and if we need to panic and throw our game plan out of the window the instant something goes wrong or not. Now the example uses a different formation and side but the point still remains the same. All of these tools will help us when analysing our tactics.
The context in Football Manager is everything and sometimes we don’t realise this, for example, you could go two goals up and think you are playing well. Or you could go two nil down and think you are playing poor but like everything else, it isn’t that black and white. It is quite possible to lose by playing well and winning while playing poorly. There can be hundreds of reasons why the scoreline is what it is, so we need to understand how we are playing in order to know what changes we need to make and why. How well do you understand exactly what’s happening in your own games?
I recently played a game in the League Cup, I am League One Sheffield United and I was playing The Premier League’s Swansea City. Now if I didn’t understand what was happening in this game I could have panicked and made changes just for the sake of it. I see a lot of users panic when they score or go a goal behind and instantly make changes, this can be a bad idea sometimes if you don’t understand why it happened. If you’re playing well and go behind then why would you really make a change instantly? Surely if you're playing well then you have just been unlucky? No amount of tactical instruction we set can control player mistakes; these will happen regardless. At least that’s how I see it.
Let me show you an example of what I’m talking about based on a game I played recently against Swansea. To give you a bit of background about the game, I was on the away side and with thirty minutes of the game left, I am trailing 3-0. These were the formations both sides used;
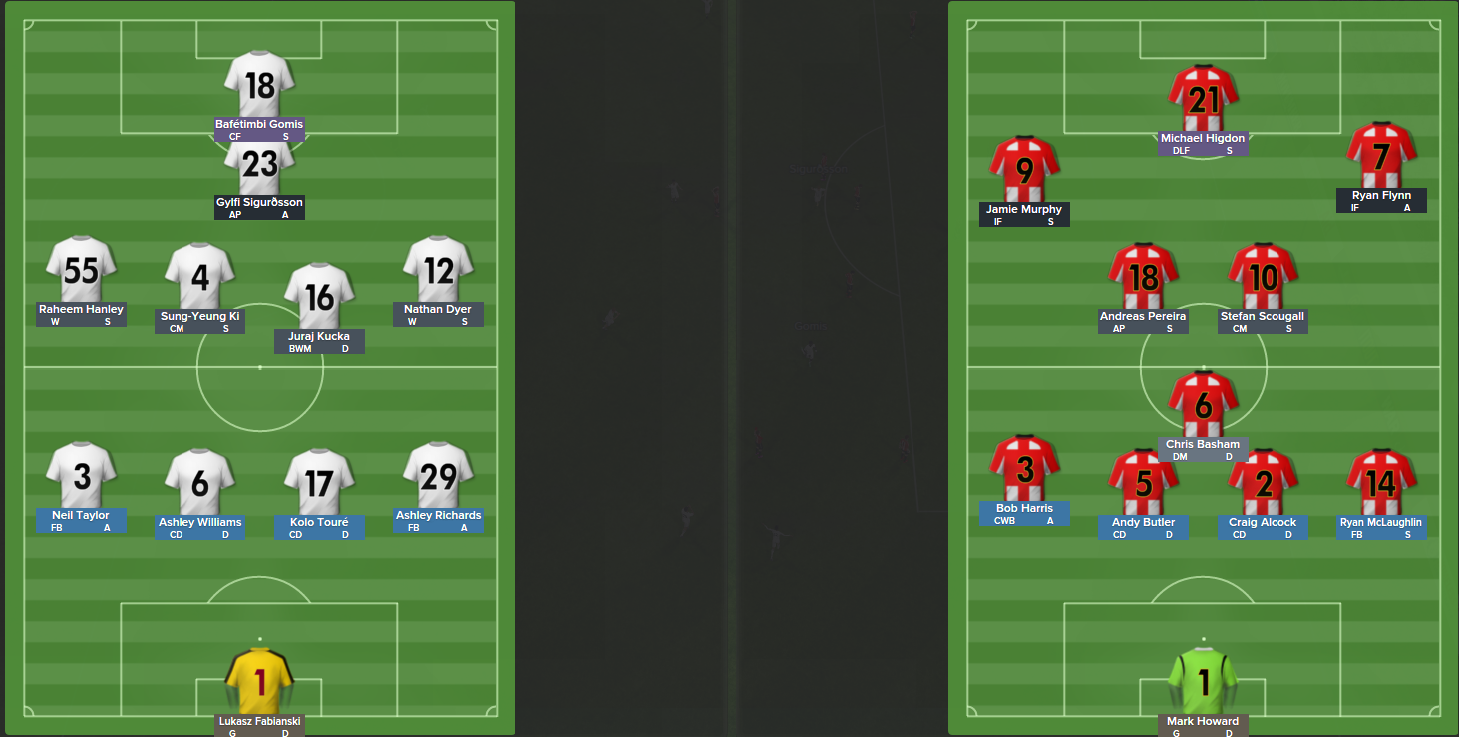
These were the stats for the first half in terms of shots both sides had;

As you can see in terms of shots it was pretty even on the face of it. I actually went into halftime two nil down though. The first goal Swansea scored came from a fantastic ball from one of their players out wide and then as a result of a cross that my keeper didn’t deal with they scored a really easy goal. I put this down to a goalkeeping mistake as I expected the keeper to deal with the cross much better than he did. I can’t show you the video of it just yet as it’ll give the scoreline away but I’ll link it at the end. The second goal was a good bit of skill from their striker although he hit his shot from 20+ yards out so I’d expect my keeper to save these kinds of shots more often than not. So again I’ll put this down to a mistake or being unlucky.
So even though I was two nil down I didn’t feel the goals I conceded should have happened in the first place so we can count ourselves as being unlucky with the scoreline. But what about how I was playing? Well, I didn’t think I was playing that bad, we had our own chances of scoring during the first half and my side generally defended well considering the gap between League One and Premier League standard players. I’d have liked to have a couple more shots on target but it wasn’t a big deal as I felt I was both creating enough and that the goals would eventually come.
When halftime approached I had a choice to make, do I stick or do I twist? Well, considering I was playing well (in my mind by watching the match and not just judging by the stats, as they can be very misleading when looking at them in isolation) and I felt the goals would come I decided to do nothing. Other managers would maybe change things around here as they are losing two nil and need to score. But if you feel you have played well and not been outclassed then why change? Yeah I get that you might think you need to go more aggressive due to chasing the game but I don’t see the point of changing anything based on what I considered to be two bits of poor play from my keeper, that’s all that really separates us. If my strikers were better I could have easily gone into this half two nil up myself I felt. I don’t like to panic, if I make a change it’s because I want something that the current tactic/settings don’t currently offer but I truly believed I’d been on the better side and was more than still in this game.
With all that in mind, no changes were made and I continued into the second half.
The second half went much the way the first half did but I didn’t create that much going forward and neither did Swansea. Then around the sixty minutes mark, Swansea scored their third goal of the game and I was three nil down. This was really their first effort at goal in the second half. Now I had a choice to make: do I still stick or do I twist? I still hold my nerve and do not panic and keep things the way they are, I have the long game in mind here and don’t want to rush. This might sound strange to a lot of you but I still believe I can win the game in the latter stages when tiredness is an issue. So I kept things the same for the next ten minutes. With twenty minutes left to go, however, I definitely twisted as I need to score four goals to go through, it seems unlikely, doesn’t it? Well no, I feel I’ve been on the better side and created better chances. Swansea is also tired now but my side seems to have conserved their energy throughout the game a lot better. With this in mind, I decide I can move from the counter-attacking strategy to a more attacking one now as the players still have the energy for it but Swansea are looking tired and have quite a few players with the low condition compared to my own. So I thought I’d exploit this fact and went attacking.
In seventy-five minutes I scored a really well-worked team goal that split open Swansea’s defence and we took the chance well. Ten minutes later I scored the second goal that put me back in the game with five minutes left. Two minutes later, from the result of a corner, we scored the third goal and it's not 3-3!!! We are in dreamland the comeback is complete and it looks like it's heading to extra time with three minutes remaining of the game.
By this point, Swansea is rattled and looks lost and tired, in the last ten minutes or so they’ve been penned in their own half and the odd times they have ventured forward they have offered little threat due to their players being tired. With one minute left of normal time the unthinkable happens, I score a FOURTH GOAL! I now lead the game. I was losing three nil, 4-3. More or less straight from the kick-off Swansea goes up the other end and equalises, what a game this has been so far. It’s weird because twenty minutes ago I’d have taken this result all day long but now I’m a bit disappointed after going 4-3 up. The full-time whistle blows and it finishes 4-4 in normal time, which means another half hour of extra time to be played.
The second-half shot stats looked like this;

I had seven shots and scored four goals, that’s not a bad return at all. I mentioned during the first half that I felt I played well and the goals would come. I feel the second half we played a lot better and became more clinical in front of goal.
After the excitement of the first ninety minutes, extra time was quite dull as both sides were really tired and offered nothing going forward really.

As it finished 4-4 after extra time with no further goals it went to penalties and I actually lost them lol. After all the drama that the game brought I lost on penalties! Ah well at least we showed character and there isn’t anything you can really do to influence penalties it's just the luck of the draw on the day. These were the full stats from the game;
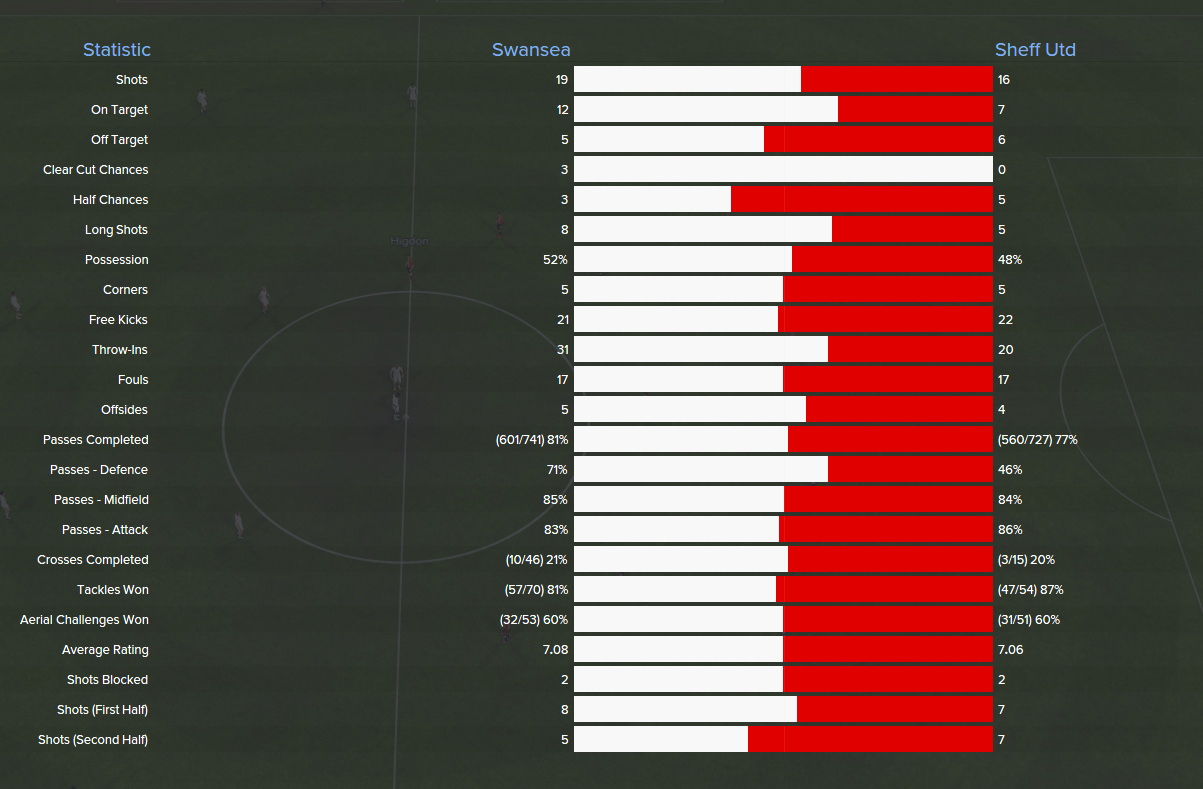
These are all the goals from the game
The first Swansea goal 1-0; http://youtu.be/-2L2wzrTrD0
The second Swansea goal 2-0; http://youtu.be/9iKDY6m1eVM
Swansea’s third goal 3-0; http://youtu.be/04lRS5NvNCI
Blades first goal 3-1; http://youtu.be/pa0mGHq3IEY
Blades second goal 3-2; http://youtu.be/7-TCH27gQs8
Equaliser 3-3! http://youtu.be/yhjhATLB6c0
The Blades's fourth goal was 3-4; http://youtu.be/DcnCDFeEZ1s
Swansea equalise 4-4; http://youtu.be/5cBF3TWgVms
So what’s the point of this article? I guess if there was one it's that you should understand how the game is going and not take the stats or scoreline at face value, context is everything. If you know you are playing well and have just been unlucky then I see little point in changing things around to chase something that you don’t need to chase. I’m not saying everyone should do that but this works for me and how I play. Also if you are to make changes then make sure to either change something or take advantage of a situation. Some people might have panicked at halftime and made drastic changes and they could have gotten a better result than me, but they could have also gotten a worse one. Timing and understanding are everything in a game like Football Manager, they are the fine margins between winning and losing. Sometimes we can be too quick to change things or sometimes we can be too late to change things.
What we should do is view how the game is going and then come up with a plan. My plan was simple, stick to what I know works and don’t panic. Then with twenty minutes to go all out for it after I knew Swansea would tire and have players in low condition. On another day I might decide to go that little bit earlier to win the game with the changes I make. But whatever I decide I’d have a clear plan throughout the game of when I’d make changes based on how the game was going. I’m not saying the changes will always work and they could backfire but I find that I can often claw back results like this.
The Next Steps
Once I’ve created a system and covered all the basics then it's time to dive straight in with the analysis to see if the formation will work long-term or not. This is where we put all the information I spoke about before into practice, this will help us make it easier to spot potential issues. Fixing them might be more difficult but before we get ahead of ourselves, it’s best to learn to identify the issues first.
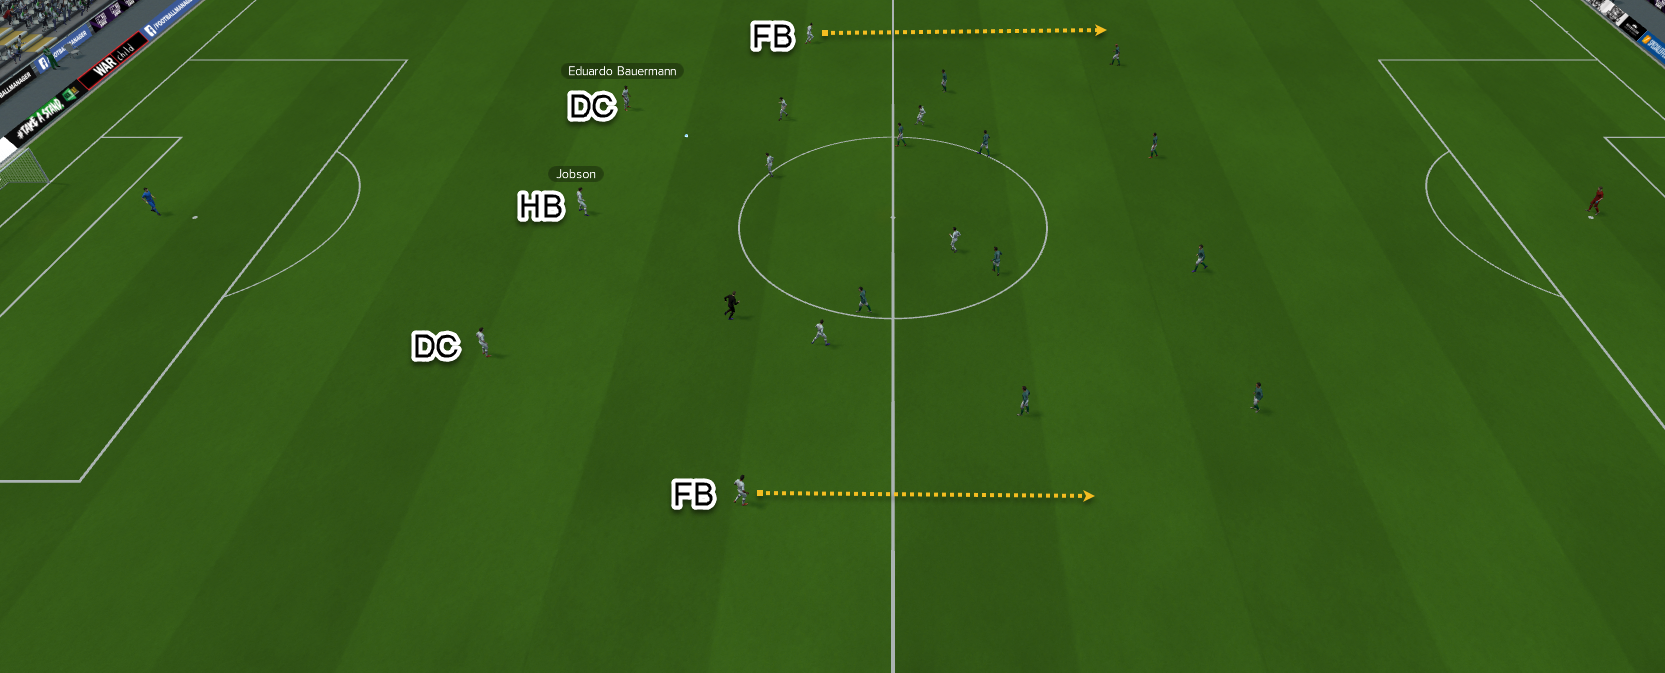
This is taken from the start of the match and we can already get an idea of how the roles will interact with each other. The halfback has dropped deep between both the defenders to form a back three, allowing the full-backs to push on and provide us with much-needed width. A few seconds later and things look slightly different.
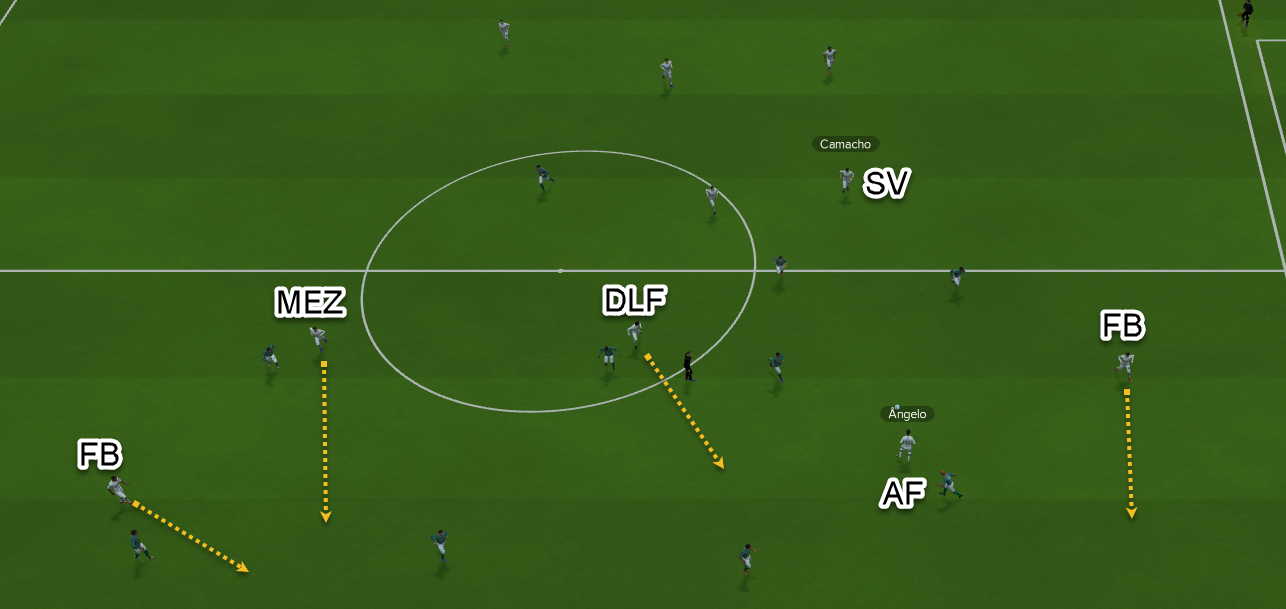
Remember earlier when I said to use different camera angles? This is what I’ve done here, I’m forever switching them around when I’m looking to see if something works or not. As you can perhaps see stuff that you might miss from a different camera angle.
The Segundo Volante passed the ball to the attacking forward and bypassed the entire opposition midfield. I also have very deep runners now offering support in the mezzala and the deep-lying forward, while the full-backs are providing width but also being aggressive in their runs. A few seconds later the move fizzles out and the fullback passes the ball back to the defenders when he receives it. However, the build-up of this move initially is really good and shows that the roles are doing exactly what I want to do.
It’s really important I don’t get too carried away though as this is still the first 45 seconds of the game but it's a really promising start. I’m going to carry on watching and observing what happens in the next 15 minutes because this is the most vital time for me. You can normally see enough here to have a rough idea of how the game is going and if you need to make changes or adapt. Regardless of what I see happen though, I won’t be making changes in this game unless I really have to. The reason for this is I need to see how the tactic plays out with all the settings, roles and duties I’ve used. I’ll likely do this for the two games after too, this is so I can get a proper idea of what is and isn’t working. Three games are optimal for this in my opinion as by then you’ll be able to notice certain behaviours good and bad and then make the right decision on what action to take.
Making notes is something I’d highly encourage people to do, especially if the tactical side of the game is something you struggle with. This will allow you to refer to the notes from time to time when you see something happening, so you can track tactical trends and even potential issues. You can do this via the notes inside the game feature or the old-fashioned pen/pencil and paper as this will mean you don’t forget something important happened. As it's still early in the game and not that important, I’ll just make a mental note here instead.
Now, this is an easy game on paper and according to the stats, I am the favourite to win the match. So this can easily become a problematic game if I don’t create space and movement. One of the main reasons we find it more difficult against these types of teams is because they don’t give space away too easily in the final third. Space is the key to everything, if a player has space then he also has time which allows him to take his time and pick out runners. Against a side that defends deep and is quite compact, it’ll be really hard to play through balls, balls over the top crosses and so on into the box as there will be no real space for the player to gain that half of yard they need. So you need to think of different ways to break them down when the above isn’t working.
A lot of people like to go more attacking when sides sit deep but for me, this only makes the issue even worse because you are making the little space you do have even more compact. That’s not to say it doesn’t work for some but for me, it’s not really something I would do. The way I see it is if you push players further up the field space is reduced and it's less likely you’ll have anyone making any runs that will really stretch or hurt the opposition due to their compactness. I spoke about mentality in great detail earlier in the book so I don’t want to go over that again but it is really relevant to this piece. The higher up the pitch you are the more likely you might have to create space and movement in deeper areas to be really effective. That’s not saying you can’t create space or movement higher up the pitch, it’s just a lot harder to do if the space doesn’t actually exist behind the player.
So how do we create effective space and movement? Well that’s the million-dollar question, isn’t it? So here is a prime example of what I’m talking about.
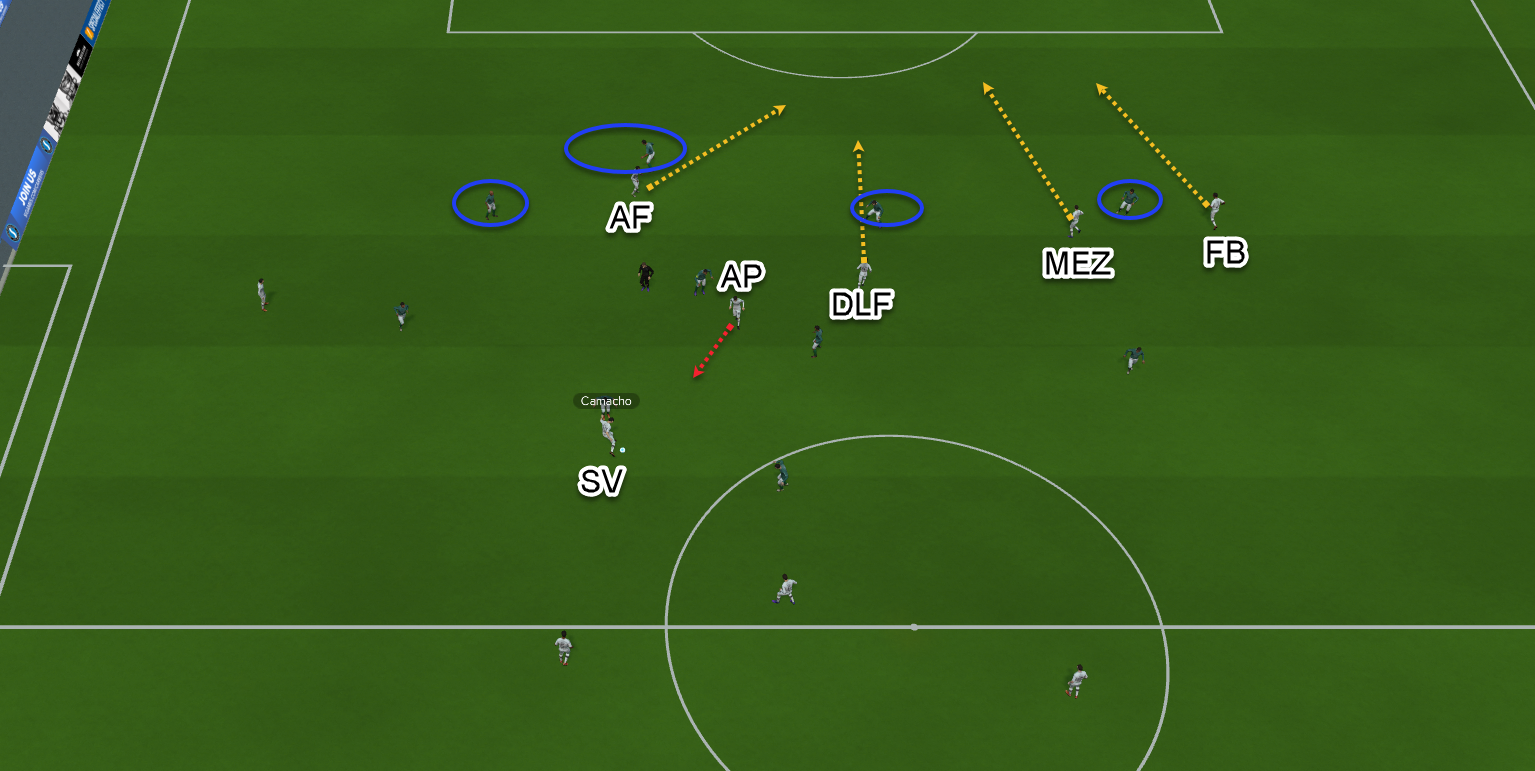
This side was more than happy to defend deep which means all the space I have to work with exists in front of the defence and I’ll struggle to get in behind them. I was playing with the balanced mentality I spoke about here in this game but if I’d been more attack-minded and had players in the positions higher up the pitch it would become even more congested or pushed my own players closer to the opposition. For what I’m trying to create this would have been a bad thing.
If I pushed players higher up this might give the opposition a bit of defending to do and needs them to keep their concentration but for me that’s no way to play, hoping the opposition makes a mistake or has a lapse in concentration. It also means where would my late runners be arriving from or where would I get movement from in general that could hurt the opposition if I was higher? I know I’m banging on about this but for the way I play, it really is important I hammer this point home because everything I do and the reasons why stems from the mentality I spoke of earlier in the book. I’m simplifying the game for myself.
Plus we are ignoring one major significant fact here, you’d also leave yourself vulnerable to counterattacks. Ever seen a post by someone claiming they dominate the game with like 20+ shots and fail to win because the AI has 3 shots and scores 2 from them? It’s because they get hit on the counter. I don’t like to play this way and like to use space that I have to create movement and get runners from deep involved and also minimise the risk of being hit on the counter.
Anyway, back to the screenshot. This is still minutes into the game, around 3 minutes. We can see that my side is causing the opposition's defensive line all kinds of nightmares with the running from deep. We are overwhelming them and forcing them to make decisions but no matter the choice they make, it’ll be the wrong one. This is what I like to call organised chaos. With all the men I’m committing forward from deep areas it’s running the opposition ragged and they’re losing defensive shape.
On the right-hand side, I have the Mez going between the centre-back and fullback, while my own fullback is making a run on the outside too. Now, this is brilliant because I also have the deep-lying forward making a run too. This means that the centre-back either has to follow his run or drop off and cover the mezzala. Either way, whatever happens here I have the advantage and the spare man. That’s without even mentioning my advanced forward who had already got the better of the other central defender.
Centrally I have one player dropping off the front to act as a passing option/link-up player, with the advanced playmaker. That’s made one of the opposition's midfielders follow him and another one is caught ball watching. Not only is the opposition being run ragged but some of them are ball watching too. The Segundo Volante plays the ball across the field right between the fullback and central defender for my own fullback, to run onto. When he receives the ball he passes it across the goal and the deep-lying forward taps the ball into the goal to make it 1-0.
It’s still early in the game but I’ve seen variations of this move happen several times now in the opening minutes. This tells me that this trend can be very dangerous when attacking which is a positive because it is happening frequently. This was one of the main reasons for using a less aggressive mentality coupled with the central midfielders instead of attacking ones too. So far in this game these have been justified and show my thought process works in practice too and isn’t just theory.
As you can see from the above the important aspects of breaking a side down/creating chances for me are;
- Space
- Movement
- Width
Don’t overcrowd areas of the pitch that can work in your favour by being less aggressive.
Obviously, the roles you select will play a major part in this but if you can create and use space then you’ll force the opposition into making decisions. Which in turn will mean people have to leave their position to deal with the threats you pose. Movement is important because it snowballs and causes a chain reaction of events plus it's harder to mark someone who is moving (especially from deep) compared to someone who is static or too advanced to really do anything.
By using a balanced mentality it alters my tempo, defensive line and closing down to match meaning I can be more patient in my build-up. And from what you can see above it works due to the movement and space both in creating and using it. To achieve width you can either change the roles/duties of the players or use the exploit the flank shouts. But you can see that for a narrow formation I have quite a bit of width with the full-backs, they’re an integral part of the system and must provide this above anything else.
It sounds really simple and basic but honestly, this is how I approach such games. Some of you might have been expecting something really extreme but this is how I play, I like to keep it simple and not overthink things because then you get lost and end up focusing on what the opposition is doing. Instead, I focus on the things my own side does and try to make the best of that. This way I feel like I’m always in control regardless of how limited my squad might actually be or how strong.
When you are looking at the roles or picking ones you’ll use in a tactic make sure you know what settings they have, as that way you’ll know the things they should and shouldn’t be doing You also need to try and envisage how they all work together too to give you the brand of football you’re creating or to better understand why something works/doesn’t work the way you want.
While I might not pay attention to what the opposition does when in possession, I still want to know if my players are doing what they’re supposed to be doing too. The first 15 minutes of the game isn’t just me patting myself on the back for good attacking play, I’m also looking at what we do when not in possession of the ball.
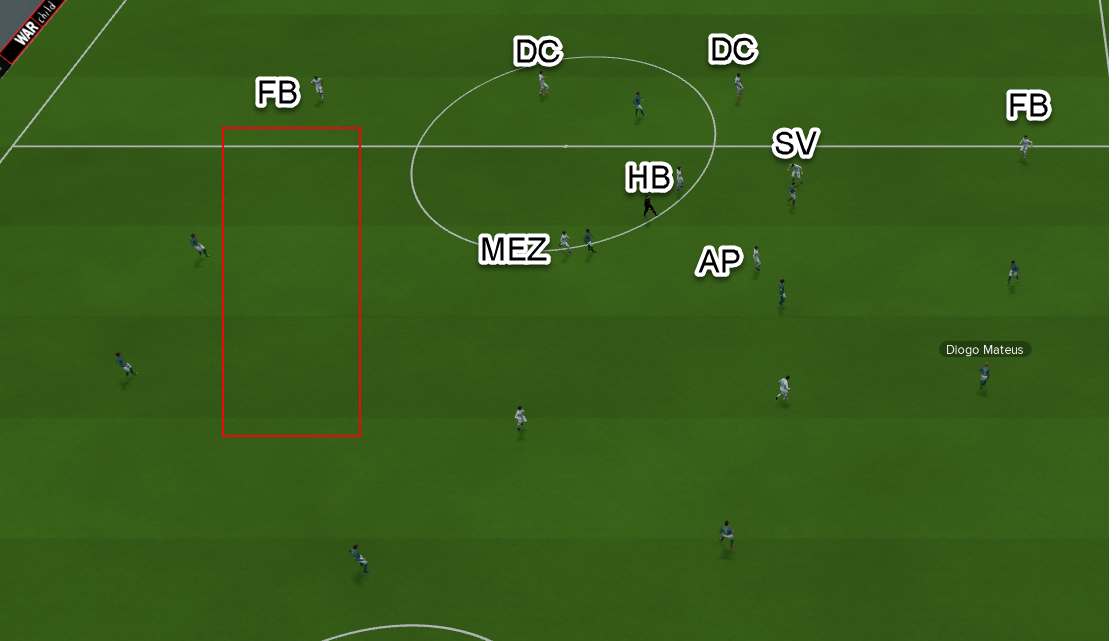
Initially, positionally we look fine here and have players covering the important areas and there looks like little danger from the opposition. However, where the red box is, is very problematic. If the opposition is intelligent here then a quick switch of play to that side of the pitch instantly puts me on the back foot and causes massive issues. I seem quite exposed here if that should happen. This is something I need to make a note of and to make sure it isn’t happening regularly.
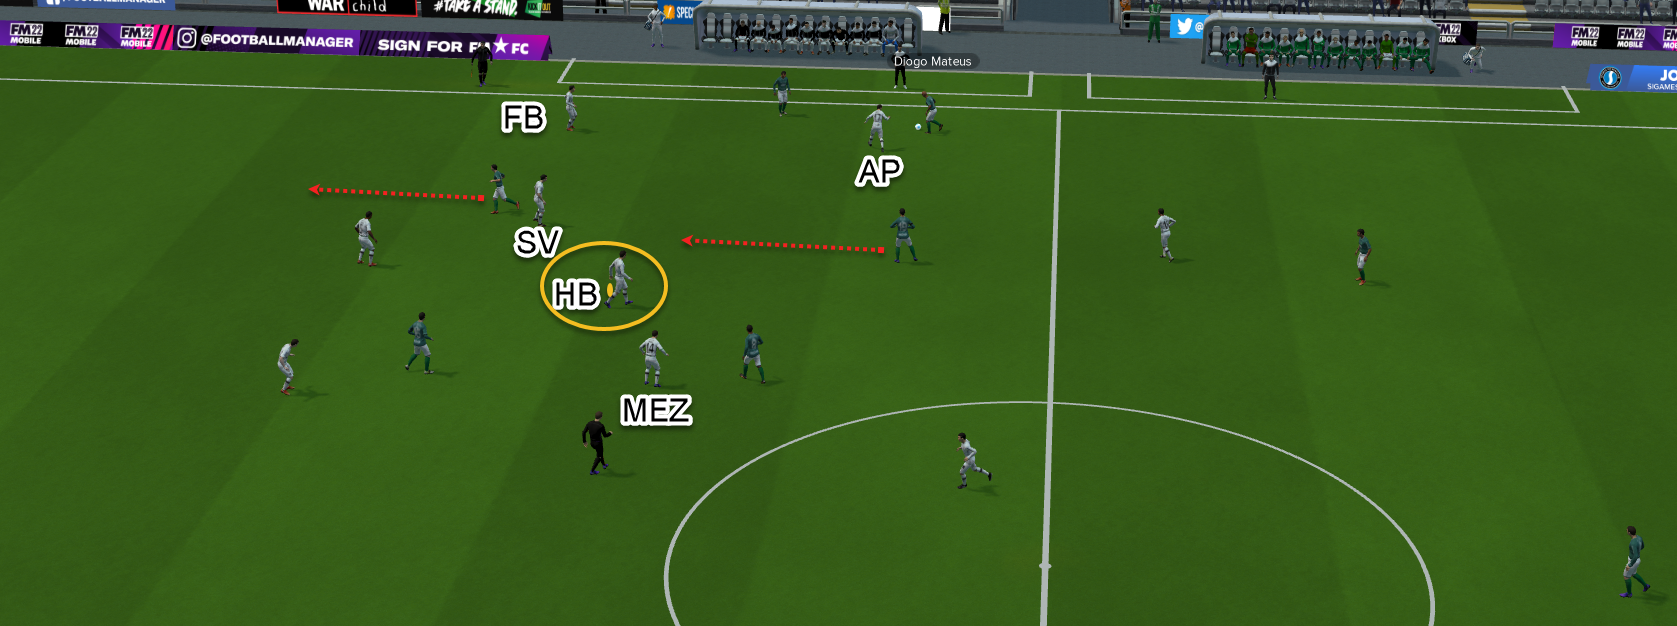
Here we see that the advanced playmaker is helping out on the wing defensively so we don’t get overrun and I’m not left exposed 2vs1 with the opposition. This is the behaviour I actually want however this means I’m not happy with the rest of the players positioning. The Segundo Volante seems to be unaware of the player behind him meaning if he steps up then the central defender needs to cut across to deal with danger. In turn, this leaves the other central defender exposed and 1v1 with the opposition’s striker. This is really bad and something I need to also keep an eye on. The solution here would be to have the half-back either press higher up the pitch to help cover the advanced playmaker going out wide. Or I could even do that with the Segundo Volante and have the half-back deeper, possibly. So there are options available here if needed. But this is the first real sign of something not working.
All of this analysis happened all in the first 15 minutes of the game, the rest of the game went the same way and I saw similar stuff happening, both good and bad. I do this type of analysis for the next two games as well before making any decision on what I need to change for the reasons mentioned earlier.
General Observations
After playing three games and making notes on what I saw happening I now have to decide how or if I want to fix what I saw. Let’s start by looking at each role and discussing what I’ve seen so far.
Goalkeeper - The keeper is doing what you’d expect and if he wasn’t then the chances are the issues would be elsewhere on the pitch. The only real issue the keeper can have is distribution ones but he’s completing around 94% of all his passing at the minute so I’m more than happy with that. If it was lower, I’d likely take a look at how and to who he was distributing the ball and then adjust accordingly. But I don’t feel I have this issue yet or any issue in general for that matter.
Central defenders - Again there isn’t much to say here about these two either in all honesty as both are really solid on the ball and defensively. They have a pass completion rate of 99% and are seeing a lot of the ball. With both centre-backs averaging well over 100 passes a game, This seems excessive but it isn’t, as you have to remember we are playing a patient game and not rushing. So we are happy to pass the ball around and wait for the right time to attack and invite the opposition to come forward to get the ball. Then we can pass around them and create space and movement.
Full backs - For most parts, the full-backs are doing exactly what I want of them. Defensively they are making about 5 interceptions a game so far, winning 95% of headers and averaging around 4 tackles per game. In an attacking sense, they are also extremely good. Averaging 4 dribbles per game, chipping in with key passes and even getting goals and assists. They see a lot of balls and pass a fair amount with a 93% pass completion rate. The areas they are picking up on the heatmaps too, show they are doing it in important areas inside the opponent's half.
One issue I have noticed in the games so far is crossing, we often fail to beat the first man and completion rates are very low. So far in 3 games they’ve had a combined 83 crosses and were only successful for 22 of them. This is a real issue because it shows we are being wasteful when in good areas and not making the most of the situation. It is something that I need to work on and improve dramatically.
The role as default comes with cross more often hardcoded into it, so I can’t reduce that which limits what I can actually do to try and improve the fortunes unless I completely change the role, something I don’t think I want to do. The reason behind not wanting to change the role is for everything else, the play is exactly what I want both in the attacking and defensive phases. While the options might be limited I could perhaps ask the players to start aiming for a specific area and adjusting those settings. The options here would be;
- Far Post
- Near Post
- Centre
Selecting one of these options might make a big difference and it might not. I think crossing on Football Manager is poor in general though. But nonetheless, based on my striker movements I think aiming crosses for the centre is the change I will make because that’s the kind of position my strikers either take up or run into. It’s not often I’ve seen them at either post, so this change makes the most sense for now.
Half-back - This position is a little bit more tricky because the player is doing everything I want yet I think the role could have become too invaluable. On average he is making 130 passes a game which is a huge amount and he is linking with the two central defenders time and time again because he tends to be the player always available for the pass. In fact, I could make a case here for the half-back becoming a playmaker even though the role isn’t a natural one. How he links with the defenders and midfielders, has made him an important component in the system overall.
So it might seem weird that I want to explore changing the role, right? We'll because he is doing his job so well that it might be a bit too much for what I need. While his ball retention is good it could be stopping us from getting the ball forward and progressing upfield a bit faster. I’m not 100% sure on this so I need to monitor it more, to see just how it is hindering us. But the logic here is that at times we are likely retaining the ball too much or being much slower with the build-up than we need.
When watching games I actually didn't pick up on this initially, it was only when I was looking at his form, stats and player performances in general that I raised an eyebrow and took note. It’s for this reason that I think I need to monitor this further over a couple more games before I make a decision one way or the other.
From a defensive point of view, it feels like he isn’t being aggressive enough in certain phases and on a few occasions I’ve felt he could be better placed to deal with a threat or could be pressing higher initially. Don’t get me wrong he is doing what you’d expect and isn’t costing us goals or being a liability. It’s more than I think I could possibly get more out of him at certain times. But then if I did change the role or messed around with the player instructions, this could have a knock-on effect for the team in general due to how he’s naturally become the heartbeat of the team.
Decisions, decisions......
Segundo volante - As you can probably have guessed by now, this is another role that involves seeing a lot of the ball, averaging 110 passes per game. This is expected because his job is to link the defence, midfield and strikers. I was worried his play might have suffered due to how effective the half-back was but gladly, it didn’t. The volante will often receive the ball and pass it around or even drive forward. His passing range is vital here though and ideally, you want someone who is technically brilliant and mentally strong so he can pull off all kinds of passes. He can keep playing simple and do short passes or he can do defence-splitting balls from deep. The player has the ability to put us on the front foot instantly with one defence-splitting pass. Not only that but he has the ability to drive forward with the ball at his feet and take people on or cause absolute chaos for the opposition as he runs towards them.
The downside of the role though or should I say a possible issue is that he is too deep at times or is too wide. This isn’t a major issue and is expected because of the shape we use as their job is to also help protect the channels and help out the fullbacks to stop them from being doubled up on by the opposition. I’d attribute all of this to the shape but it’s just more noticeable, and prominent if the central midfielders also move out wide. For most parts, it seems fine but on the odd occasion they all go to a similar area it leaves us vulnerable to quick switches of play.
I don’t need to do anything drastic though and I can just keep an eye on it. I might be able to sort this issue out though by looking at the advanced playmaker settings.
Advanced Playmaker - While this player has scored and assisted three times in the first three games, he is being a bit wasteful with his passing. Averaging 110 passes per game he has one of the lowest completion rates with 87%. This isn’t actually a major issue but I definitely feel he should be slightly higher here. His average rating is the second highest in the team too with 8.26 after three games. So he is playing well and from watching the games, doing everything I need.
I did notice he wasn’t connecting some passes with the strikers and I think this is because his passing might need to be a little more direct, so he can try and ping balls in behind the defence like the Segundo Volante currently does. At the moment it feels like he is passing it a bit too short and the opposition's defence is cutting it out while the striker is making a run behind. So changing this should give us more success I’m hoping.
In the Segundo Volante section, I mentioned I might be able to fix the deep position issue by looking at the advanced playmaker. I think that the advanced playmaker is being too proactive with his press and positioning and is naturally drifting to the left-hand side. Now to try and give us more structure I am going to ask the advanced playmaker to hold the position. This won’t fix the issue on its own because it’s a setting that impacts what the player does when your team has the ball. But this means he’ll be less likely to drift around and be caught on the wing when in possession of the ball, meaning he should, in theory, be better placed when we lose the ball.
To also help with this I will change his pressing trap setting from balanced to less often so he retains his position more initially before pressing. This should help deal with the issue I was finding the Segundo Volante in on the odd occasion it happened. After making these changes, again I’ll track what kind of impact they have had over the next two or three games and see if it has helped or not.
Mezzala - This lad does a bit of everything but he is a runner and a direct goal threat because he will look to make those run in behind the defence and get into the opposition's box. he’s basically central to everything in attack and is a passing option for the advanced playmaker too so he isn’t crowded out. The two link up very well and the surging runs he makes from deep, cause all kinds of issues and often disrupt the opposition's defensive line. So far this role has been perfect and it feels like I have a striker in the midfield making those late runs into the box.
He doesn’t see less of the ball than the other players but he does pass less. In fact, he has the second-fewest passes attempted per game with 47. But it’s more about running with the role as that’s the primary function. He has already scored 4 goals and grabbed 1 assist.
Deep-Lying Forward - The decoy!! I call him the decoy because he links with the mezzala brilliantly. Often you’ll see the deep-lying forward drop deep and take the defender with him, this leaves space for the mezzala to run into, it is a nightmare to defend against for the opposition. Goals are a bonus but aren’t what I should judge him on due to the fact that the mezzala and the advanced forward score a decent amount so far due to what he is doing on the pitch. I could likely change it so he scores more but that likely comes at the cost of the other players in the side. Saying that though, he still scored 1 in the first 3 and got 2 assists.
Advanced Forward - So far so good and scoring goals. He has 6 in 3 games so far. I’m happy with the role and player and while he might be the spearhead of the team, he is also contributing to the team and setting others up too which is good to see. He is occupying the second opposition central defender position. Again he is both a decoy and goal threat because he makes late runs in behind/between the defence for those defence-splitting passes from the Segundo Volante, advanced playmaker, half-back, deep-lying forward, full-backs and even the mezzala. The advanced forward seems to be the final part of the jigsaw so far and is the one benefitting from how we play as a team up until this point.
Further Refining
The longer you play and the further you get into your save, you might need to refine your tactic, shape or strategy even more. Or maybe you’ve never stopped refining and tinkering to get things as close to perfect for you, as you possibly can. So in this part of the book, I want to discuss ways and methods that we can use to aid us even further, as there is a lot of stuff I’ve not mentioned yet like the data hub.
Data Hub
I’ll be honest here and say this isn’t something I use as much as I should but that’s more because I tend to use the data available while in a game or straight after the match. But the data hub can be a brilliant feature if used correctly and makes it much easier to spot tactical trends both good and bad over a large period of time. It can also provide useful information on past opponents and the next one. You can find out a vast array of different things in the hub that can help you with refining your tactic and making it better. So let’s take a look at how we can transfer this data to possible tactical tweaks.
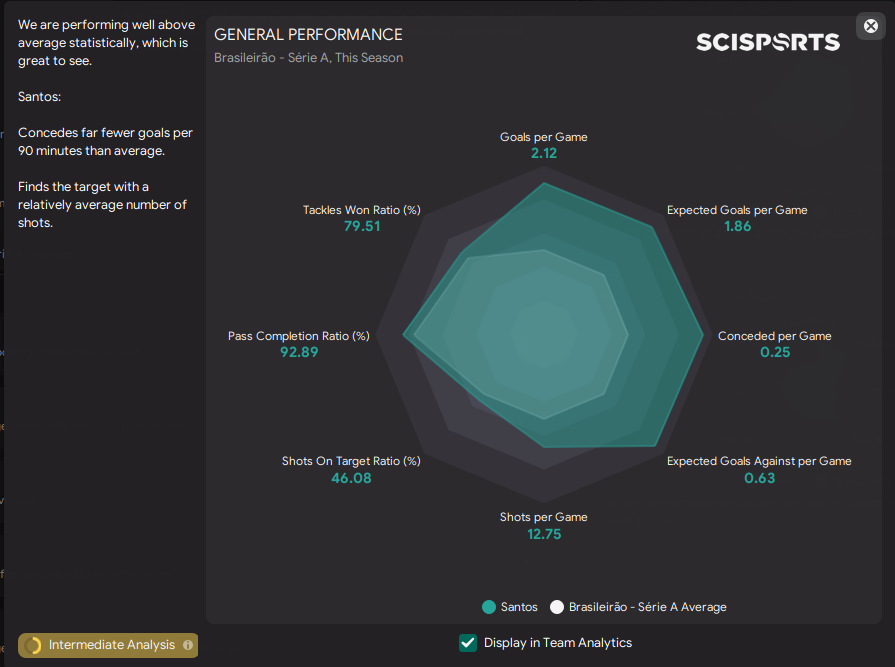
On the general performance chart, you can see how you stack with certain metrics compared to the rest of the league. This can be good when used as a quick snapshot to see how you measure up but I don’t think you should put too much stock into this as it doesn’t really tell you much about how you play or the things you do right or wrong.
On the team performance tab, the key findings section can tell us a bit more about the things we are doing well and the information displayed in this bit is dynamic so can change. If we take a look at my side currently it looks like this;
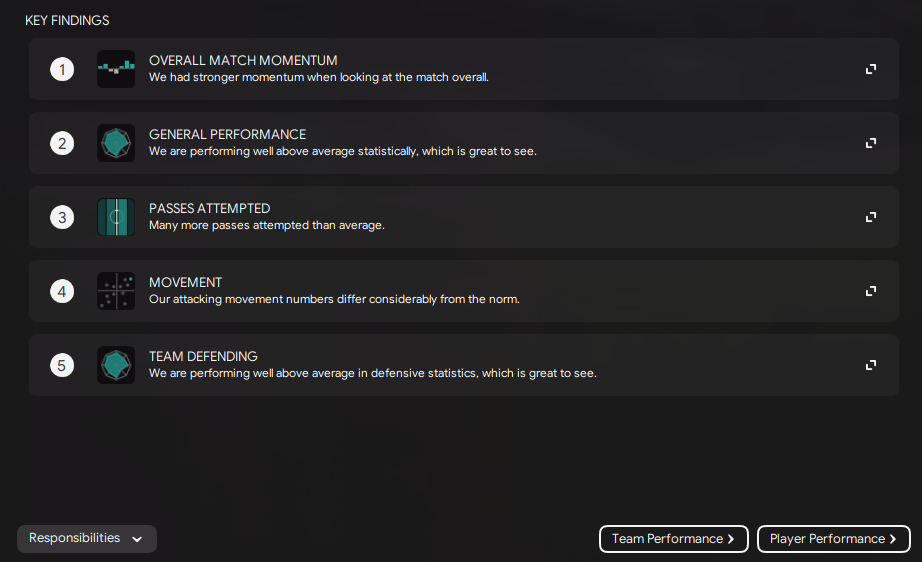
The momentum one I don’t really care for as it's for the last match and we already took a quick glance at the general performance one. So let’s take a look at the passes attempted and see how this translates to how the tactic works.
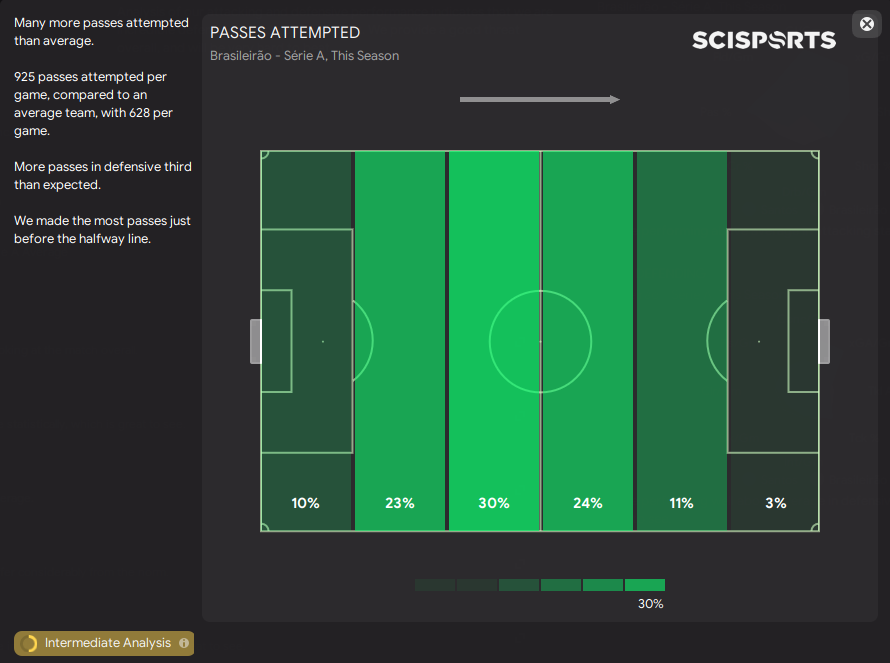
We are almost 300 passes per game above the average for passes here which means we seem to be using the ball a lot. What we don’t know though is why my average is far higher than every other club or if these passes are excessive or not without knowing the full context around what is happening. That’s something we will have to find out later as we explore more. It might not be an issue and everything might be working as intended but at the same time, it could be a cause for concern and see us passing about needlessly and not really doing much with the ball.
Us having more passes in the defensive third than expected isn’t a shock either when you remember we are using the Brazilian Box formation. The shape naturally lends itself to having passed in these kinds of areas due to the defenders, two defensive midfielders and two central midfielders. We also play out from the back so it makes sense that we’d be much more active when passing in the area just before the halfway line. The metric here also shows us we only have a combined 14% of passes in the final third. Again this is kind of expected because of the roles we use. But it also doesn’t show us if this is good or bad. Are we simply not creating enough in the final third in terms of passing output, or are we just more clinical with our passing overall and being really efficient. The percentages on their own aren’t a cause for concern and regardless of whether it is low or high, they have no context to them other than passes attempted in general.
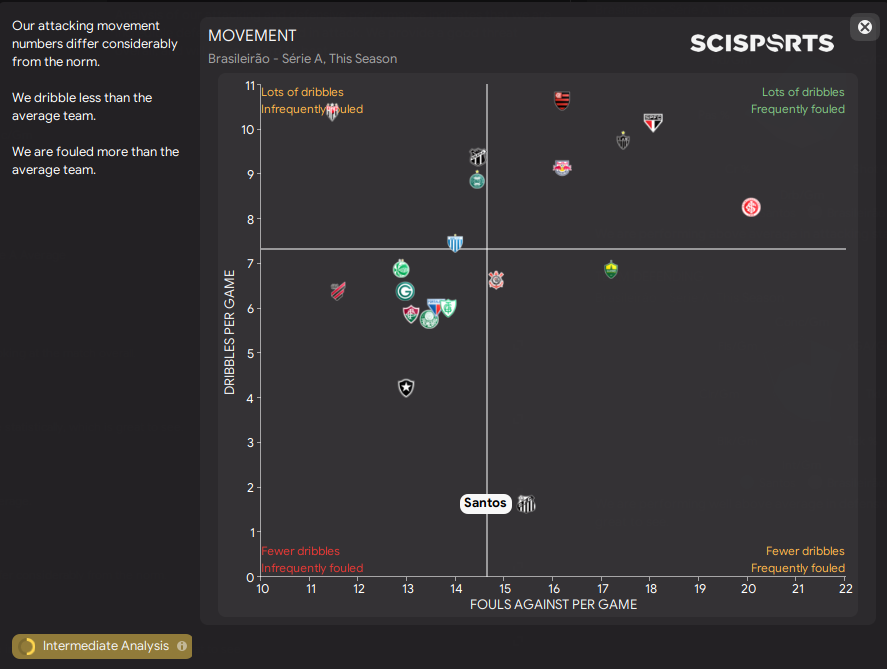
You might think that this doesn’t make for good reading because we are by far the worst side in the league for dribbles per game but you’d be wrong. If you think back to the roles we use in the tactic, we don’t actually have any roles that focus on dribbling with the ball. Yes, some roles might do it depending on the phase of play from time to time but literally, none of the roles used to focus on dribbling at all. Instead, the side is set up to pass the ball around and get from A to B by passing.
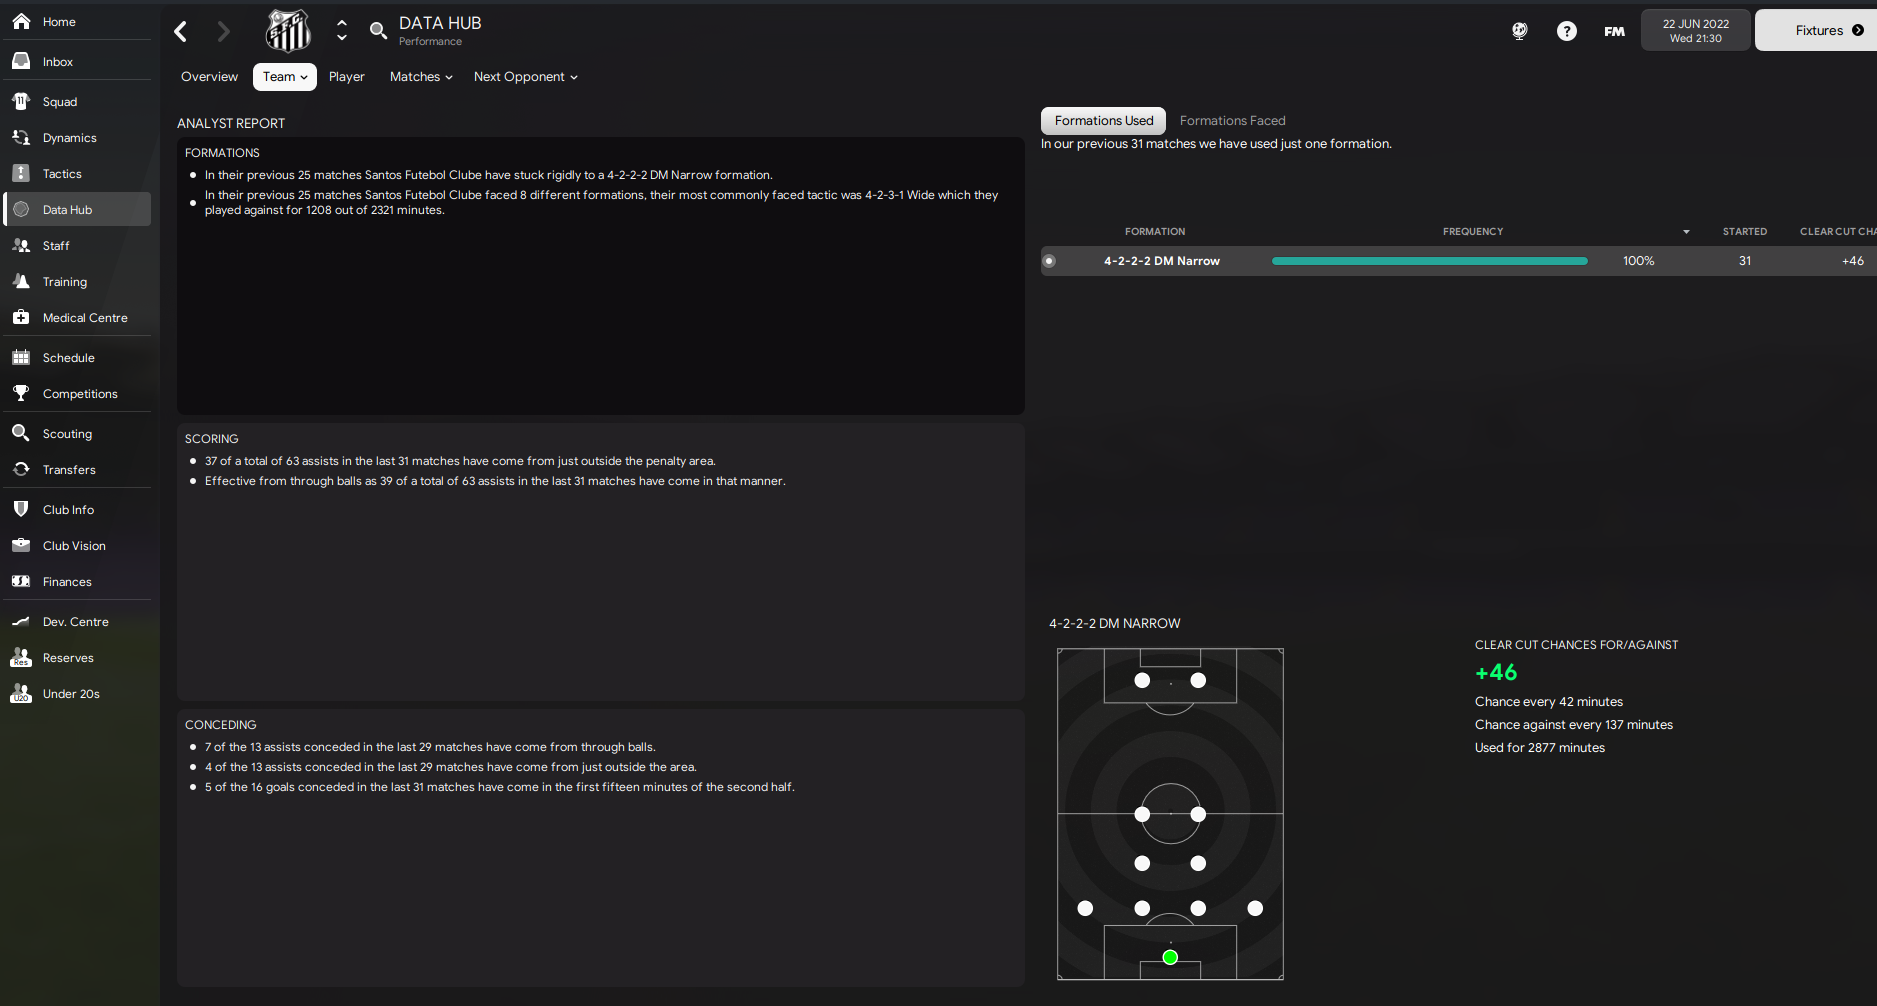
If we take a look at the report tab inside the data hub, this tells us information about the tactics we’ve used and also which tactics we’ve faced. It also gives us a brilliant snapshot of both how we score and concede goals. As you can see in regards to scoring, we are getting a lot of assists from through balls and from just outside the penalty area. This tells me that the side is getting into good areas because this is happening regularly. It suggests we are getting into the box enough to be able to control this area of the pitch.
The goals we are conceding don’t seem to be too concerning based on the assist location data from above. Neither is the pitch location for the assists either. However, 5 of the goals scored within the first fifteen minutes of the second half are worth investigating as this seems to be a regular trend. A third of the goals I’ve conceded have all come during this period. Maybe it’s related to my team talks, it could perhaps be that the opposition is making changes and I’m unaware and don’t realise. It’s not been a problem in the sense that I’m still winning games and keeping clean sheets on the whole but long-term it could be a warning sign that something is wrong. I could likely ignore this as I’m still winning and picking up points right? Wrong.
It’s very easy to turn a blind eye to things when you are winning because, on the face of it, nothing seems wrong even though the warning signs are there. What you need to remember though, is, that everyone is likely to have a bad patch somewhere and the little things that don’t currently matter now will matter way more during those times. As they’ll pile on top of the other issues you’ll be going through. So I always think it's best to get to the bottom of things if possible. Even if you don’t make any changes based on it, at least you can be prepared and make a mental note and be aware of what’s causing it.
My favourite tab in the data hub though is the matches one, especially the last 5 matches tab.

We can see tactical trends here too both good and bad. You can also click the checkbox on any of the 5 games to exclude them from the data too, so you can see which issues arise in which games and how the trends change. It might also throw up different trends that aren’t currently listed too. Let’s start with all the good things my current tactic does though before discussing the issues.
From the information in the positives column, it says we are scoring goals from close range, which means we are working the ball into the box well and finishing off chances. The touches-to-shots ratio seems good too and is showing we aren’t messing around when we do have the ball in these types of areas. It also says we’ve scored 11 from 37 shots inside the box. While this might be on the positives list, it also suggests we are being wasteful as I like to aim for 50% of all shots I have to be on target. Now I’ve not checked yet but my overall number of shots might be 50%. But I’d like to explore these 37 shots in more detail. For this, though, I'll have to go back to the individual games and check them all one by one for that kind of detailed info.
The final third entry isn’t a shock either considering how the tactic is narrow and heavily focused on central players. So this type of analysis is expected, in fact, if it wasn’t listed I would be majorly worried something was drastically wrong.
There’s also a couple on here mentioning defensive stuff too. One of those is opposition goals from inside the penalty area, it says we have conceded 0 in 23 shots which is really pleasing to see. While 23 seems a high amount it's worth remembering we have played 31 games so far, so it's a really low amount. It tends to indicate that the shots we do give up in these areas are either low quality or ones where we can apply pressure to take away the danger.
The other thing mentioned under the positives is that we tend to win the ball back and regain possession in our own final third, in central areas. Again this shows that from a central point of view the defensive midfielders and central midfielders are doing a good job at recovering the ball and doing their defensive duties.
Now if we focus on the negatives on this screen, there aren't as many as I assumed there would be, I was expecting at least 4 or 5 here. Before we discuss the 3 it does list it’s worth pointing out that they might not be negatives at all, just like earlier when I thought one of the positives was actually a negative because I’d had less than 50% shot conversion, the same applies here. The things listed in either column are arbitrary rather than contextual. So what that means is the stats that make up all of the information we are presented with here, don’t account for your formation, your player and team settings. Nor does it know the overall style you’ve created or trying to create. So if something is listed here it doesn’t mean it is an actual issue.
The analysis says we’ve had 25 long-range shots and scored 0, that’s quite worrying. While the overall amount of shots is low for 31 games played, it does suggest that when we do shoot from the range we score. So what I need to do here is check the individual analysis for the players from the games so far and see if it's a cause for concern or not. I’m actually not checking just because we haven’t scored one but I also want to check to make sure that when we do shoot from range, it isn’t killing a perfectly good move where a pass would be better suited. Also want to ensure that we aren’t shooting from the range because we lack forward options or the players shooting, aren’t isolated and left with no other choice but to shoot from areas/angles they have no chance of scoring from.
One of the negatives listed is that we have allowed the opposition to score 1 goal from 10 shots from long-range. So the advice is now telling me to play with a higher defensive line, which is something I don’t really want to do. I play with a low line for a specific reason which I discussed earlier in the book. Why it’s telling me to play with a higher defensive line is because it is logical that the further up the field we start from, the more distance between the defenders and the keeper meaning the opposition strikers, shouldn’t be in shooting distance. The recommendation does make sense. However there are two issues here; It doesn’t suit the playstyle I’m creating and secondly, it opens up a whole new issue that I’d like to see happening.
That would be through balls and possible opposition players running in behind the higher defensive line. Either way, I’m never going to nullify every single threat that’s not realistic nor is it possible. Every single shape, playstyle, setting etc has a weakness attached to it. It basically comes down to a choice you have to make between risk vs reward. For me, the risk of someone scoring a long-range effort is worth it for everything else that goes in my favour. If I was to make any change it would have a knock-on effect elsewhere and possibly take away something good. So it’s up to us to learn how our systems and playstyles function, so we are aware of this. Then you can make an informed decision about if the risk is worth the reward. If so it’s worth sticking to what you already have. If you think it’s not then simply make a change but then be aware of how this has a domino effect on everything else and could alter your current system or playstyle in a subtle way.
By now you should be starting to understand your tactic more and know how it should be playing and how to spot issues and attempt to fix them. In the final part of the book, we now begin to look more closely at the relationships between the roles and duties I’ve used. To get a more solid understanding of how the players come together to give us the result we’ve seen so far. For this, we combine everything learnt so far throughout this book and really dive into the players on an individual level as we analyse how every single player functions and links with others.
While also taking a broader look at what they actually bring to the tactic. Understanding how everything comes together can only be done when you understand how the roles and duties you’ve selected, work together. By that I mean, I use two fullbacks but what is their actual job, who do they link up with, what type of support do they offer and so on. Hopefully, this can be fully explained in this section, so you’ll be able to have a look at your own tactics to see if the player is doing what you actually want them to be.
Before we start the match analysis for why everything works, let's take a look at some of the players' individual contributions to the side this season, now season 1 is completed.
Goalkeeper
The goalkeeper's job is a simple one, just be a goalkeeper. I don’t need or want him to do anything else. He only needs to do the simple basics like just rolling the ball out to the defenders and saving shots. Or just distribute the ball to the fullbacks depending on how the defenders are being marked.
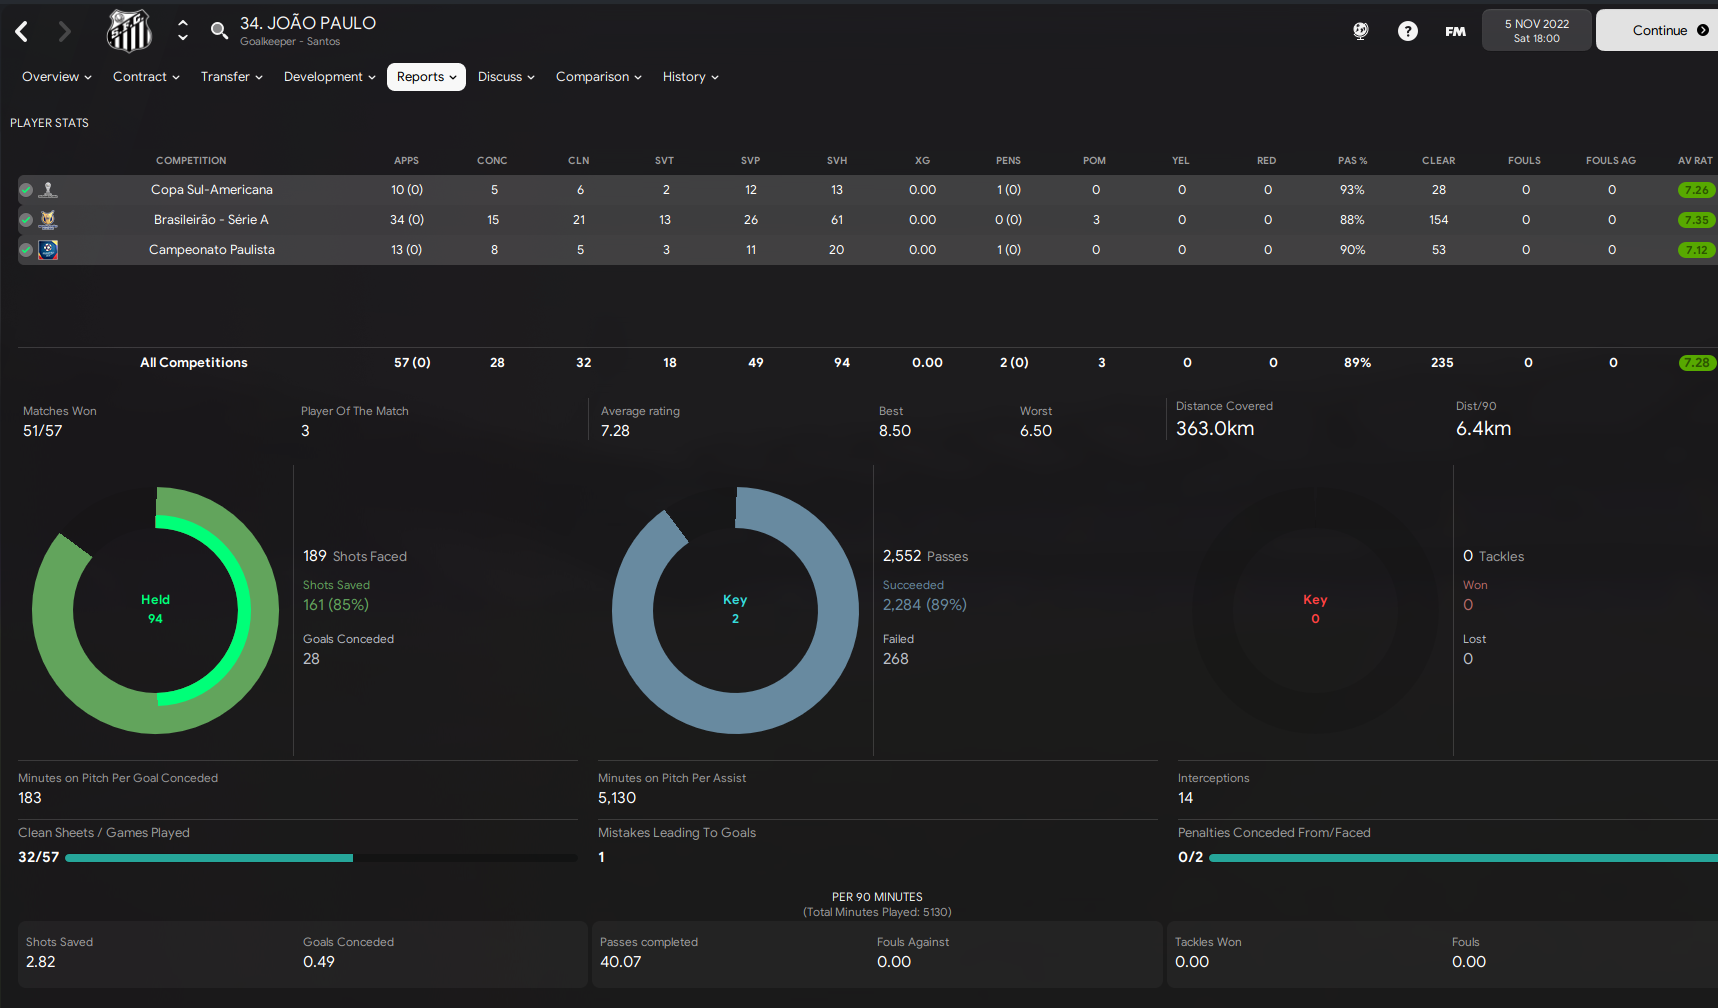
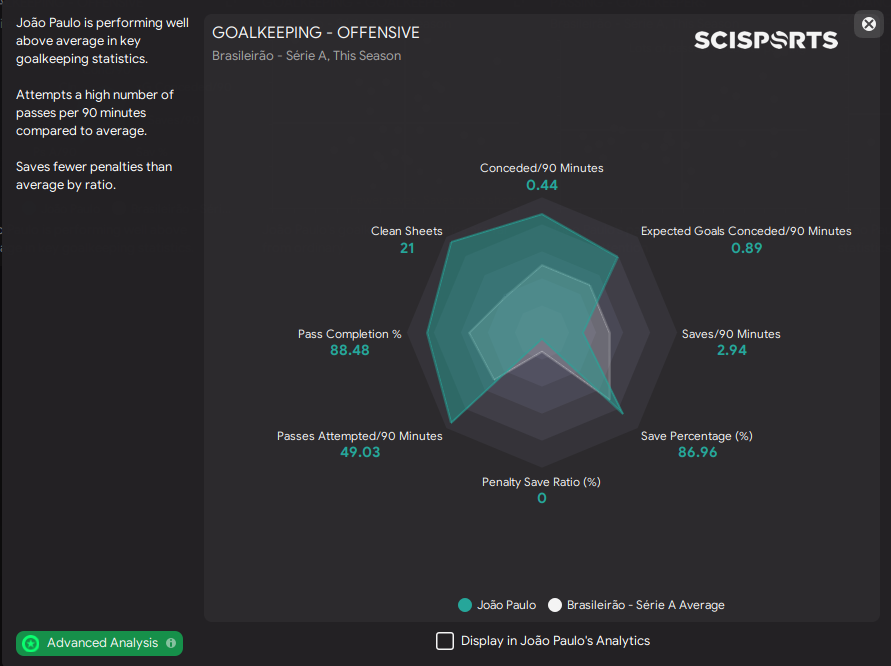
Here we can see he is a brilliant shot stopper so he’s doing the very basics of his job well. He’s well above the league averages for most things, the ones he isn’t, are because we seem to be dominant so he’s not seeing as many shots against him as other sides in the league do. Passes attempted and pass completion rates are very high due to him being the absolute start of everything, with us playing out from the back. Overall he’s had a fantastic season both defensively and offensively.
Right-Sided Full Back
Another player who is playing well above the league averages is the fullback on the right side of the pitch. The player's job here, in fact for both fullbacks, is to keep the width and help provide the strikers
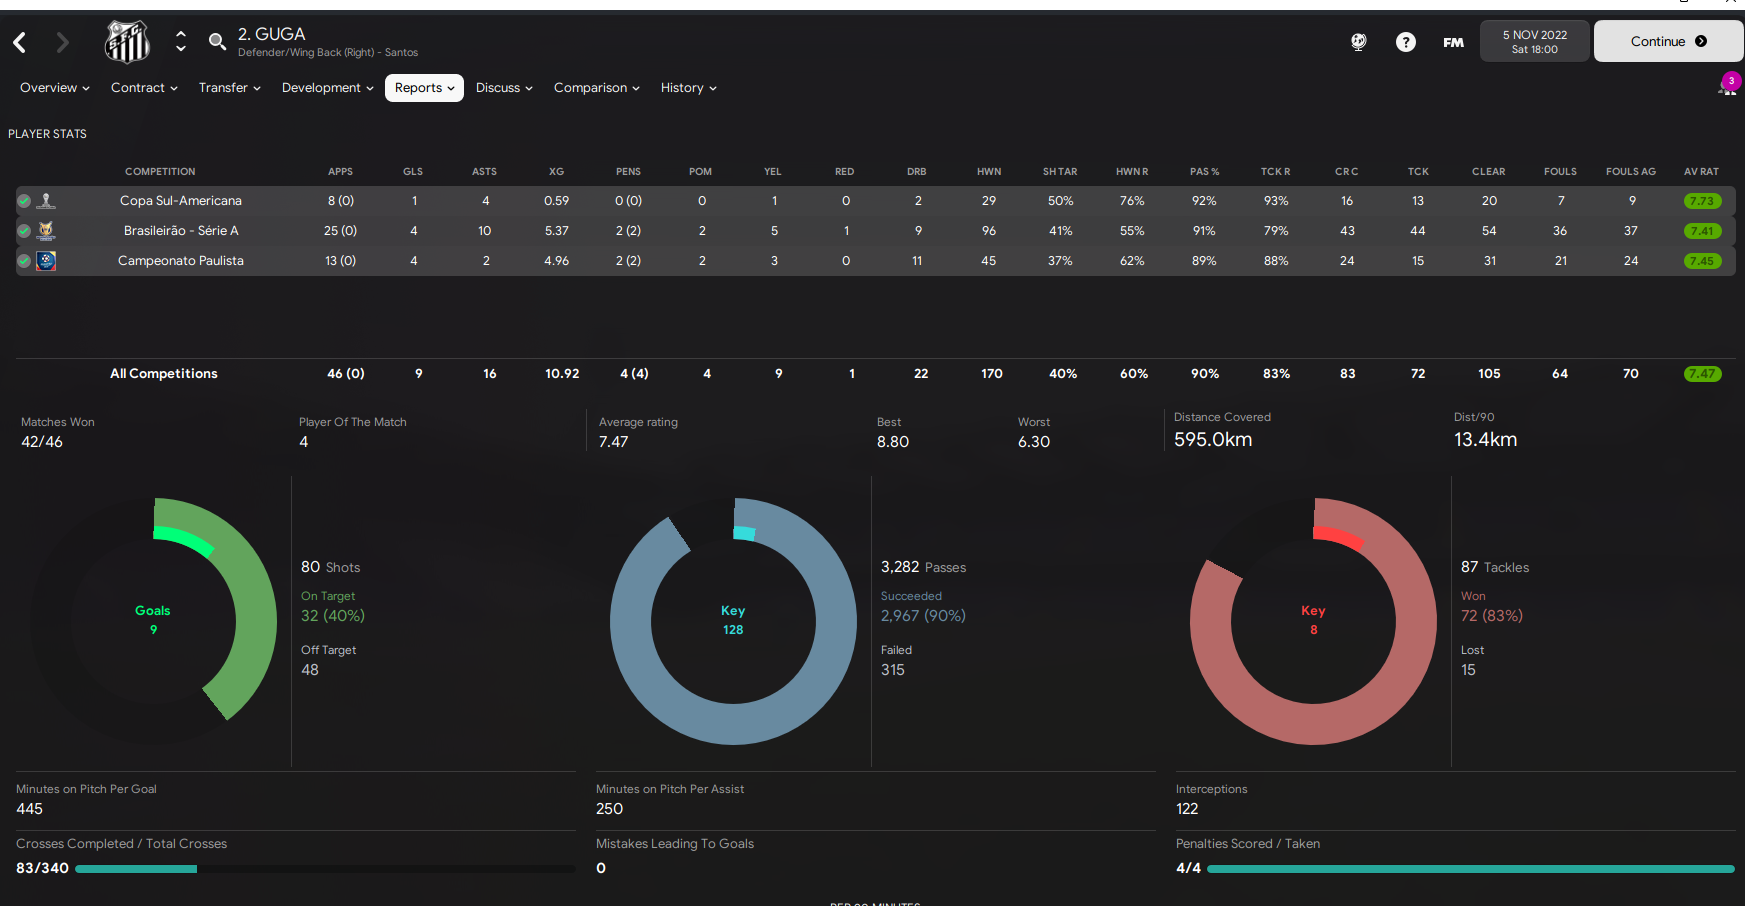
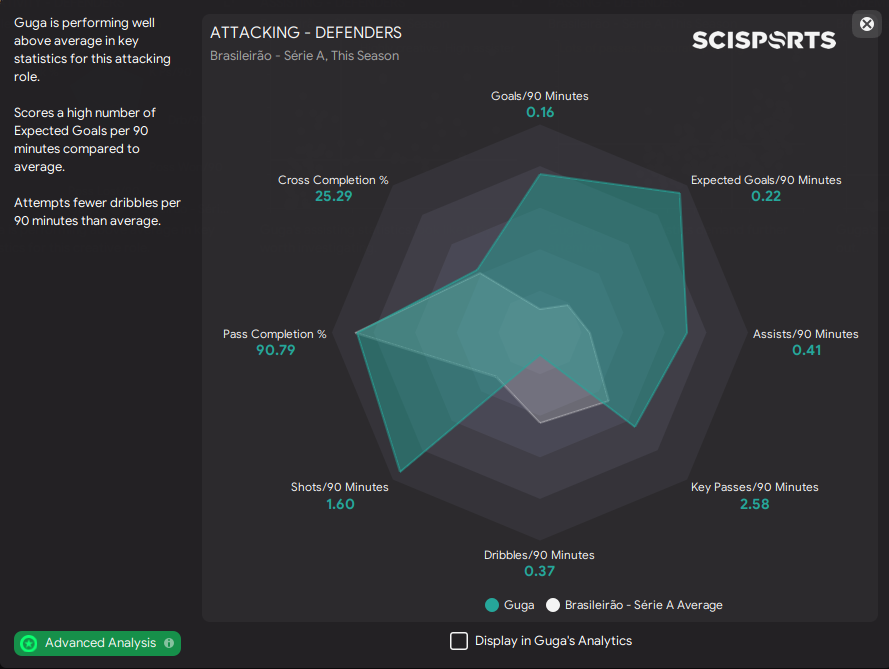
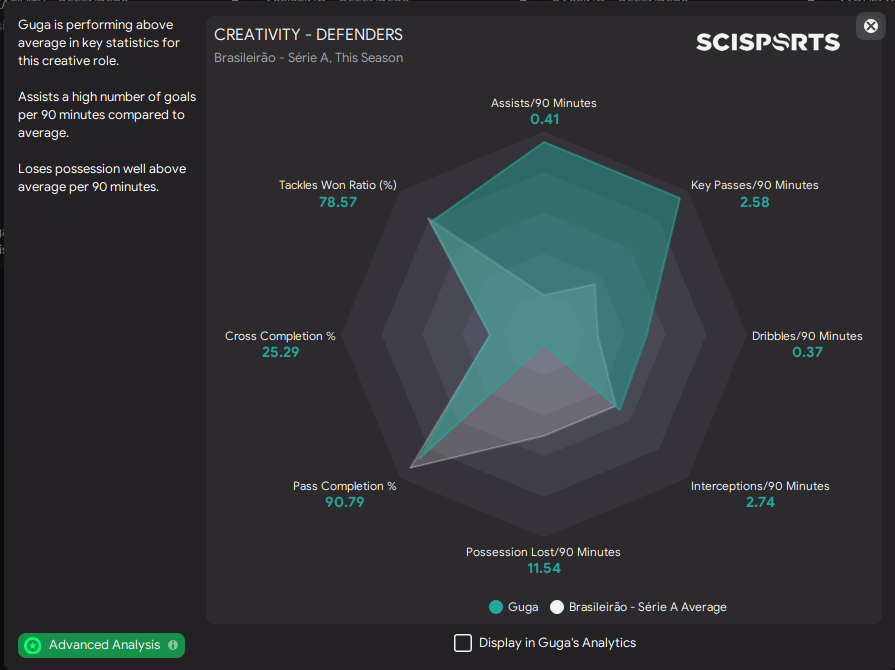
You can see he has had a phenomenal season really and is outperforming most metrics by quite a lot.
Left Sided Full back
Both full-backs have had similar seasons but while the left-sided player has seen more of the ball, he’s been less involved with goals he’s actually scored. There is a reason for this though and that’s because the advanced playmaker is on this side of the pitch, so at times, the play gets funnelled through him instead. Whereas on the right side of the pitch, the mezzala is a running type of role, allowing him to better link with the full-back on that side. Still, it’s been a solid season overall.
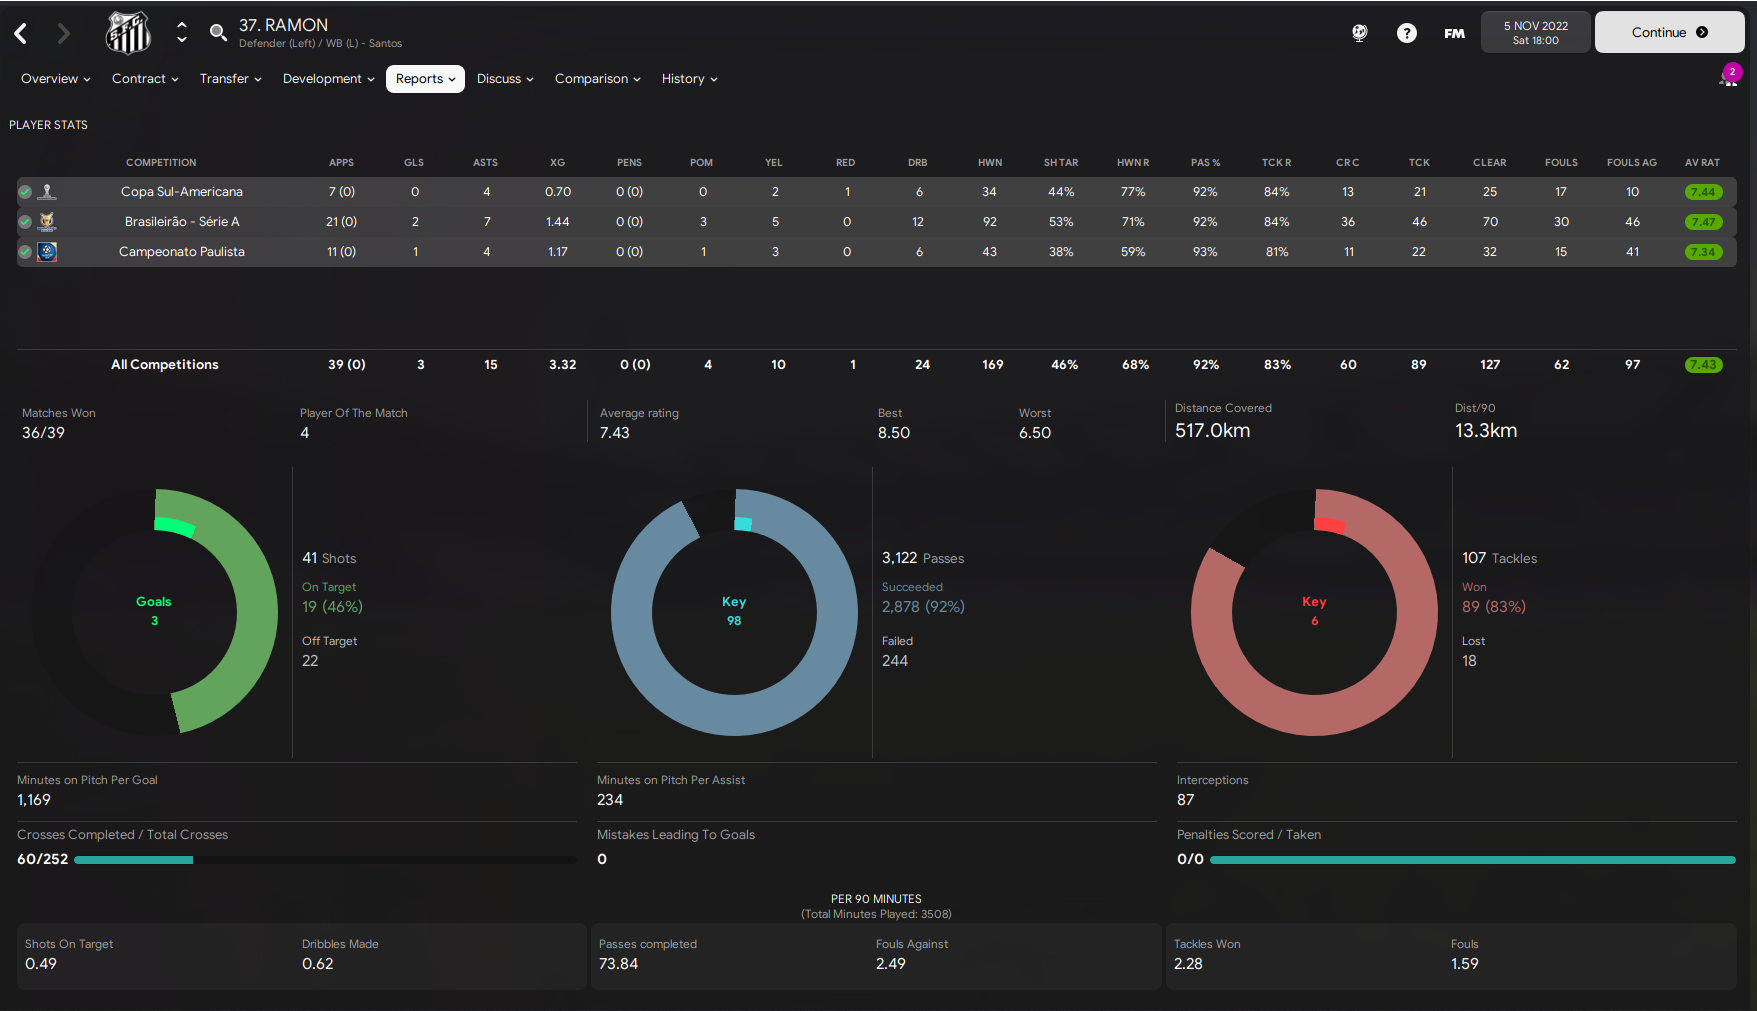
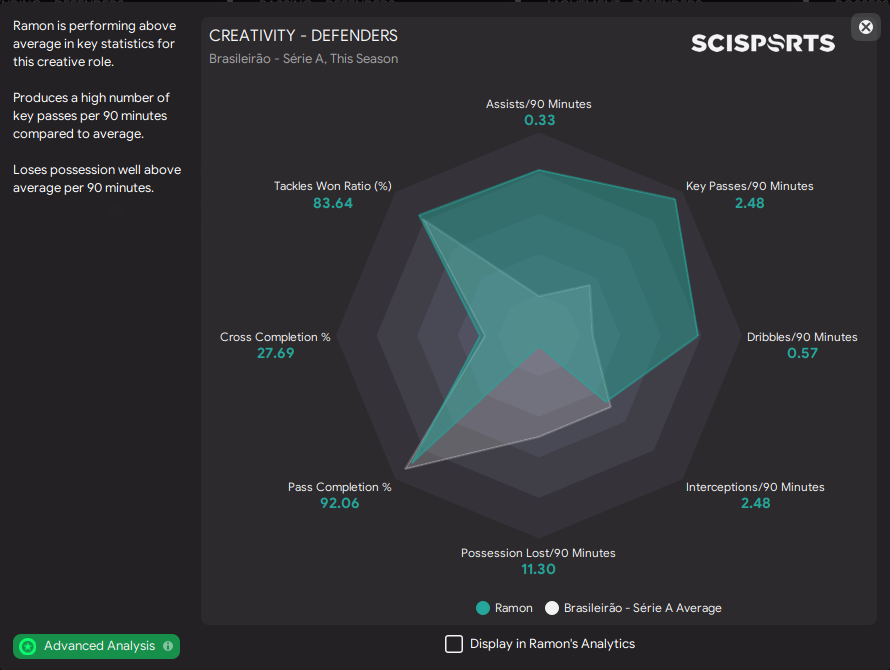
Again he is drastically outperforming most metrics and they’re very similar to the right full-back stats, there isn’t much difference between them. Just little subtle differences which will be down to player attributes and possible player traits. Ramon, for example, has the player traits - crosses early and runs with the ball down the left.
Central Defenders
Due to how the season ended up being played out, we became a very dominant side. It was a little more tricky at the start as I lost a few key players to the big European clubs when they came sniffing around. But I was able to reinvest that money and strengthen multiple positions which made us a much stronger side overall. Both my main central pairing were new signings that ended up fitting in very well. They both had decent seasons and what you’d expect.
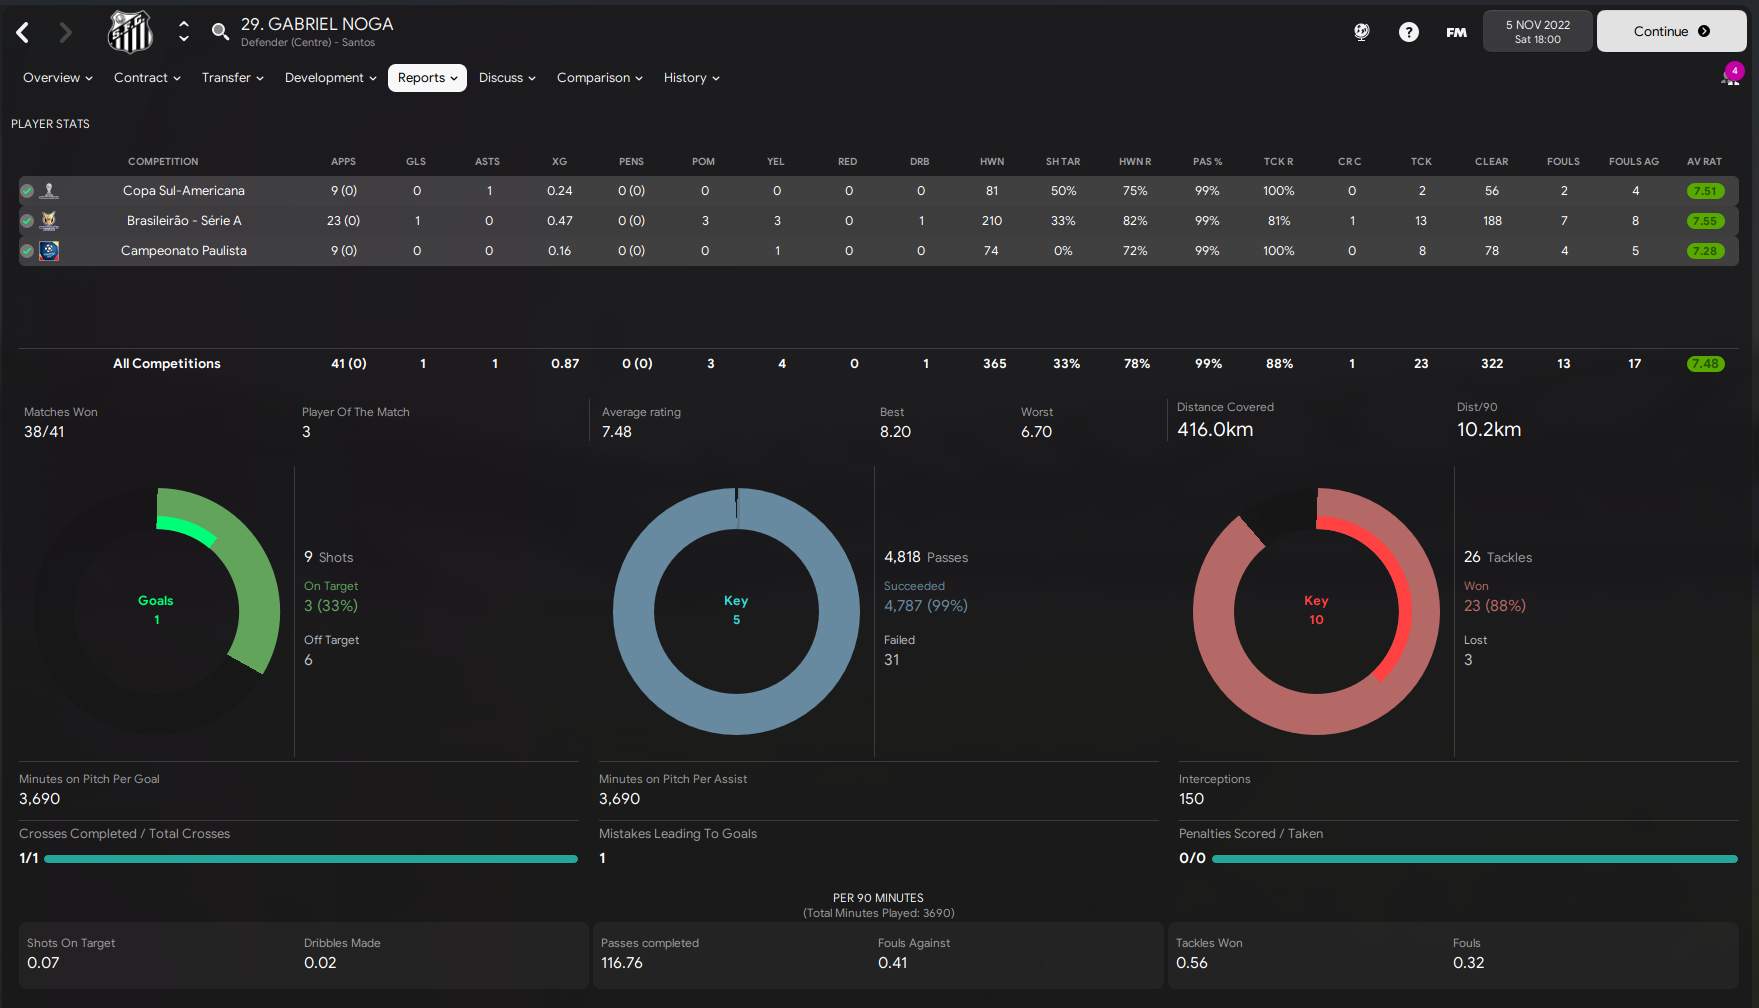
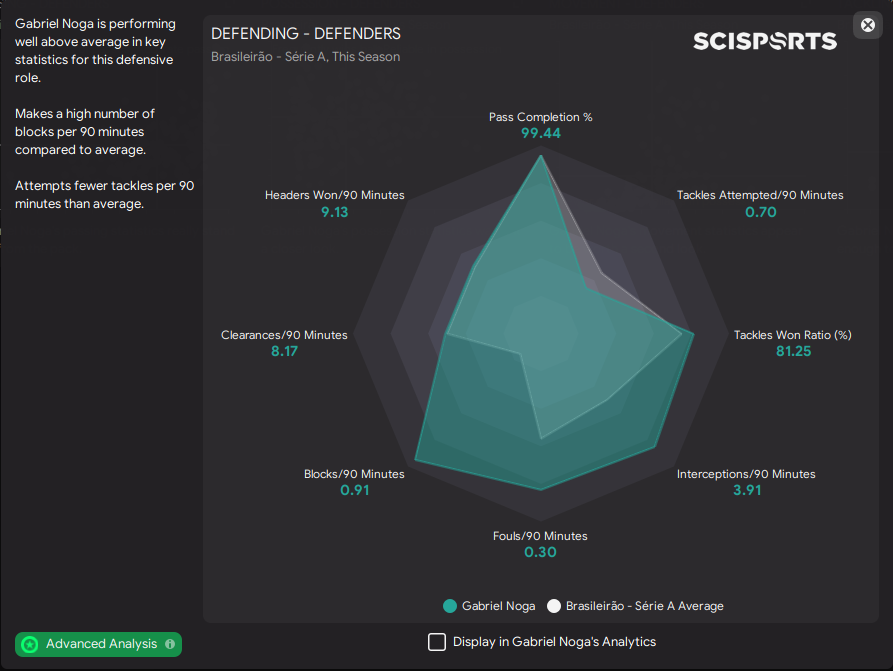
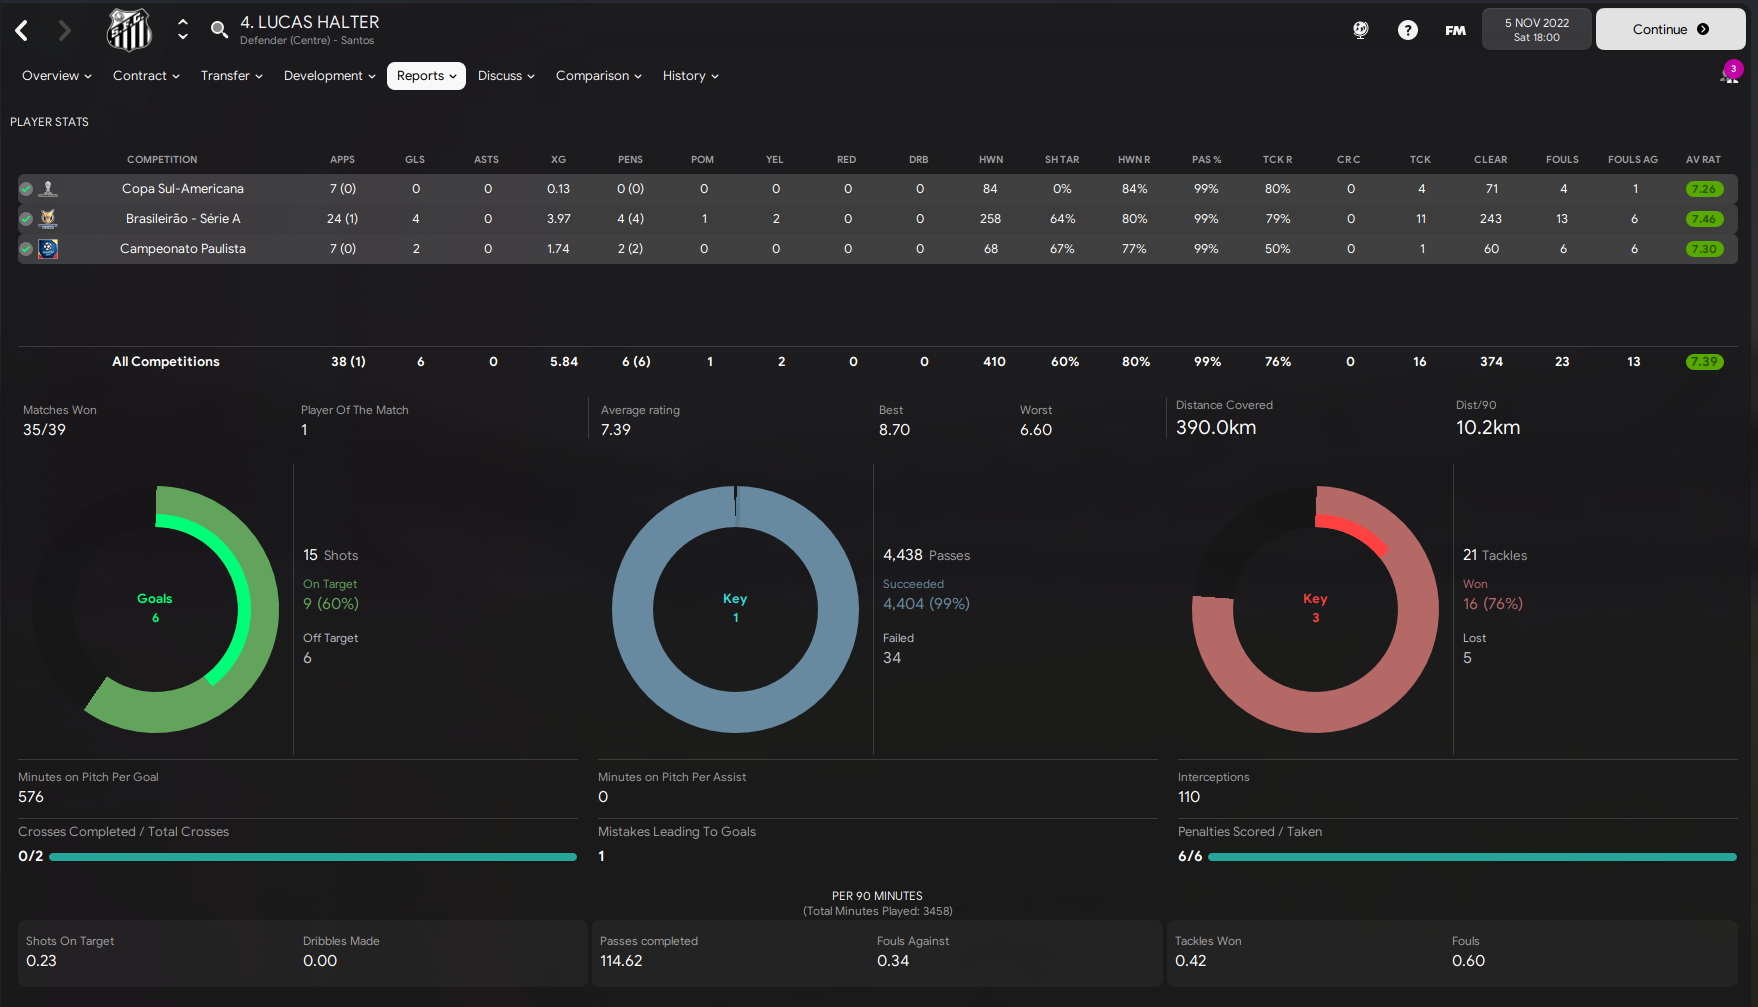
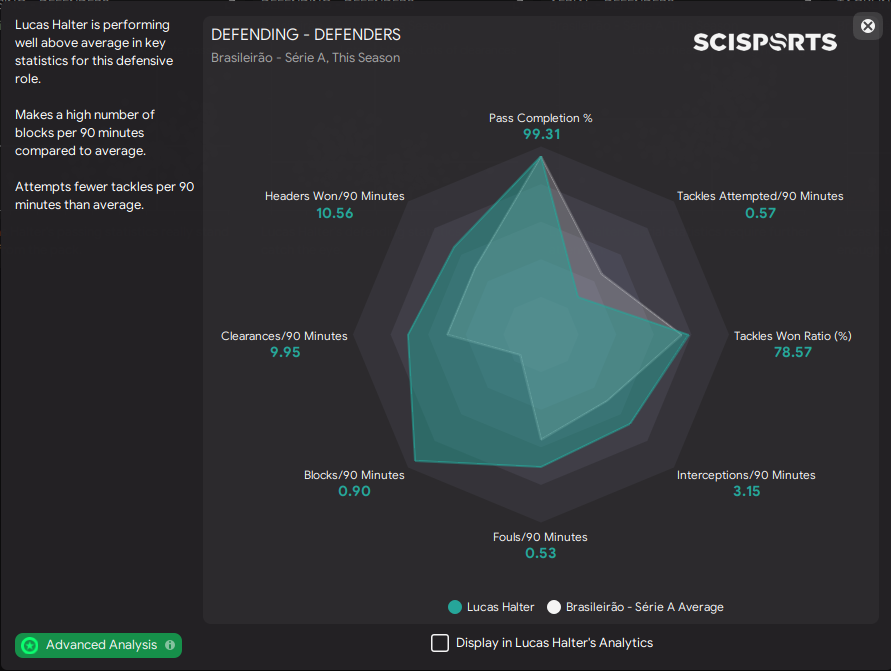
Again all metrics are very similar but Halter is more dominant in the air than Noga, which makes sense as his attributes are much better suited for heading, bravery and jumping. They both had slightly lower tackling averages than the rest of the league but we can attribute this to us being the more dominant side in the league, the further it went on.
Anchor
If you remember at the very start of the analysis I said that the half-back was perhaps wasted. Well, it turns out he was and I felt having an extra player split between the central defenders was a bit overkill due to us becoming a really good side. For this reason, I changed the role to that of an anchor instead; this was the only role change I made throughout the tactic. If I hadn't become a really good side due to reinvesting the money we received, I’d have 100% kept the role as it was because it would have been fine. In fact, it was fine now too really it's just I wanted to possibly utilise the player slightly more advanced but in a specific area. Hence why the anchor role was selected as that did just that.
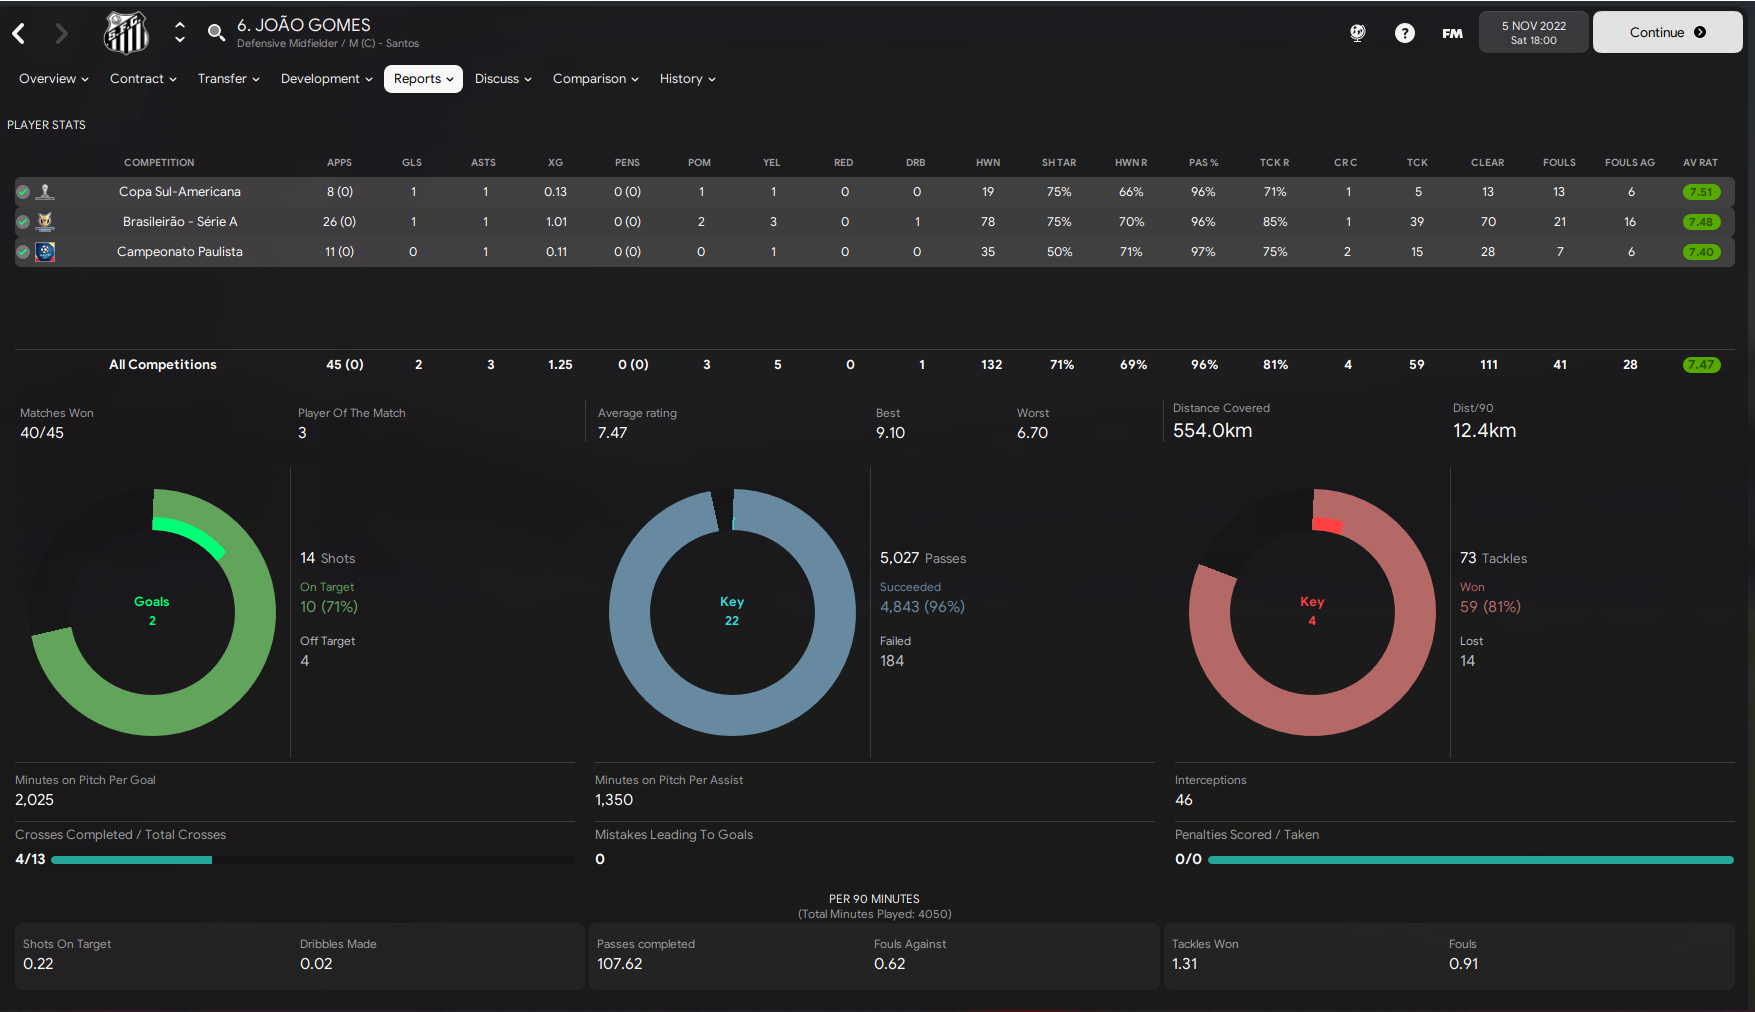
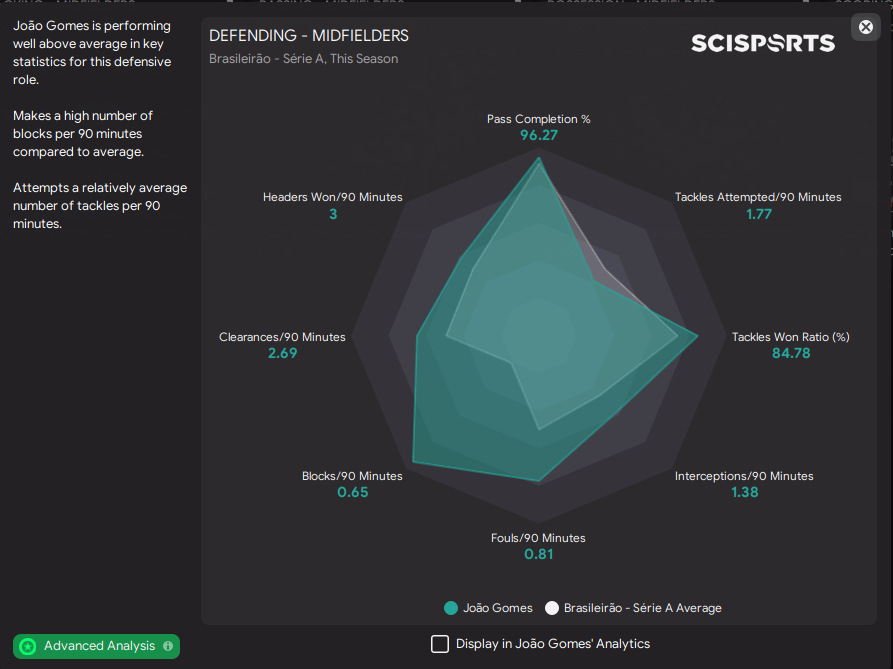
A very solid season overall and he did all the simple things to the best of his ability. I needed nothing more than that from him. I feel it’s always good to have someone do the basics, it’s almost like he is responsible for the jobs no one else on the side wants to do.
Segundo Volante
This is by far my favourite role in the game since it was introduced a few years back.
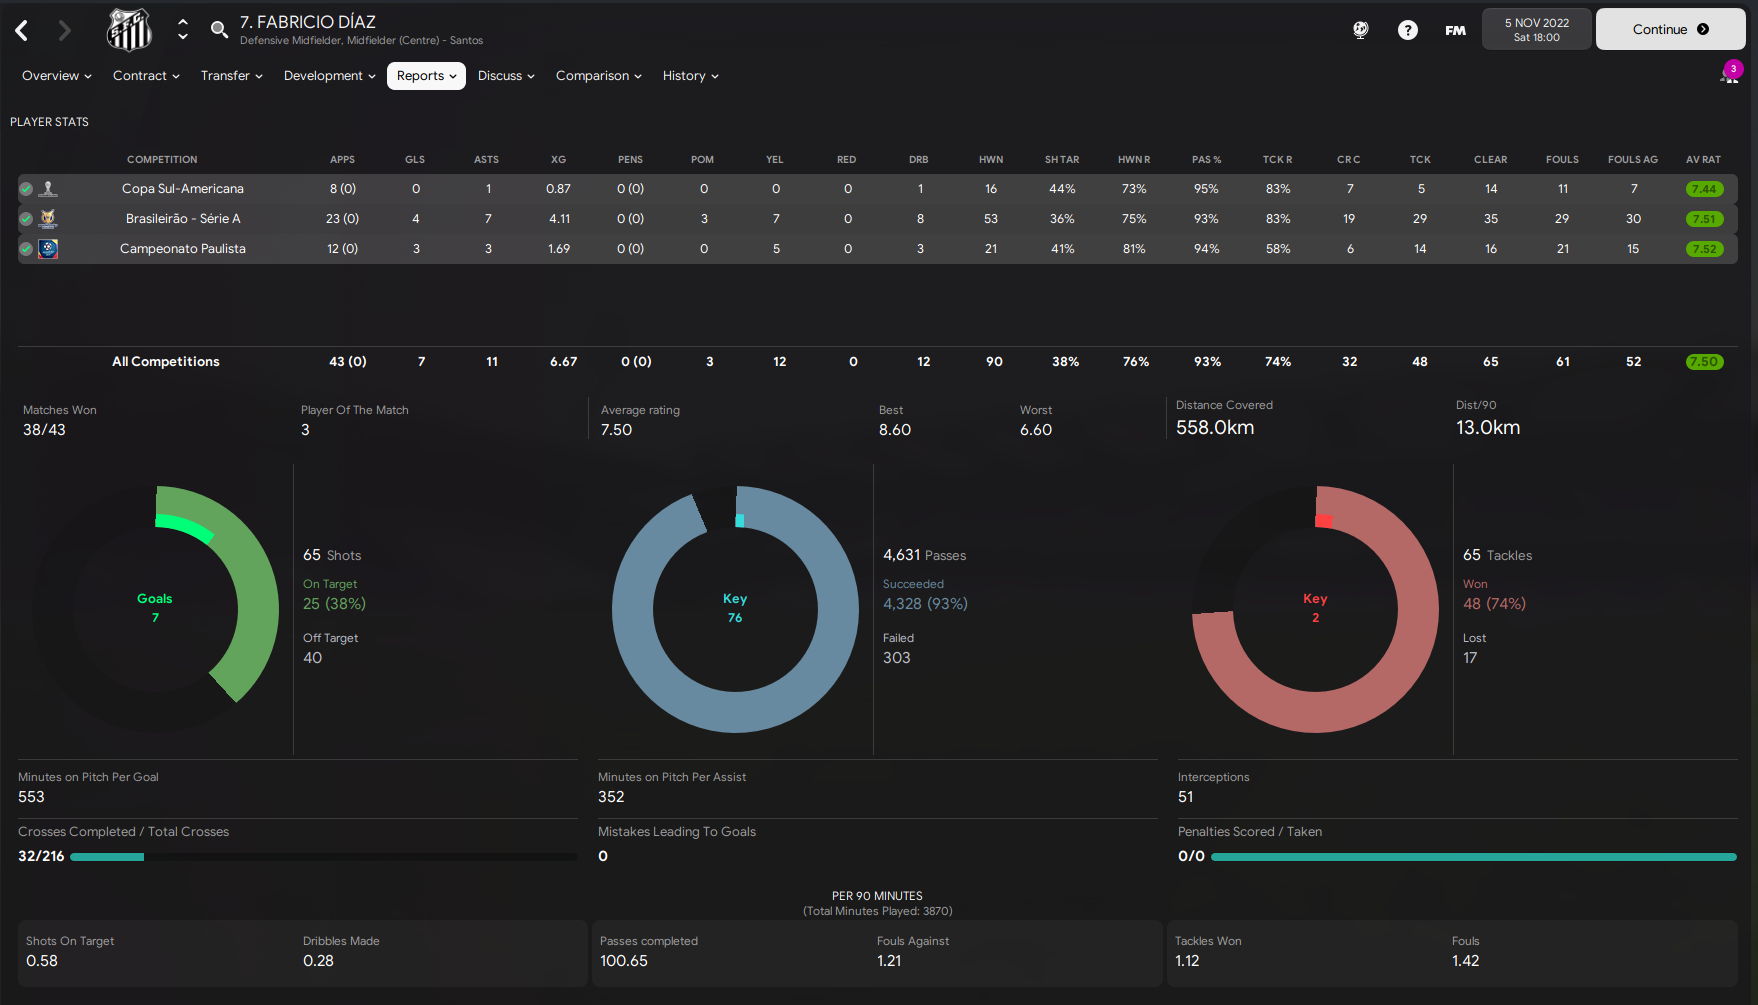
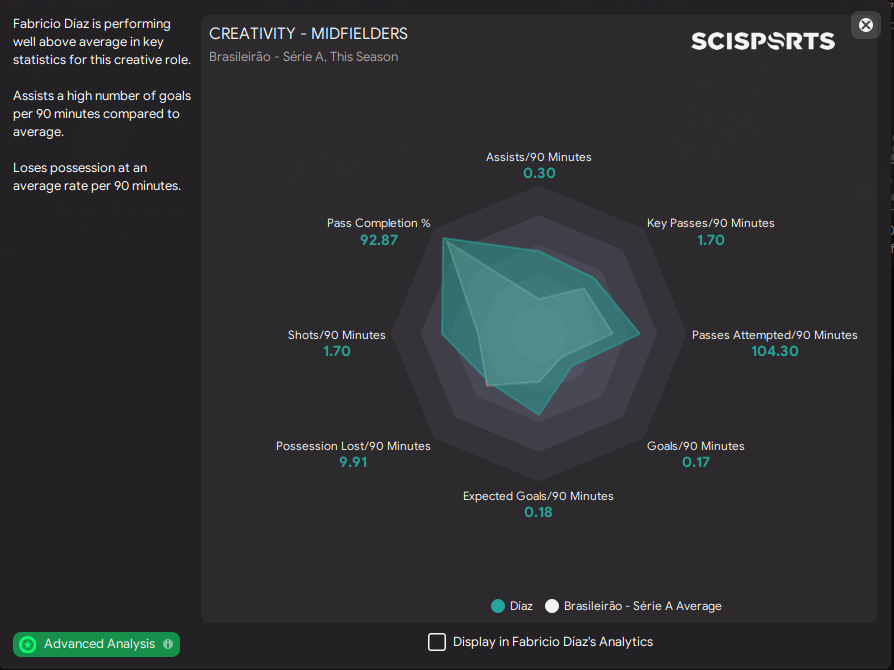
You can see that he seems to be very involved with play and the metrics for his role are really good. Involved in absolutely everything and seems to be playing at a very high standard. He’s managed to grab a fair amount of assists and goals, far more than I thought he’d achieve.
Advanced Playmaker
Yet another player who has contributed with a fair amount of goals and assists too. This is great to see as this team seems to have goals in them from all areas of the pitch and everyone is contributing.
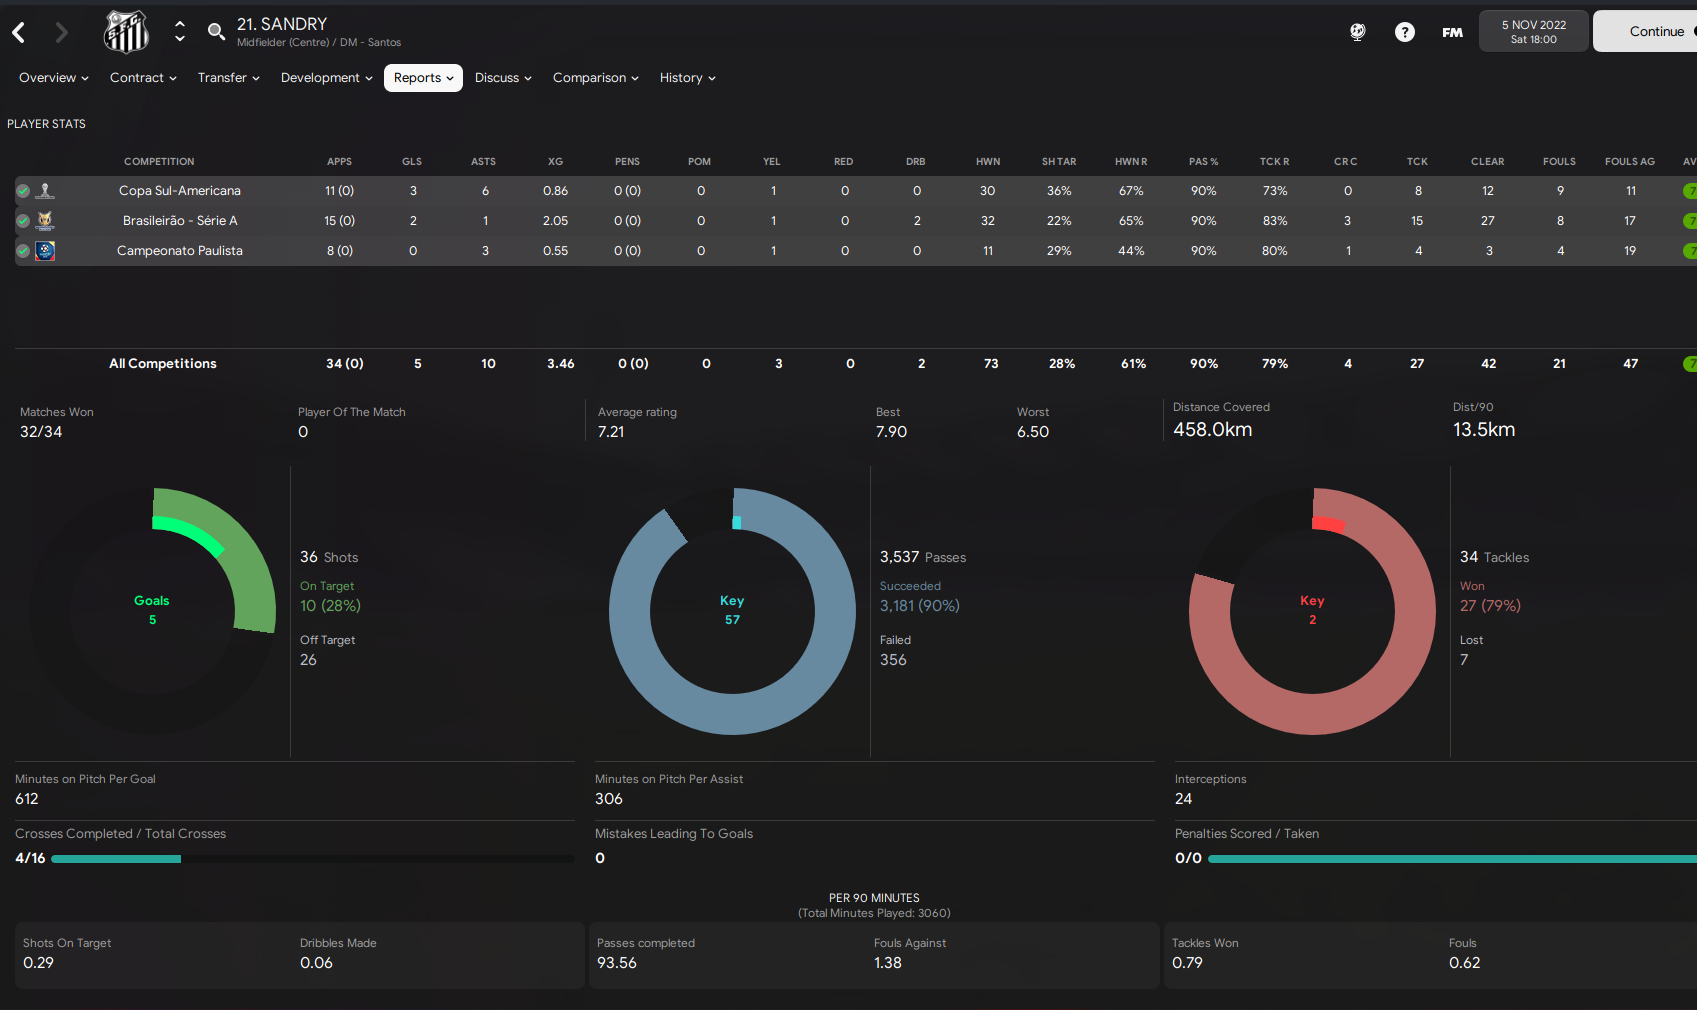
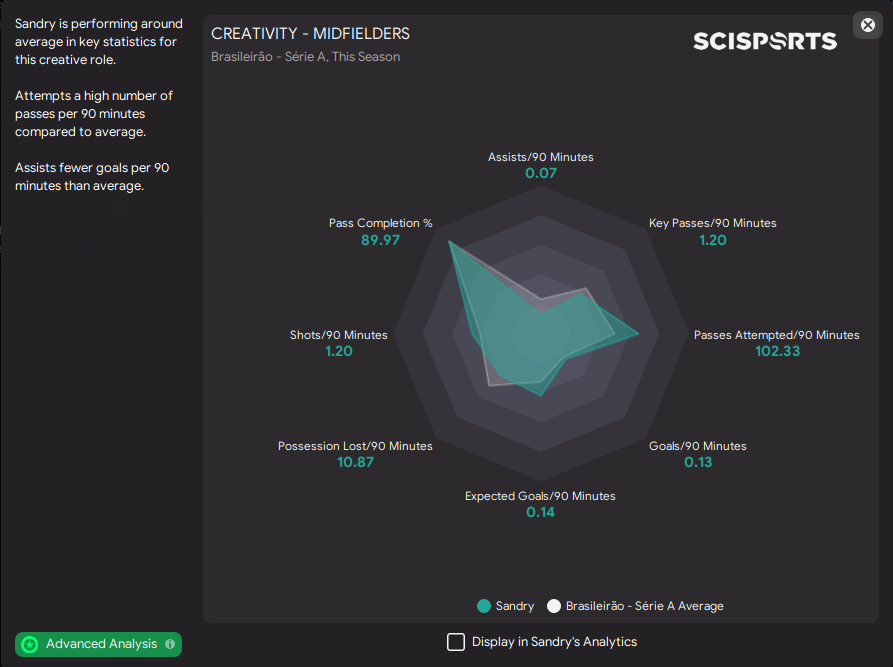
Passing aside, he isn’t massively outperforming anything really. This doesn’t mean he isn’t an important part of the system. This is one of the times where ratings don’t actually justify what the player is doing and one of the reasons, we can’t just rely on stats and metrics to tell us how the player is playing. His main goal in this system is to just be a creative passing outlet and someone who recycles the ball. Anything else is a bonus. But what he does for the team, enables us to play better overall while perhaps not being reflected in the individual attributes. You’ll have a clearer picture of what I mean a little further down in the analysis. But it’s important to remember that stats or even player ratings aren't always indicative of what we have asked the player to do. Nor is it a reflection of how well he is fulfilling the role too. We still have to use our own eyes to make judgements too as stats are arbitrary and we don't know what we want him to do.
Mezzala
This performance might raise a few eyebrows just because of how effective he is.
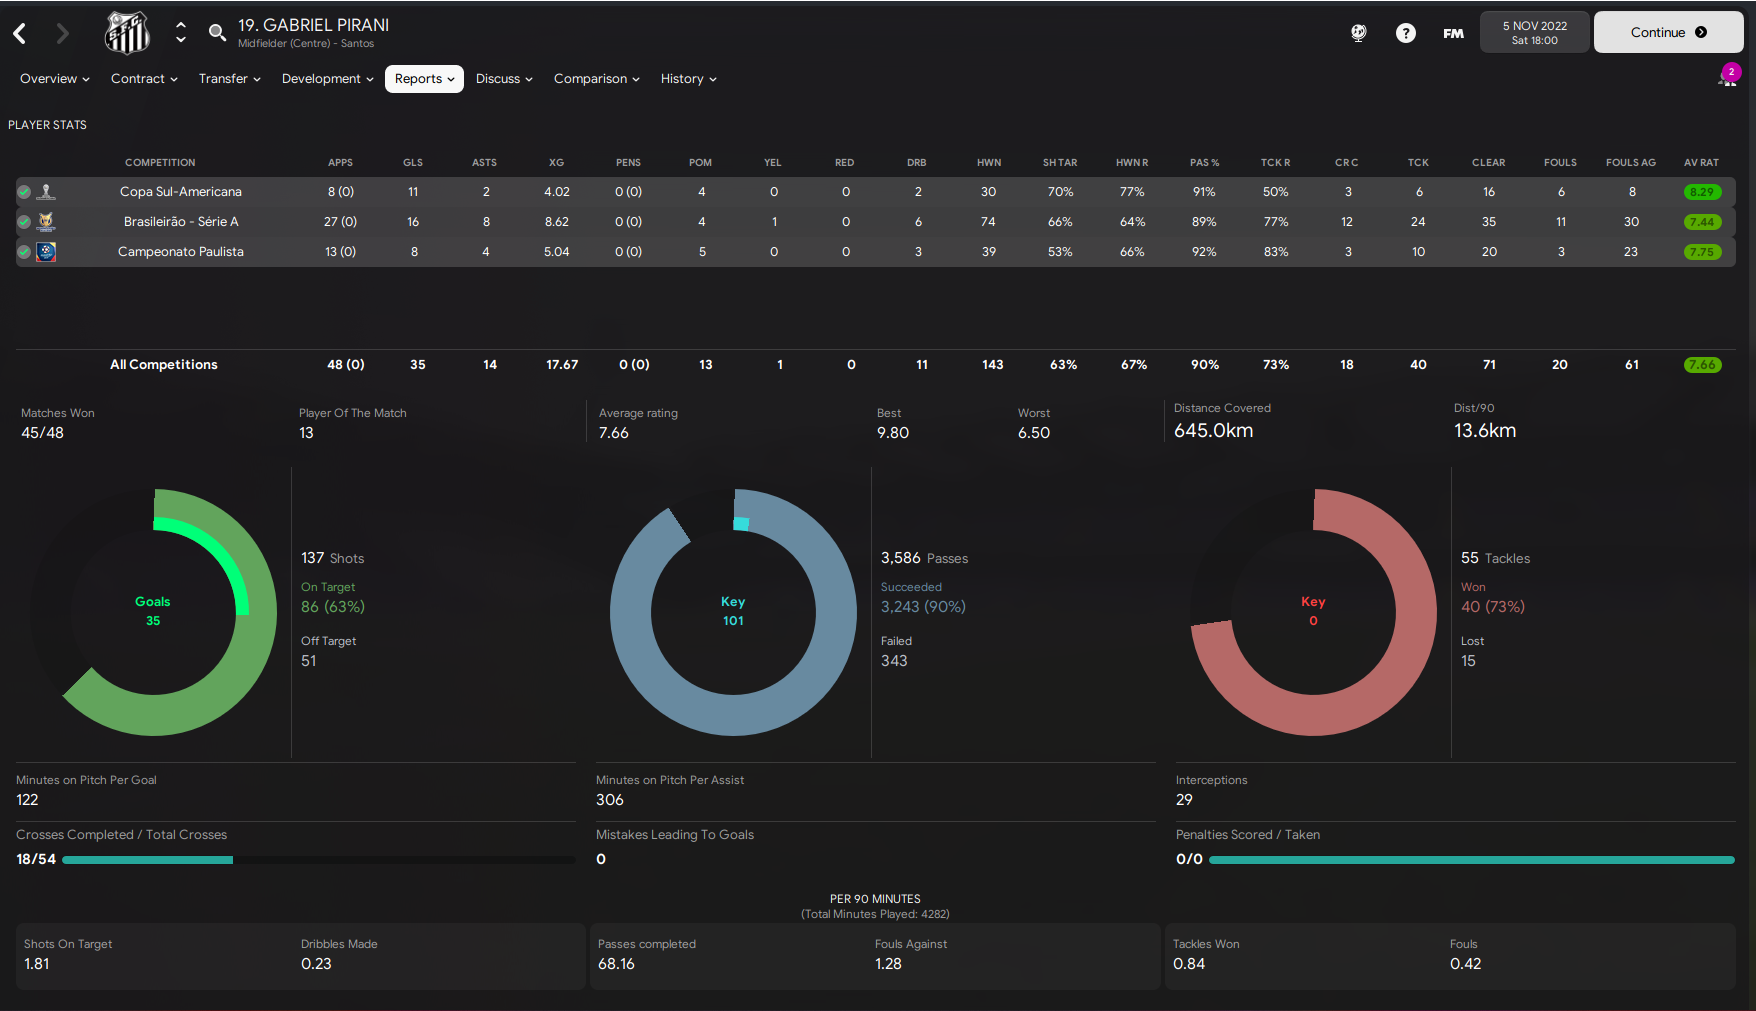
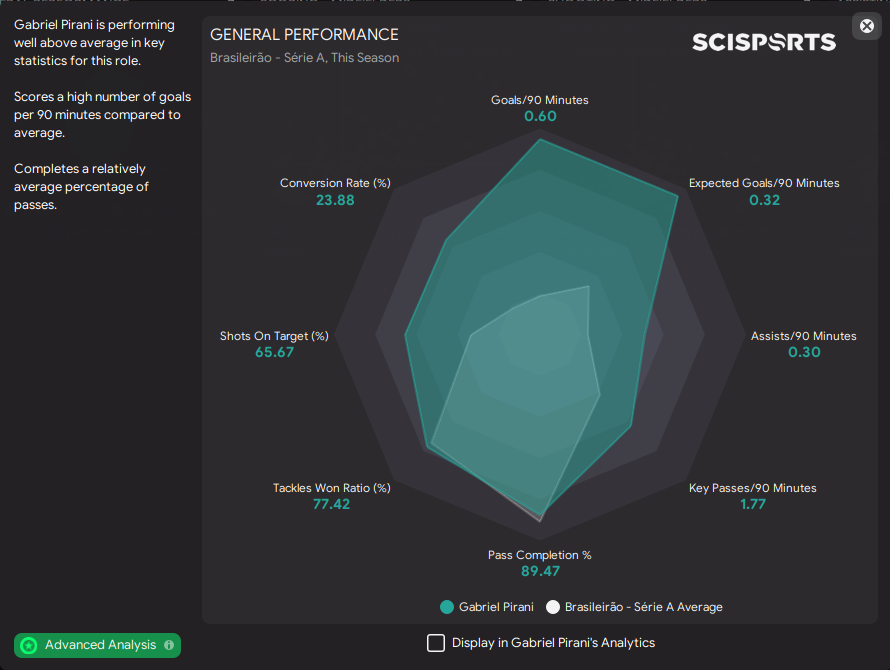
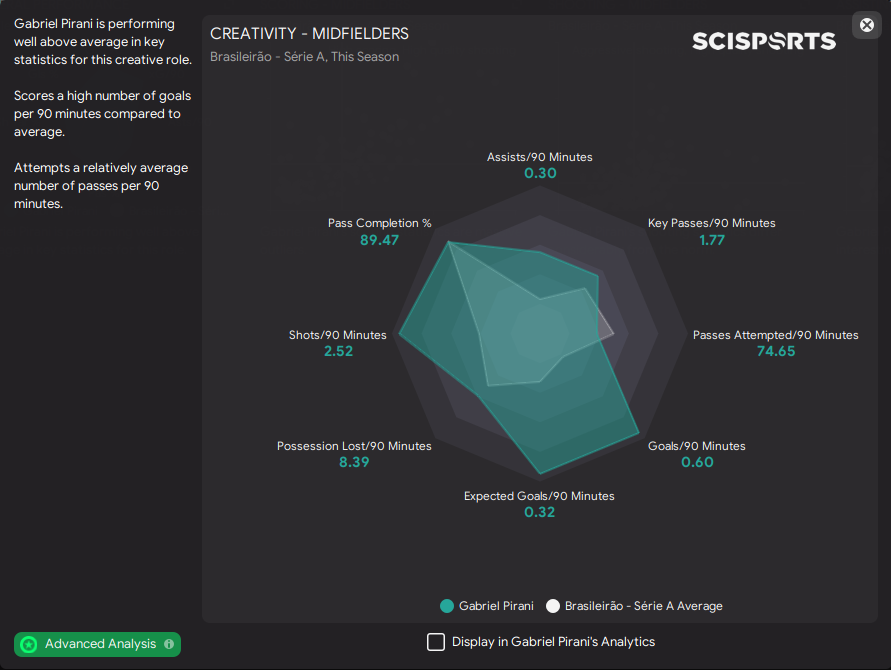
What a season! 48 games, 35 goals (not a single penalty taken) and 14 assists in all competitions.

You can’t even begin to understand how important this mezzala role is for the tactic. It’s a combination of what the role itself actually offers and how the players around him, feed him the ball and open up space for him to make early or late runs. It’s absolute chaos at times.
Deep-Lying Forward
The deep-lying forward is probably the most important role in the entire attacking third than I use. Without this role, we’d not be anywhere near as good because the role just offers far too much. The player creates space by taking his marker with him when he drops off the front. It’s one of the reasons the mezzala is super effective. It’s a great pairing and allows the mezzala to become the second striker.
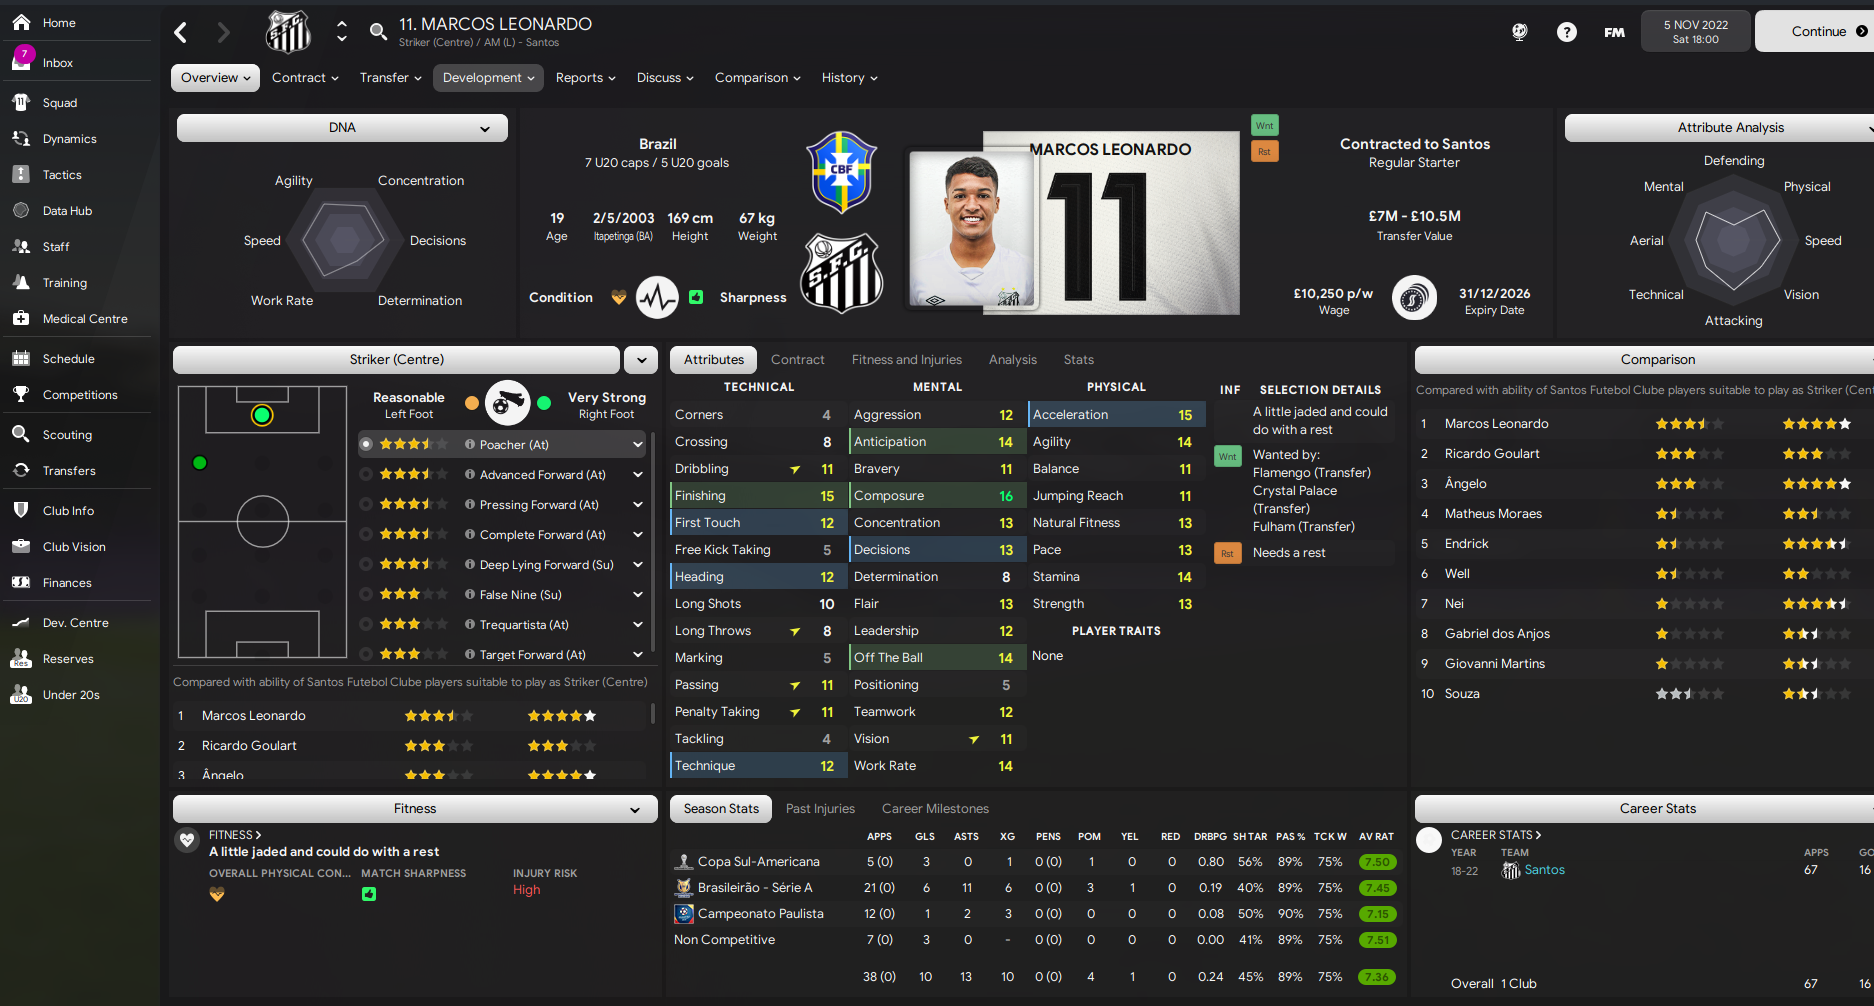
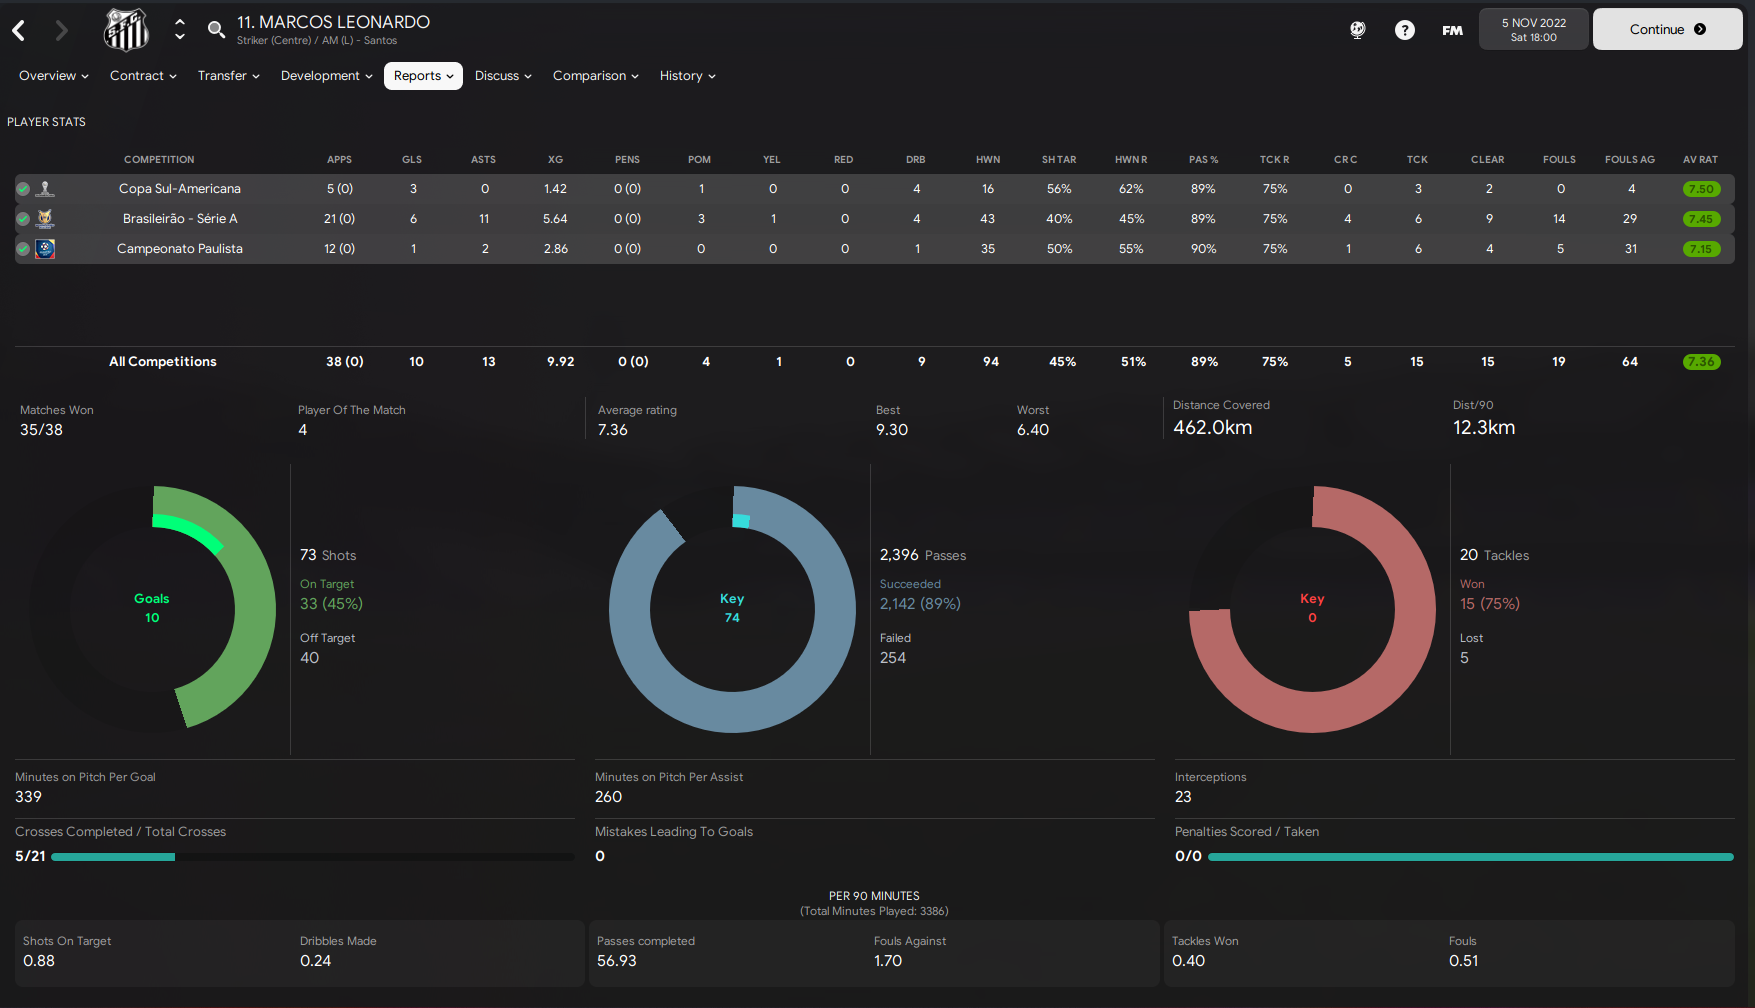
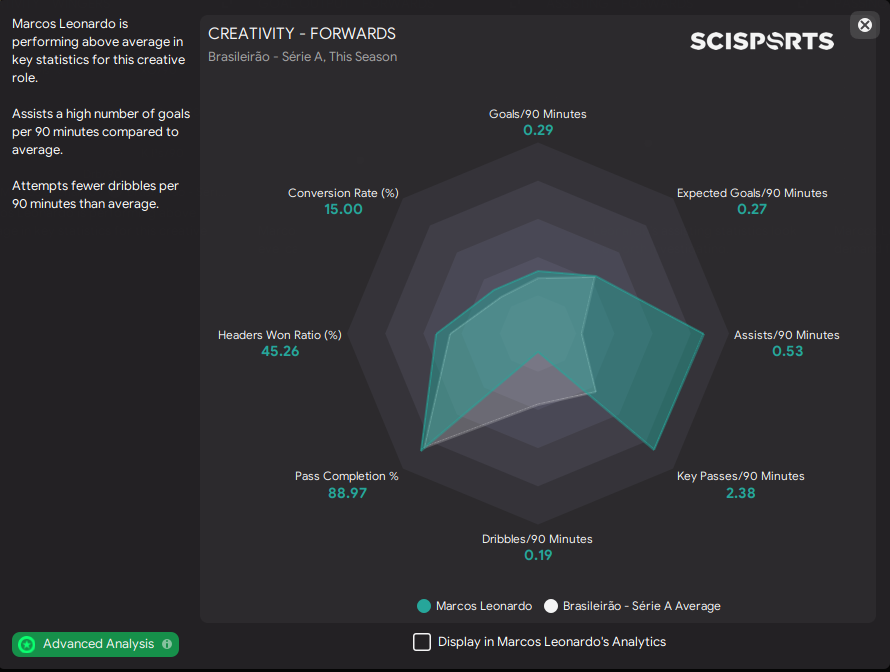
At a quick glance, you’ll likely think he’s had a poor season if we just base it on goals scored but that’s not his main job. His job is so much more, score goals, assist, create space, play other people in, occupy his marker and so on. When you use roles that create movement then you need a role like the deep-lying forward that drops off the front for this to be more successful in my opinion. Overall he’s had a brilliant season though in the key metrics that I want him to be good in.
Advanced Forward
The most advanced player on the pitch 90% of the time. Often he is the one who finishes off all the moves and provides the end product, along with the mezzala.
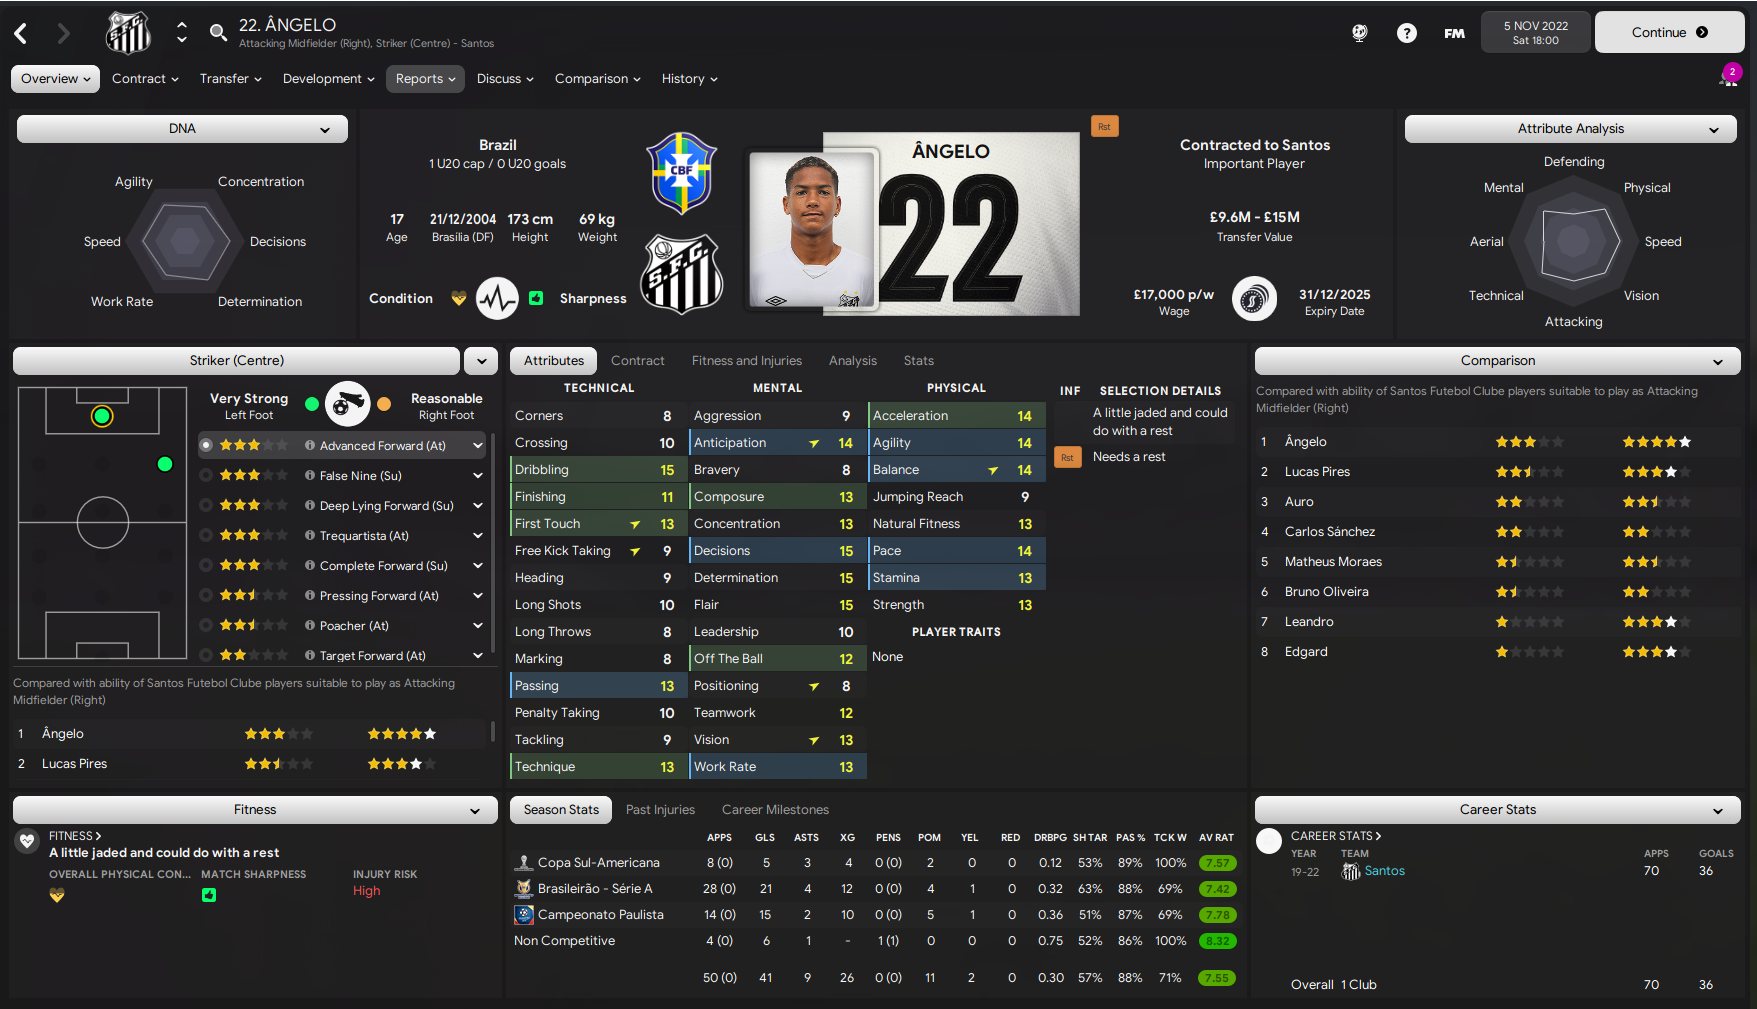

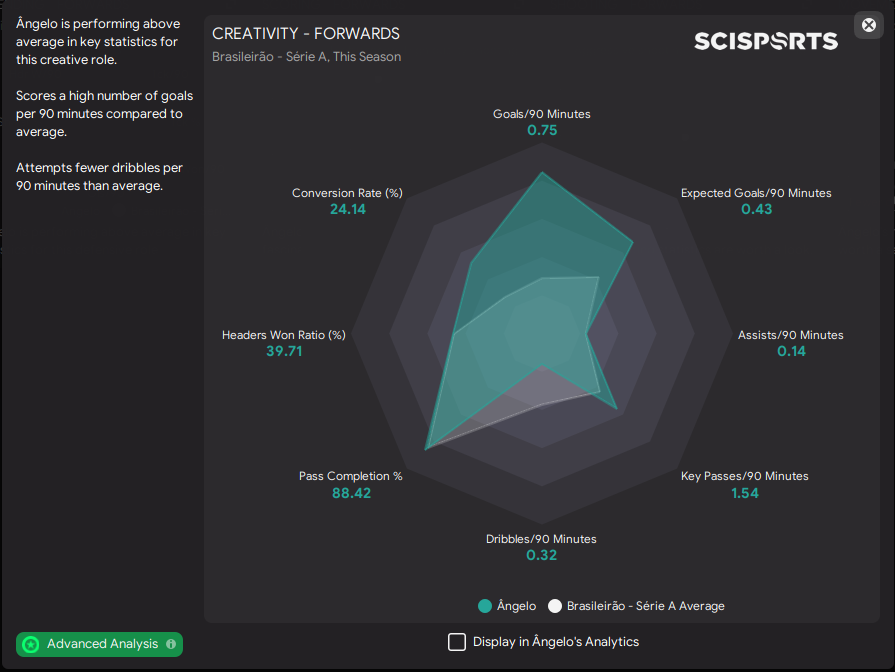
The main tally’s man in the side. He doesn’t take as many shots as other strikers in the league but he is a lot more accurate and clinical compared to those.
Match Analysis
Now we have a general idea of how the season went and what players offered to the side statistically, it’s time to delve into the actual tactic now and look at its functionality. This time I’m going to start from the front backwards though as I believe to fully understand the system we use, we have to start there to demonstrate just how important the deeper players are.
Strike Partnerships
The strike partnerships are a very interesting part of the tactic and I’m also going to include the mezzala as one of the strikers too due to what he does and the style of play he’s adopted. Let’s look at the deep-lying forward and see just why I labelled him as the most important player, in the final third.
This role is all about the link-up play and its primary goal is to provide a link between the midfield and attack. It can be a very creative role and is often used when you lack bodies in and around the attacking midfield areas of the pitch. The deep-lying forward will look to drop into this space and provide a link as well as looking to create chances for their teammates. You should expect him to be more focused on creating for others than scoring but that’s not to say he can’t score lots of goals.
In any two-man formation, you’d look to use this role if you had him partnered with someone more attack-minded like an advanced forward or poacher. It’s very rare in a two-man striker formation where this role is used that the second striker would be anything other than an attack-minded one. The only time he would be played alongside another deep creative type of striker would be if you were creating something specific or looking to use strikers but give off the effect of playing strikerless.
It could also be used if you had a rampaging central or attacking midfielders like a mezzala or shadow striker. It even works if you want to create a goal threat from wide like an inside forward. The main factor to consider when using the deep-lying forward role is, who are the support players going to be and who are getting beyond him to be a goal threat, as you will need those types of players to play off the deep-lying forward.
This role comes with two duties;
Support - On this duty, the player will have these instructions active, hold up the ball and more risky passes. With this duty, the player will be responsible for dropping deep and linking play. They can and will score goals but creating and playing others in is more the focus and aim of the support duty. You can expect to see them dropping off into little pockets of space and roaming around looking for the space. They’ll look to spray passes out wide or to the oncoming players who are looking to go beyond him into more dangerous positions.
Attack – With this duty the player has three player instructions: hold up the ball, get further forward and move into channels. On this duty, the player won’t drop as deep as the support one and he will also be slightly more greedy in terms of taking shots or having chances himself. He will still do the above but he’ll do them from areas slightly higher upfield and might be slightly more biassed and selfish towards taking shots and being a goal threat compared to the support duty.
Those are the basics of the role that should give you an understanding of how the role functions and what to expect.
The shape you use will also impact how the role functions, as will the roles and duties used around him and in the setup generally. For example, a deep-lying forward as a lone striker will act a lot differently than in a system that uses two strikers. The reasons for this are due to what the player actually does during the game and the space he’ll be dropping off into as well as the space he will be running into. The dynamics are vastly different when you add someone else into the mix alongside him or even just behind him from the attacking midfield position. We also then have the player's attributes, which determine how he will interpret the role himself. There are also player traits to take into consideration too.
Lots of people think that a player must have ideal attributes to play roles and be successful in them but that’s not true. A player with a different attribute set will still be able to play the role and do well but how he plays the role will be a very different interpretation. I find myself saying one sentence quite regularly in comments on the blog and when replying to people on the SI forums. That sentence is - Any player can play any role, the only thing that differs is how he interprets that role. I think a few people forget this at times.
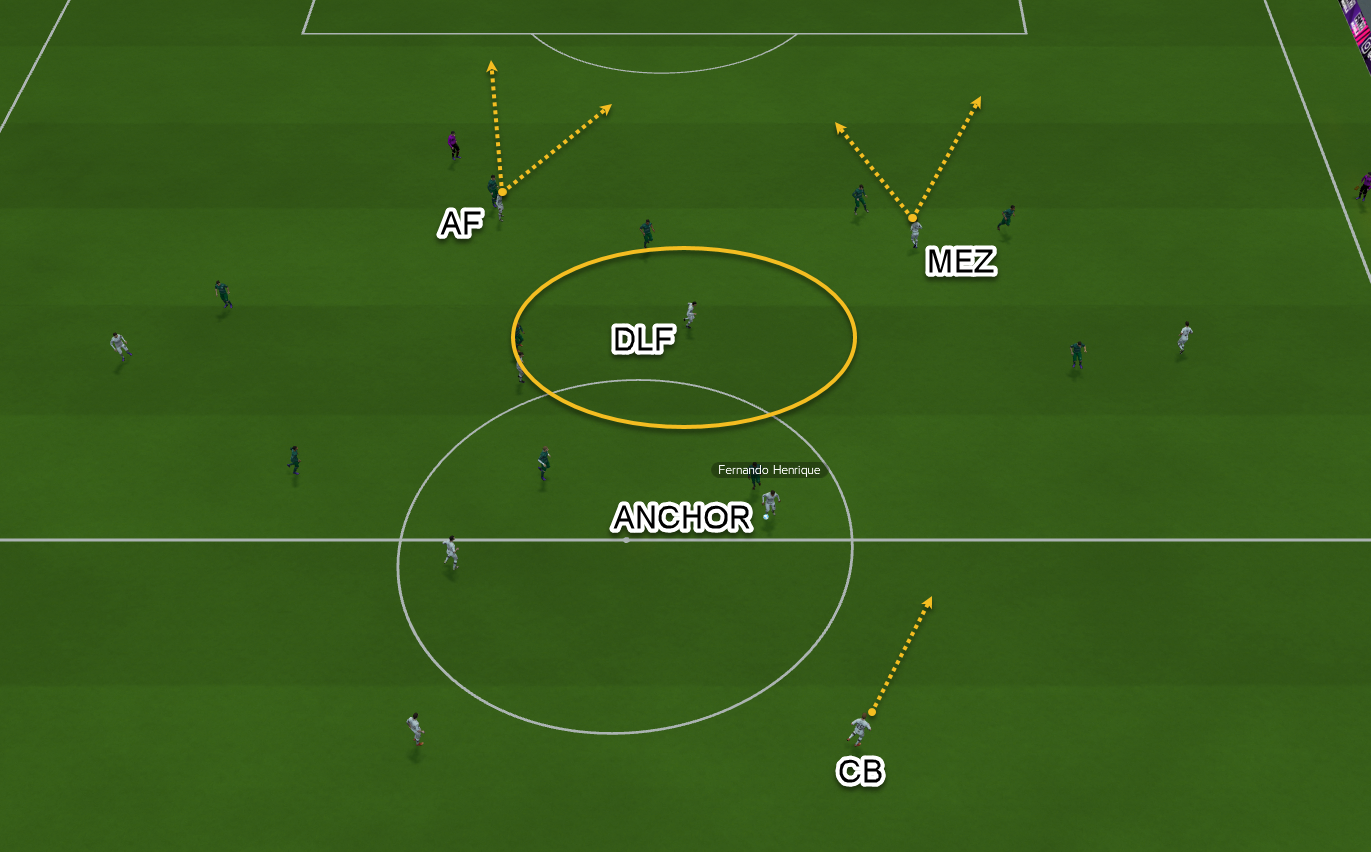
In this example, we can see exactly what the deep-lying forward can offer us. We see that the anchor is in possession of the ball and is about to pass it to the central defender. The central defender can move forward with the ball at his feet. All the time this is happening, the deep-lying forward is drifting around in the area that is circled. He’s roaming around constantly looking to find space where he can then involve himself in the play. While this is happening, his strike partners have already begun to move forward. They both have two different running paths they can take, depending on how and when the ball is played to them.
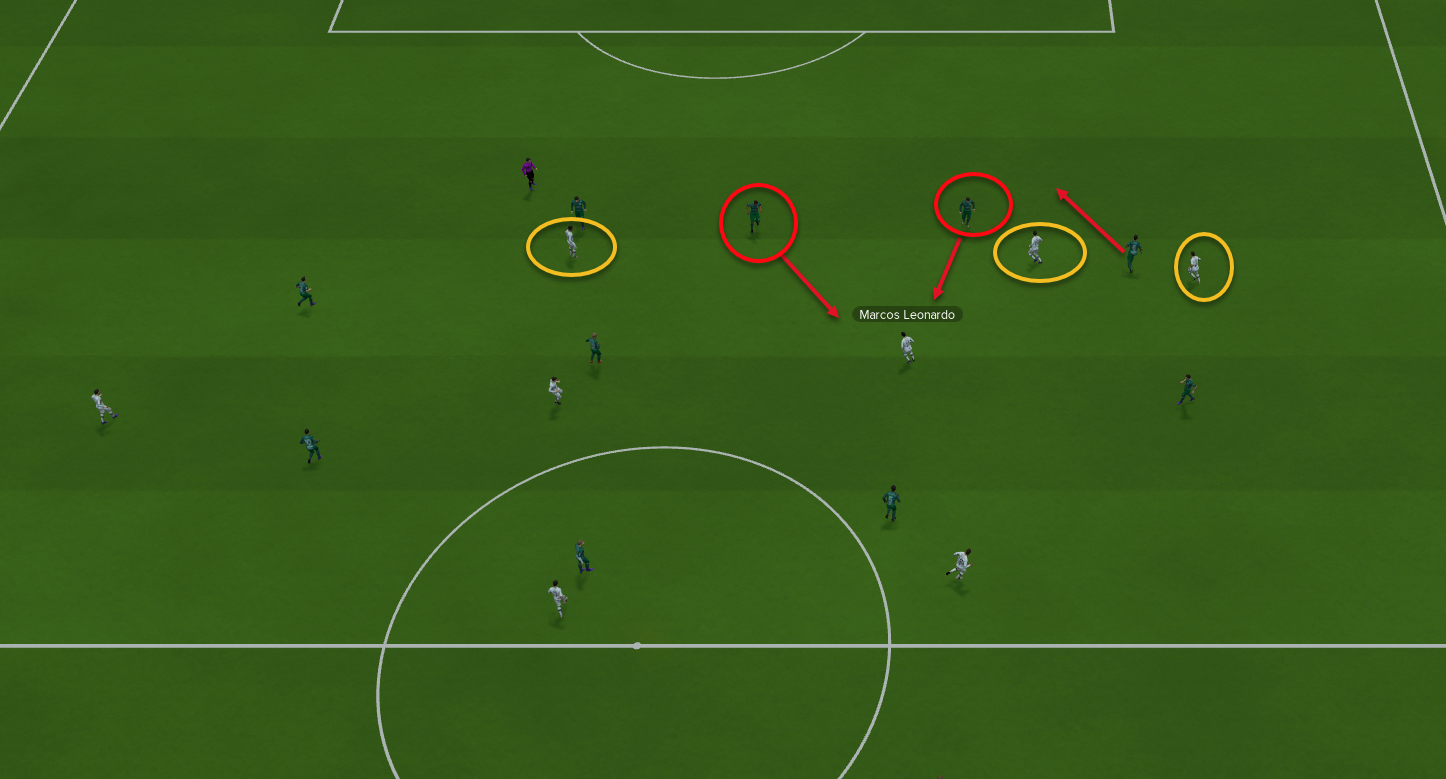
Once he receives the ball, look at just how much space he has. The opposition's defensive line now has to make a decision on whether to press him or back off. If they press him he can pass the ball with ease to any of the players circled. If they back off him and don’t press then he can just drive at them and that is exactly what he did.
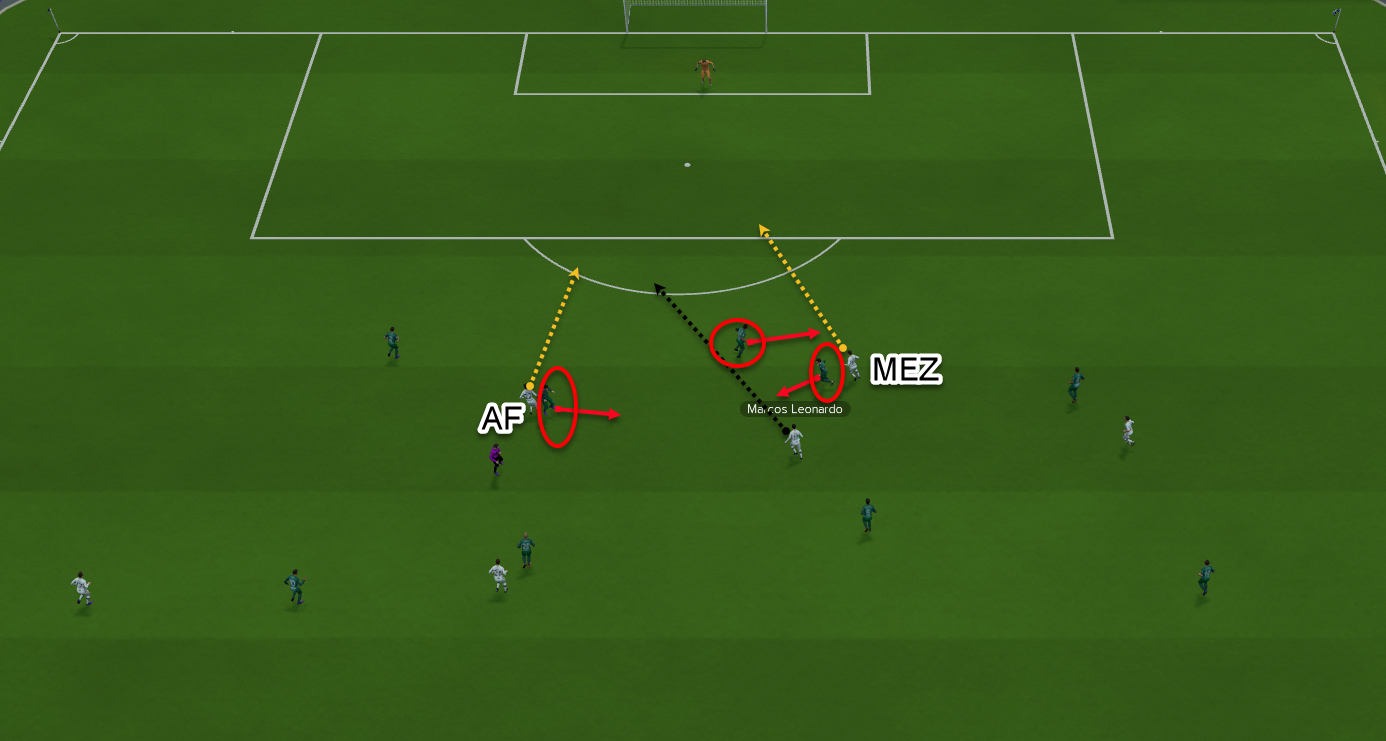
This is still the same move but the defending is atrocious from the opposition. The mezzala’s marker has decided to leave him and finally come across to deal with the deep-lying forward. This then means the central defender now has to go across and deal with the mezzala. While on the other side, the advanced forward’s marker has totally been caught ball-watching. This allows the deep-lying forward to play a simple ball into the path of the advancing forward, who slots home to make it 1-0.
Although this is only one example of how all three of them work together, it is the perfect example because you could replace what the deep-lying forward has done with any of the other two and it would be a very similar outcome. We also know this works well because the data from earlier in the post supports this too and it explains why the mezzala also scores an incredible amount of goals. All three of them work in tandem to create space, use it and force the opposition into making a decision. I mentioned it earlier in the book that making the opposition to make a decision but that decision being the wrong one, was the key to everything and it is.
The Defence, Midfield and Attack
I’ll include the defence, midfield and attackers in this analysis so we can see how they all link together too. Actually, in the move above, we saw how the anchor and central defender linked together and then how the defender linked to the striker. It doesn’t get much simpler than that, to showcase how simple yet effective the play is. In that one move, we went from midfield to defender, to striker to 1-0 in the space of 10 seconds of game time.
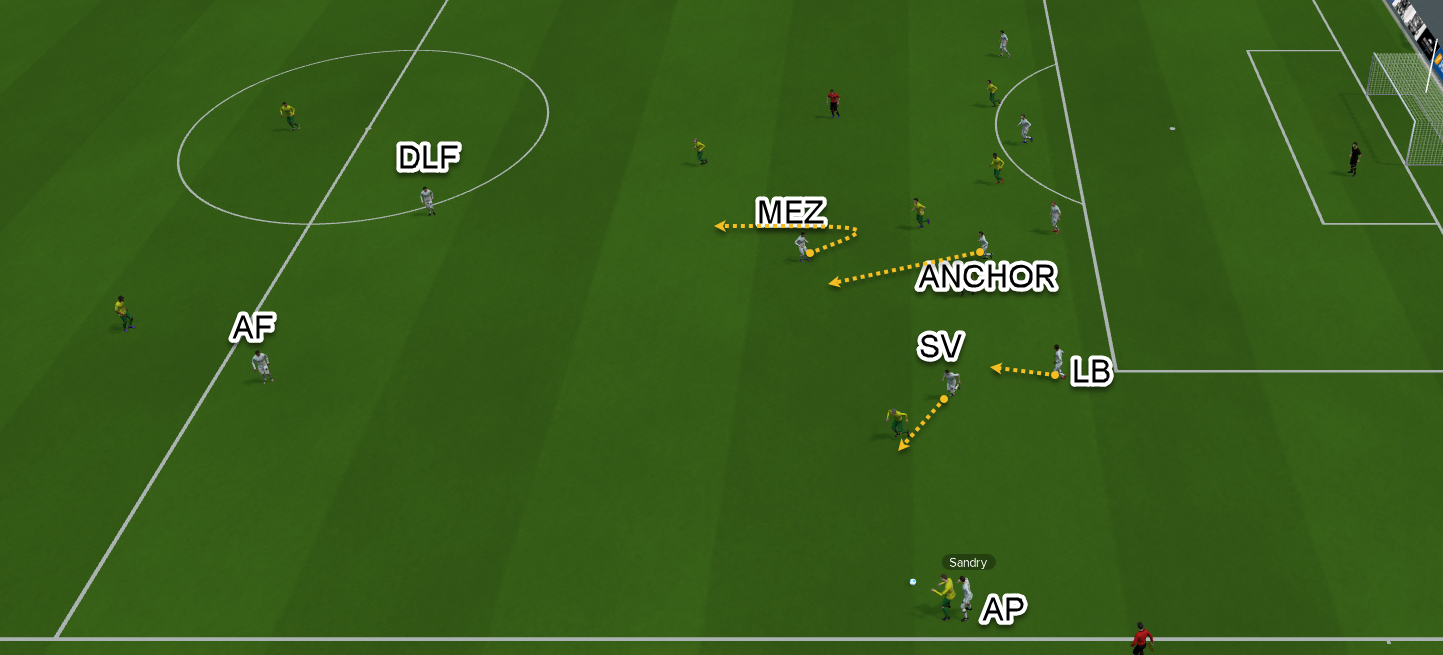
Here the advanced playmaker is about to win the ball back due to a heavy touch by the opposition. The Segundo Volante is already coming across to help deal with the threat and the anchor man is stepping up too. While this is happening the mezzala is coming towards a more central area too but as soon as he sees us win the ball, he starts making a run forward. He starts that kind of run because he is anticipating if the ball is played to him quickly.
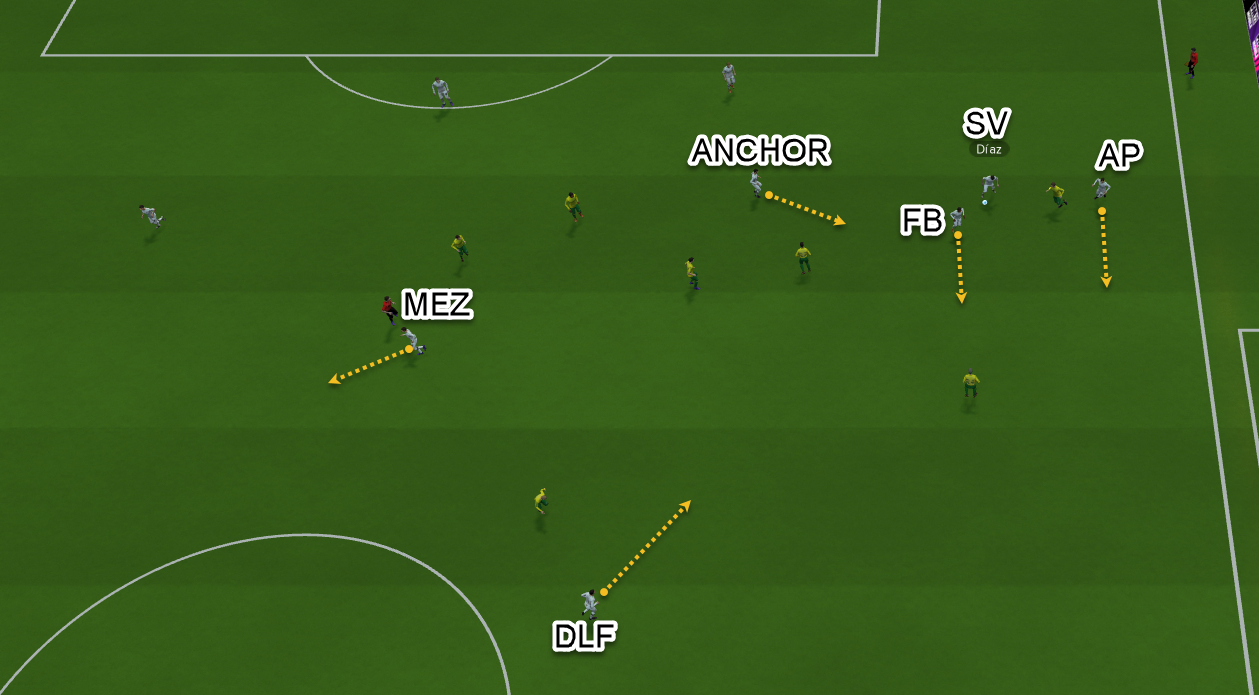
After winning the ball back, the advanced playmaker gives it to Segundo Volante while continuing his own run down the wing. When the receiver receives the ball he has a fair few options. The deep-lying forward is dropping much deeper to offer support. The mezzala is still making a run for it across the field, ready to be prepared for any quick switch of play. Two other players, the fullback and anchor, also support options for a pass. From this position, we can actually break forward if the player chooses as we have runners and options.
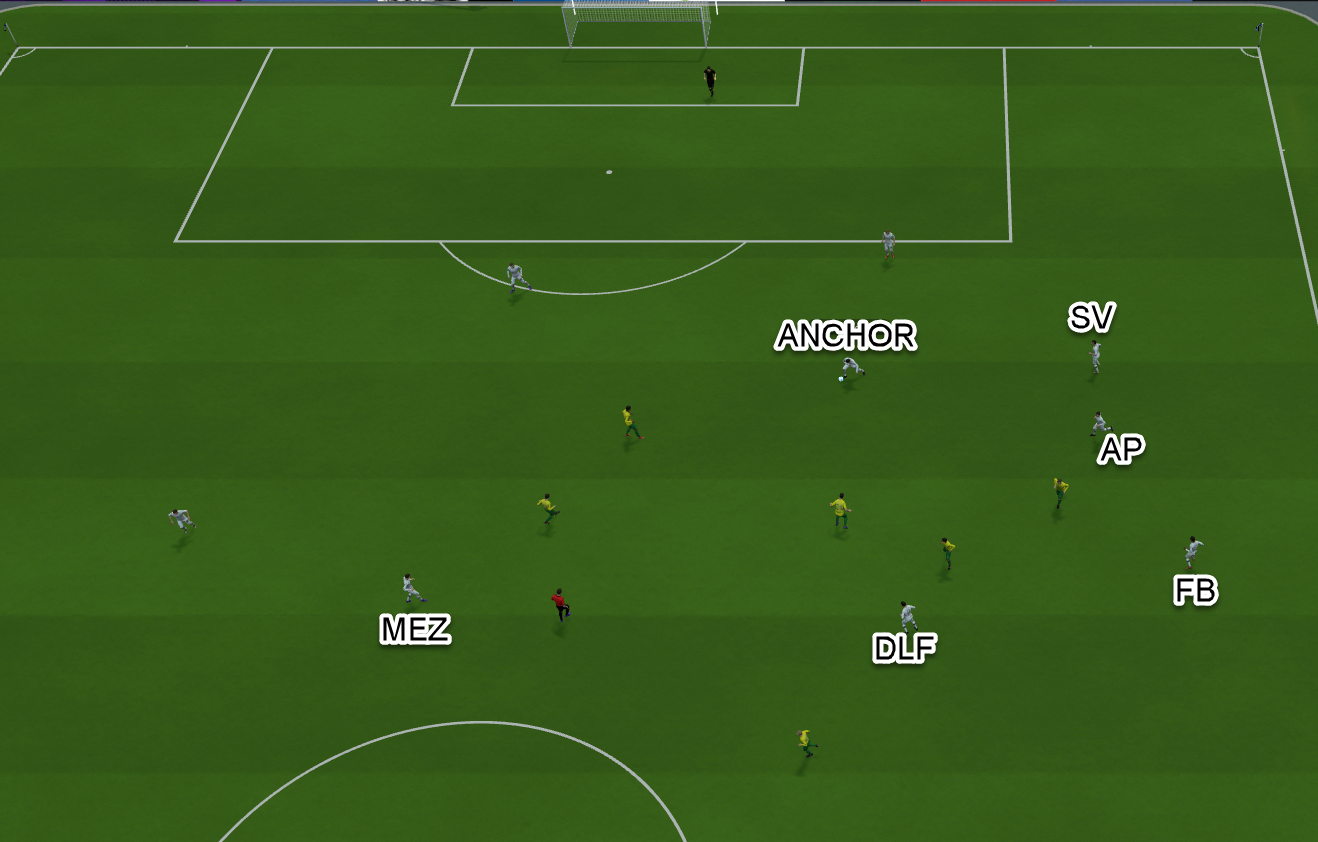
Instead, we play it the same way as the ball is passed to the anchor and then he drives infield a little bit before deciding he’ll play it safe and pass it back to the advanced playmaker. So while the break might have been on here, we didn’t take it and decided to slow play down instead. There could be two reasons for this. One is that the player just didn’t feel it was the best move in this scenario. Or it’s because the Segundo Volante has the slow play-down player trait. It’s hard to know what the reason is here but if I had to pick one, it would be the player trait.
The reason for saying that is, that I’m fairly sure with the initial positioning and momentum we had, under normal circumstances that is what the player would have done. But the fact we are deep in our own half, he didn’t want to take the calculated risk and wanted to build again from the back. I think if this move happened further up the pitch he’d have taken the riskier option.
Once the advanced playmaker receives the ball, he passes to the fullback who then holds up the play for about 4 or 5 seconds. This allows the advanced playmaker, anchor and Segundo Volante to all take up a slightly higher position than they previously had. By him taking his time to allow others to catch up, it means we are in a much better-placed position, to keep moving the ball upfield.

We can see exactly how we’ve progressed the ball upfield so far here. The central defender, Segundo Volante and advanced playmaker all keep linking here and passing the ball around to retain possession while we move upfield. This isn’t possession just for the sake of it, we are moving forward while being patient and probing. The full-back has already started moving down the wing and the deep-lying forward is already dropping even deeper to help him out. The advanced playmaker decides the pass is too risky for the fullback due to his positioning and the marker. Instead, he turns his body around and passes to the deep-lying forward.
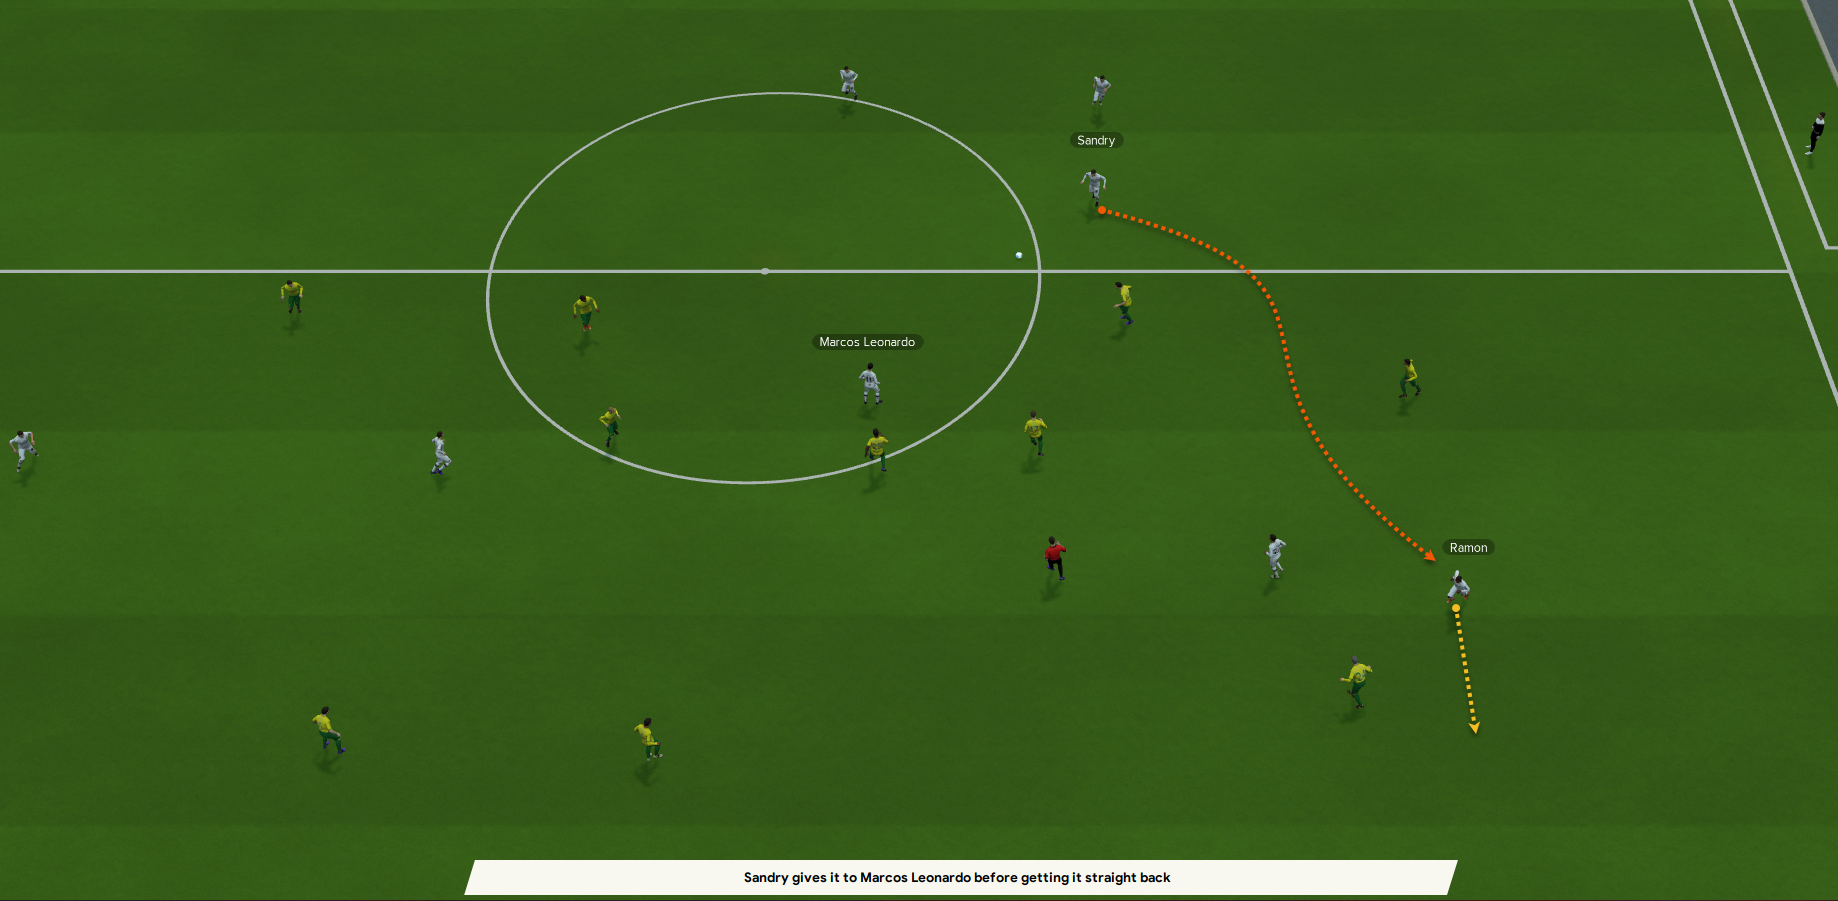
It’s a quick one-two as the deep-lying forward plays the ball back to him instantly. What this did was take the advanced playmaker's marker away from him initially and give him space. Remember how earlier in the move we played it safe, patient and just probed the ball around finding space, well now we go riskier. Once the advanced playmaker gets the ball, he hits it for the first time and curls the ball into the path of the fullback. Immediately we have gone from being inside our own half, to deep inside the opposition. So we had taken our time and then when the time was right, took a risk to get us going and put us on the front foot.
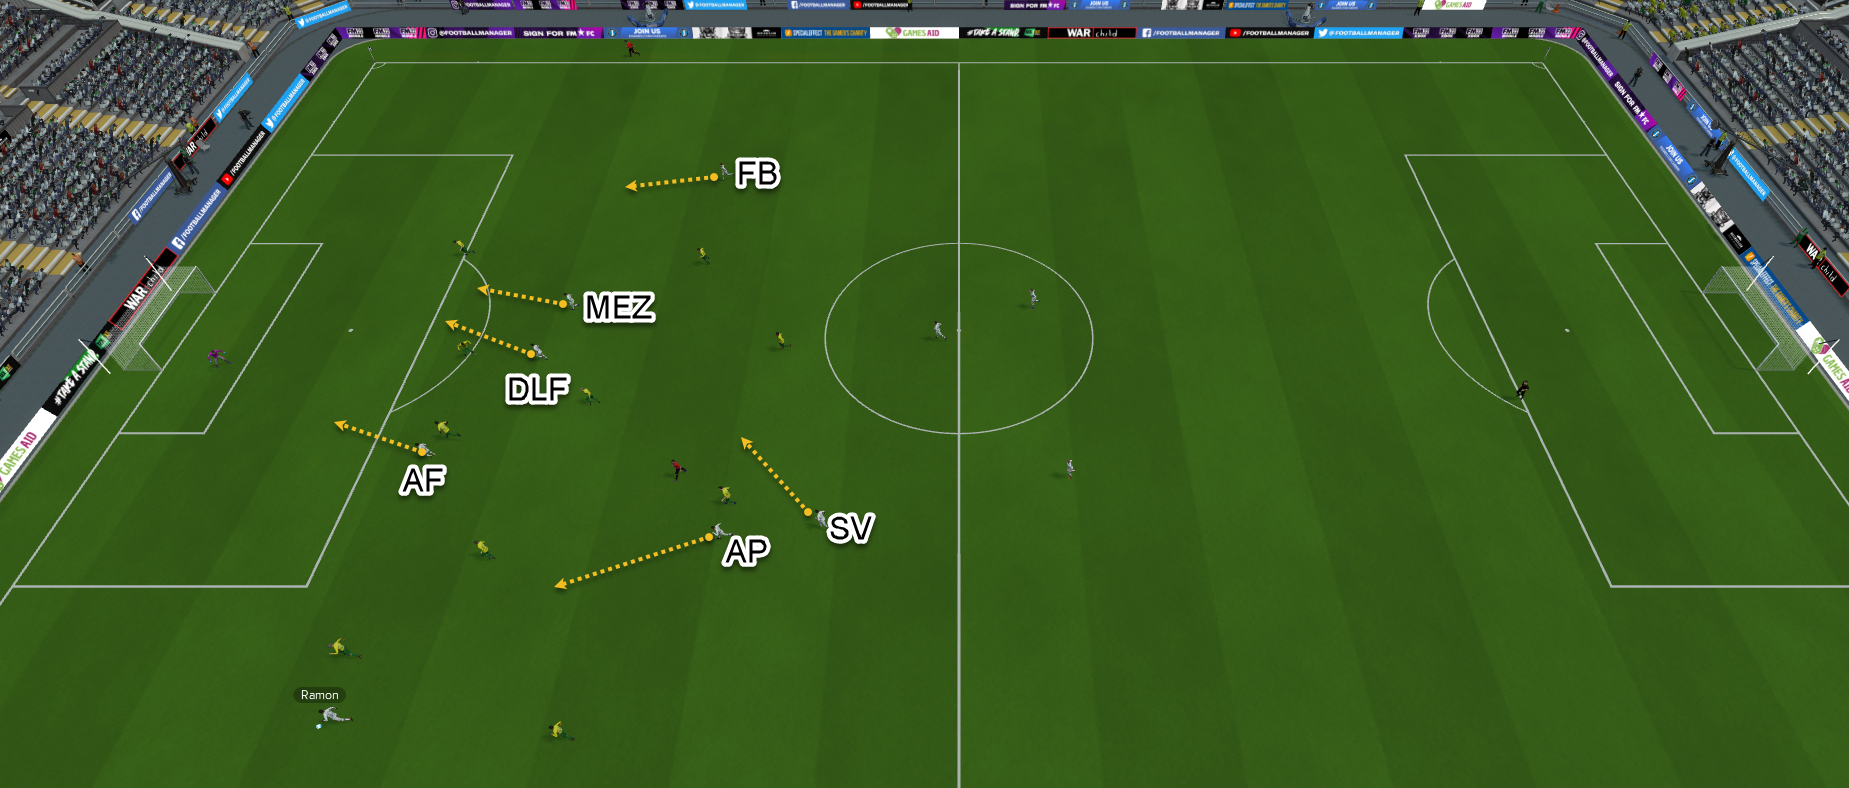
Still the same move but look how well we worked the ball upfield considering we were deep in our half and on the touchline. In the above screenshot, you can see how we are flooding people forward from deep. The opposition is all disjointed and trying to recover their positions. But we have committed a large number of people forward and three of them are busting a gut to get into the box for any type of cross. Sadly on this occasion, the fullback hits the defender and it goes out for a corner.
I could add many more examples but I think I’d end up going on for far too long and perhaps detract from the point of the book. Which was to show you how to create a tactic from scratch and to get you thinking about pairs and combinations when considering what roles to use. Hopefully, you’ve enjoyed the book and it can become a great reference point for those who perhaps might be struggling with the game or those looking to take things to the next level.
Thanks for reading.
Cleon